Chapter 1: Overview of Rivet Nuts
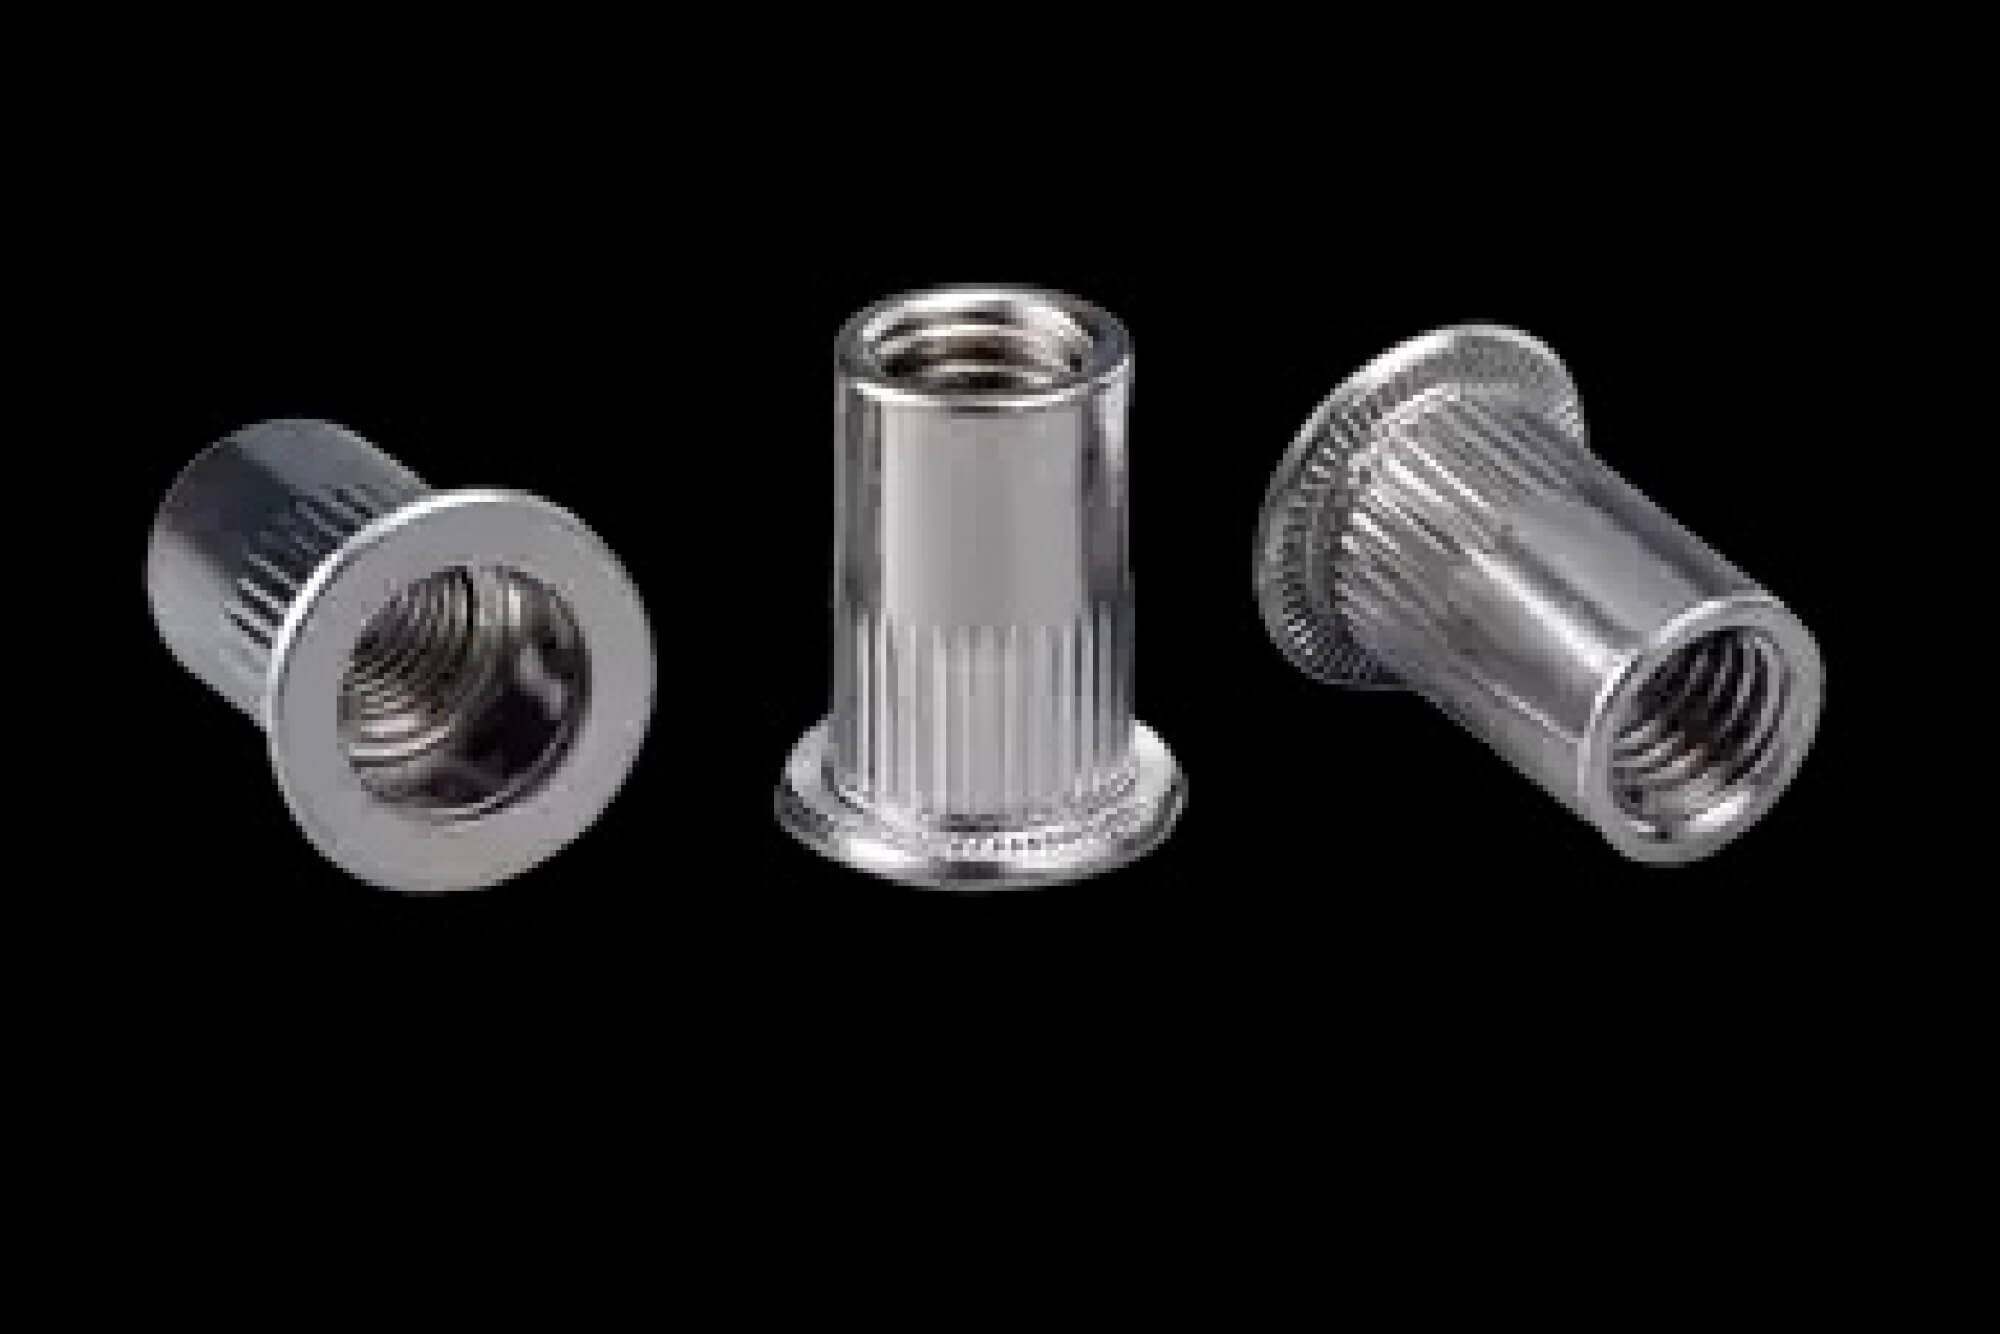
I remember the first time I encountered a rivet nut. I was puzzled by its appearance and curious about how something so small could create such a strong connection. A rivet nut, also known as a rivnut, is essentially a tubular fastener with internal threads. When installed in a pre-drilled hole, the rivet nut is deformed or “collapsed” on the blind side of the workpiece, creating a secure, load-bearing attachment.
Rivet nuts differ from regular nuts because they don’t require access to the back side of the material. In many traditional fastening methods, you need to hold the nut on one side and tighten the bolt on the other. But with a rivet nut, you can work from just one side of the material, which is why it’s also referred to as a blind fastener. Over the years, I’ve grown to appreciate how efficient and versatile rivet nuts can be.
Most rivet nuts feature a head, a body, and an internal thread. The head is what rests on the outer surface of the workpiece, while the body extends into the hole. When you apply an installation force (usually with a specialized rivet nut tool), the rivet nut expands or buckles at the backside, gripping tightly onto the material.
Many industries depend on rivet nuts. In the automotive sector, a rivet nut can provide a robust thread in thin metal or composite panels. In consumer electronics, rivet nuts help secure components without requiring large nuts behind delicate structures. In heavy machinery, rivet nuts can be found in control panels, engine compartments, and anywhere else that needs a secure thread in a place that’s hard to reach.
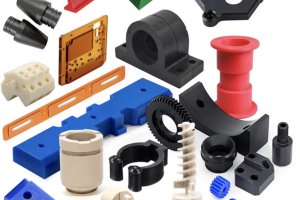
One interesting aspect of rivet nuts is their variety. There are open-end and closed-end designs. There are flat-head, countersunk-head, and reduced-head variants. Some have a knurled body to resist rotation under torque. Others come with hexagonal bodies for extra spin-out protection. Learning about the different rivet nut styles can feel overwhelming at first, but it’s all driven by practical needs.
When we talk about the working principle, it boils down to:
- Insert the rivet nut into a prepared hole.
- Use a pull tool (or similar device) that threads into the rivet nut.
- The tool pulls on the threads, compressing the rivet nut body until it expands on the backside.
- Remove the tool, and you have an installed rivet nut with robust internal threads.
In my earlier days, I thought rivet nuts were mostly standard items. But I soon realized there’s a significant demand for custom rivet nut solutions. Whether it’s special dimensions, unusual materials, or unique head styles, many businesses need rivet nuts designed for a specific application. That’s where custom rivet nut manufacturing comes in.
However, this first chapter is just our starting point. I want to clarify the basics, so the rest of the content makes sense. Now that we know what a rivet nut is and how it works, let’s go deeper into its applications, materials, customization parameters, and the pivotal role CNC machining plays in producing specialized rivet nuts.
Chapter 2: Rivet Nut Application Scenarios
Rivet nuts pop up in more industries than most people realize. I once toured a facility that manufactured industrial refrigeration units. Everywhere I looked, I saw panels and frames held together by rivet nuts. In that environment, the rivet nuts had to withstand vibration, changes in temperature, and possible corrosion from humidity.
1. Automotive Sector
The automotive industry was one of my earliest clues that rivet nut usage could be extensive. It’s not just the outer body of a car that requires secure threaded attachments. Engine compartments, interior panels, and even specialized brackets can all benefit from rivet nuts. Often, these areas offer limited access on the backside, making a rivet nut a perfect choice.
Manufacturers also rely on rivet nuts to ensure the strength of a connection is consistent. A poorly installed weld nut or a regular nut-and-bolt combination can lead to rework if you lack full backside access. With a rivet nut, workers only need to position the fastener from one side, thread the installation tool, and set it.
Additionally, rivet nut technology supports different metals used in automotive chassis. Steel rivet nuts work well on steel body parts, while aluminum rivet nuts can reduce weight and prevent galvanic corrosion in aluminum panels. The automotive sector often demands custom rivet nuts to handle unique structural or aesthetic requirements, like countersunk heads that remain flush with the panel.
2. Aerospace & Aviation
I’ve seen rivet nuts in the aerospace industry too. The high cost of every pound in an aircraft means weight-saving strategies are paramount. Using thin materials for housings or frames can be beneficial, but these materials typically lack the thickness to tap a reliable thread. Enter the rivet nut.
In aviation, there’s also a strong emphasis on corrosion resistance and high-strength materials. Thus, stainless steel or high-grade aluminum rivet nuts might be used. Components in aircraft cabins, wings, or internal compartments can’t always be accessed from both sides, making a blind rivet nut critical.
3. Electronics & Enclosures
My first real hands-on experience with rivet nuts was in an electronics assembly context. Imagine a large metal enclosure for a server rack or an industrial control system. You often have to install sub-panels, fans, or cable trays inside that enclosure. If the enclosure is a sealed box, drilling holes and using standard nuts can be a headache.
By placing rivet nuts inside these enclosures, we get a secure anchor for screws or bolts that hold interior components. Additionally, electronics often involve specialized needs such as EMC (electromagnetic compatibility) shielding, so the rivet nut might need certain coatings or metal compositions.
4. Furniture, Fixtures & Displays
I’ve even seen rivet nuts used in modular furniture and high-end display stands. Whenever someone needs a disassemblable structure that can be flat-packed and reassembled multiple times, rivet nuts excel. Sure, you could use a simple wood screw, but if the material is composite or metal, a rivet nut offers more reliability and reusability.
Custom rivet nuts can be designed with decorative heads or tinted finishes that blend with the furniture’s aesthetic. They also let you connect metal frames to each other or to wooden panels without complicated bracketry.
5. Industrial Machinery & Heavy Equipment
In heavier machinery, there’s a need for robust fastening solutions that can be installed quickly. Production lines often have to mount guard plates, brackets, or control boxes onto large frames. It can be impossible for a technician to reach behind certain areas of a machine to tighten a nut. That’s where the rivet nut’s blind installation truly shines.
I’ve visited facilities where robotic arms are used to install rivet nuts in heavy steel frames. The rivet nut, if specified properly, can handle the stress, vibration, and torque loads typical in an industrial environment. But in those environments, standard rivet nuts might not always suffice, especially if the steel is thick or extremely high in tensile strength. That’s when a custom rivet nut might be necessary—maybe with a longer grip range or higher-grade material.
6. Custom Product Design
Sometimes, a completely new product emerges that demands a specific fastener solution. Designers might say, “We need a flush head that won’t protrude, plus we need an unusual thread pitch for compatibility with our existing hardware.” That’s a scenario where a custom rivet nut is the perfect answer.
Designers also want to ensure brand consistency. They might request a rivet nut with a custom color, plating, or even a logo. While these might seem like cosmetic features, they can be crucial for brand presentation at trade shows or in high-end consumer products.
Why These Scenarios Demand Rivet Nut Customization
The next logical question is: why not just buy off-the-shelf rivet nuts for all these applications? Often, a standard rivet nut can handle general fastening jobs. But once you go into specialized environments, you might need a rivet nut that differs from the usual specs.
- Unique Body Geometry: Some assemblies require a rivet nut with an extended flange to distribute load over a larger area.
- Non-Standard Threads: Certain automotive or industrial designs might use a proprietary thread standard.
- Composite Materials: If you’re working with carbon fiber or advanced plastics, you might need a rivet nut with special knurling or a different shape for optimal grip.
In these cases, custom rivet nut solutions arise. And if we look at search trends (I’ve spent time analyzing keywords, including “rivet nut custom,” “rivet nut CNC,” and so forth), we see people looking for specialized manufacturing or design services. They want to know how to get a rivet nut produced that meets their exact needs.
It’s not just about function either. In industries where visual presentation matters, a standard silverish rivet nut might clash with the product design. So you see requests for anodized or tinted rivet nuts. There’s also a push for rivet nuts that can endure tough environments: high temperatures, corrosive chemicals, or salt spray conditions for marine applications.
From personal observations, the most advanced questions I see revolve around large-scale production requirements. That means a client wants thousands or millions of custom rivet nuts per year, with tight tolerances and consistent quality. Now, that’s not something you can do purely by manual processes. It often requires specialized machinery, thorough quality inspection, and well-honed CNC strategies.
Meeting Industry-Specific Needs
I’ve also seen a push for rivet nuts that solve assembly line challenges. For example, if a line worker struggles to align a rivet nut in a tight corner, a custom design might include a small pilot or “lead-in” feature that positions the rivet nut more easily.
We can’t forget about the specialized torque or spin-out requirements either. For certain applications, the torque-to-turn factor must exceed a specific threshold to ensure the rivet nut won’t start rotating if the final assembly is subjected to vibration or repeated torqueing. In these situations, a hex or semi-hex rivet nut, or a rivet nut with external knurls, might be the answer.
Conclusion of Chapter 2
Ultimately, the wide-ranging scenarios in which rivet nuts are used highlight how flexible and powerful this technology can be. But it also underscores why so many people end up searching for custom rivet nut solutions.
Automotive folks might need that perfect flush head rivet nut. Aerospace engineers might need a high-strength, corrosion-resistant variant. Electronics manufacturers might want rivet nuts that accommodate quick assembly inside a sealed enclosure. And furniture designers might need subtle aesthetics and easy field assembly.
Rivet nuts are more than just a nifty fastener. They’re a core element in countless industries. That’s why the demand for specialized rivet nut knowledge and custom production is stronger than ever.
Now that we’ve covered where rivet nuts fit in, let’s move on to materials. Because once you understand the different material options—and how they affect performance and manufacturing—you’re better equipped to design or order custom rivet nuts that truly meet your needs.
Chapter 3: Material Selection & Performance Considerations
Rivet nut performance hinges on the material you choose. I often find that when someone wants a custom rivet nut, they’re either looking for an unusual geometry or a specific material property (or both).
1. Carbon Steel Rivet Nuts
Carbon steel is a go-to choice in many industries. It’s relatively strong, cost-effective, and easy to manufacture in large volumes. When I began exploring rivet nut manufacturing, I was surprised by how many standard rivet nuts used carbon steel.
Carbon steel rivet nuts can handle decent tensile and shear loads. The downside is corrosion potential. That’s why you’ll see carbon steel rivet nuts often coated or plated. Zinc plating is common, though more specialized coatings exist for harsher environments.
- Pros: Good balance of strength and cost, wide availability.
- Cons: Corrosion can be a problem without protective coatings.
2. Stainless Steel Rivet Nuts
If corrosion is a big concern, stainless steel rivet nuts come to mind. I’ve seen these used in boat-building, food processing equipment, and chemical handling systems—basically anywhere water or corrosive agents are a factor.
Stainless steel rivet nuts are typically more expensive, and the manufacturing process might require specialized tooling due to higher material hardness. Certain stainless grades like 304 or 316 can handle extremely harsh conditions.
- Pros: Excellent corrosion resistance, strong.
- Cons: Higher cost, can be harder to form or machine.
3. Aluminum Rivet Nuts
Aluminum rivet nuts are quite popular in applications that need to save weight. I’ve worked with clients in the electric vehicle (EV) sector who favored aluminum rivet nuts for battery enclosures. By shaving even a few grams, they could optimize overall vehicle weight.
Aluminum also has decent corrosion resistance, though not on par with stainless. Depending on the grade, aluminum rivet nuts can be surprisingly strong. However, they might not handle the same torque or load as steel or stainless variants.
- Pros: Lightweight, good corrosion resistance in mild environments.
- Cons: Lower strength than steel or stainless, can strip threads under high torque.
4. Copper or Brass Rivet Nuts
I’ve heard of copper or brass rivet nuts primarily in electrical applications. The conductivity of copper or brass can be desirable if the fastener itself needs to help with grounding or EMI shielding.
These materials are softer, so you have to be careful about thread integrity. If you’re in an environment that requires both conductivity and moderate strength, brass or copper might be a reasonable compromise.
- Pros: Good conductivity, decent corrosion resistance, aesthetically pleasing.
- Cons: Softer than steel, can deform under higher loads.
5. Exotic Alloys
In extreme environments, you might even run into exotic alloys like Inconel or titanium. These cases are rare and usually come with a high price tag. But if you’re dealing with high temperatures or extremely corrosive environments, a custom rivet nut made from a specialized alloy might be the only solution.
Surface Treatments & Coatings
The raw material isn’t the whole story. Often, rivet nuts receive additional treatments to enhance performance.
- Zinc Plating: Commonly used for carbon steel. Provides basic corrosion protection.
- Electrophoretic Coating (E-coating): Offers uniform coverage, sometimes used in automotive.
- Anodizing: Typically for aluminum rivet nuts, can add both corrosion resistance and color.
- Passivation: For stainless steel, to maximize corrosion resistance by removing free iron from the surface.
When I was evaluating different rivet nut suppliers, I noticed that some offered fancy coatings like PTFE or ceramic-based layers for lubricity or extreme temperature scenarios. Those are specialized solutions often found in aerospace or high-performance machinery.
Performance Traits to Consider
When someone asks me which material is best for a rivet nut, I often respond with another question: “What do you need this rivet nut to do?” Because each environment is unique.
- Corrosion Resistance: Will the rivet nut face salt spray, chemicals, or high humidity?
- Strength Requirements: How much torque and shear must the rivet nut handle?
- Thermal Environment: Will it be installed near an engine block or in freezing conditions?
- Weight Constraints: Is this an aerospace or EV application where every ounce matters?
- Electrical Conductivity: Does the design call for an electrically conductive fastener?
By identifying these needs early, you can narrow down whether you need steel, stainless steel, aluminum, or something else.
Material vs. Machinability
Now we come to a key concern: manufacturability. Some rivet nut forms come from cold heading, which is cost-effective for large volumes. Others might be CNC-machined if you want a shape that cold heading can’t produce at scale or with the required precision.
- Steel: Cold heading steel is common, and CNC machining steel is also doable.
- Stainless Steel: Harder to cold head in some cases, might require specialized processes or slower CNC speeds.
- Aluminum: Fairly easy to CNC, but might be more difficult to maintain thread integrity if the design has thin walls.
What I’ve learned is that the material you pick directly influences the manufacturing route. If you want a high-volume, standard rivet nut in carbon steel, cold heading is probably your best bet. If you need a custom shape in stainless steel with tight tolerances, CNC might be the way to go (or a combination of cold heading and CNC finishing).
Example Table: Material vs. Key Properties
Here’s a quick reference table I put together to compare different materials for rivet nuts:
| Material | Strength (Relative) | Corrosion Resistance | Typical Use Cases | Cost (Relative) | Machinability |
|---|---|---|---|---|---|
| Carbon Steel | High | Low (coatings help) | Automotive, general | Low | Good (cold heading & CNC) |
| Stainless Steel | Very High | Excellent | Marine, food, chemical | Higher | Moderate-Hard |
| Aluminum | Moderate | Good (mild env.) | Lightweight designs | Moderate | Easy (CNC) |
| Brass | Moderate | Moderate-Good | Electrical, decorative | Moderate-High | Easy (CNC) |
| Copper | Low | Good | Electrical grounding | High | Moderate |
| Exotic Alloys | Very High | Very High | Aerospace, extreme temps | Very High | Hard (special CNC) |
(Table 1: Comparing common rivet nut materials and their properties. )
From this table, you can see why carbon steel is a standard solution, and why stainless steel is favored in harsh or corrosive environments. Aluminum is a winner in the EV or aerospace realm, and brass/copper come in for electrical or decorative functions.
Real-World Experience: Selecting Materials Under Pressure
I recall working with a team that needed rivet nuts for a water filtration system. At first, they considered carbon steel for cost reasons. But those rivet nuts would be exposed to constant moisture. When I brought up stainless steel rivet nuts, they hesitated because of higher cost.
Ultimately, they chose stainless steel. The extra cost was justified because the alternative would risk premature corrosion and potential failure. If a rivet nut rusted and lost grip, the entire system’s panel might fail.
Surface Finish Decisions
Selecting the rivet nut material is only part of the decision. Many folks ask me, “Do I really need plating?” My response is typically, “Only if you care about rust, friction, or appearance.”
- Zinc plating can add a protective layer against rust.
- Anodizing on aluminum can create a range of colors. I’ve seen brand-new EV prototypes with bright green anodized rivet nuts as an aesthetic statement.
Performance in the field should guide your surface finish choice. If you’re deploying rivet nuts in a heavily corrosive environment, a robust coating is invaluable. If it’s purely aesthetic or brand-based, a tinted or decorative coating might suffice.
Match Material to the Application
The key takeaway is that rivet nut materials shouldn’t be an afterthought. They’re central to the function, durability, and cost of your custom rivet nut. If your user environment is punishing, don’t skimp on material quality. Conversely, if your environment is mild, you can save some budget by using carbon steel with a basic zinc plating.
Now that we’ve discussed materials and performance considerations, let’s move on to the design and customization parameters. That’s where we talk about the variables that let you tailor a rivet nut to your exact requirements.
Chapter 4: Customization Parameters & Design Variables
Custom rivet nut design is one of my favorite topics. Back when I first started exploring rivet nut customization, I realized there’s so much more than just picking a standard size.
1. Thread Specification
The thread is a vital part of any rivet nut. Standard threads like UNC, UNF, or metric (M6, M8, etc.) are prevalent, but custom pitch threads also exist. In specialized machinery, you might see a unique thread standard to avoid mix-ups with other fasteners.
When clients ask me about custom rivet nuts, the thread specification is often the first detail we tackle. That’s because everything else—body diameter, head shape, grip range—must accommodate the chosen thread.
2. Body Diameter & Grip Range
The “grip range” is the thickness of material the rivet nut is designed to clamp against. A typical rivet nut has a minimum and maximum grip thickness. Exceeding that range might cause improper deformation or a loose fit.
When you need a rivet nut that works with, say, a 4 mm to 6 mm thick panel, you might not find an off-the-shelf item with exactly that range. Hence, a custom rivet nut could be designed to accommodate your specific thickness.
Body diameter is also crucial for installation. It must align with the pre-drilled hole or punch diameter in your workpiece. If you have a unique hole size or want a certain clearance tolerance, you’ll need to tweak the rivet nut’s body dimensions.
3. Head Style
My personal design experiences taught me that the head style can make or break a rivet nut’s performance. A wide flange head distributes the load over a larger surface area. A countersunk head sits flush with the surface, making it ideal for aesthetic or low-profile applications. A reduced or small flange head might be necessary if you have limited real estate around the hole.
Some designers request a special head shape that aligns with their product’s contour. For example, a slightly curved head that sits perfectly on a curved metal panel. That’s beyond any standard offering, which is where CNC machining or specialized tooling plays a role.
4. Body Geometry: Round, Hex, Knurled
I recall a project where spin-out was a major concern. The torque required to loosen the screws was so high that a round rivet nut kept rotating. To solve that problem, we shifted to a hex-body rivet nut, which physically prevented spin-out.
In other scenarios, external knurls or ridges on the rivet nut body help grip the host material. This is especially true if you’re installing the rivet nut in a softer material like plastics or composites.
5. Special Features: Seals, Collars, or Extended Shanks
Sometimes, the design needs more than just a standard rivet nut shape. For instance, a sealed rivet nut can prevent water or fluid ingress. Others might have an extended shank that protrudes from the backside of the assembly for additional mounting options.
I’ve also encountered designs with integrated collars, meant to provide a precise standoff distance. This can help align mating parts or provide space for air circulation or wiring routes.
6. Tolerance & Concentricity Requirements
High-precision applications, such as in aerospace or medical devices, might demand strict tolerances on thread pitch diameter, head flatness, or body roundness. If the rivet nut is off by a fraction of a millimeter, it could result in alignment issues with the rest of the assembly.
When you push the envelope on precision, that often means custom CNC machining. Mass-produced cold-headed rivet nuts can achieve decent accuracy, but extremely tight tolerances typically require a finishing step.
7. Surface Finish & Aesthetics
We touched on surface coatings in the previous chapter, but from a design standpoint, you might have aesthetic goals for your custom rivet nut. Perhaps you want a color-coded head to match the brand identity or to differentiate different thread sizes.
I once worked with a company that color-coded rivet nut heads based on thread size. Their factory workers could quickly identify whether they were installing M6 or M8 by looking at the rivet nut’s color. That’s a small detail, but it can improve efficiency and reduce errors.
Table of Common Customization Variables
Below is a table summarizing the key variables people tweak when designing custom rivet nuts. We often see a combination of these in play for a single project.
| Parameter | Description | Why It Matters | Example |
|---|---|---|---|
| Thread Spec | UNC, UNF, Metric, etc. | Must match mating screw/bolt | M6, 1/4-20, etc. |
| Body Diameter | Outer diameter to fit hole | Ensures proper fit, prevents spin or rattling | 7.8 mm, 9.2 mm |
| Grip Range | Min and max material thickness | Ensures correct deformation and clamp | 1.0-2.5 mm |
| Head Style | Flat, countersunk, reduced flange | Affects load distribution and aesthetics | 2 mm thick flange |
| Body Shape | Round, hex, knurled, slotted | Prevents spin-out, improves grip in certain materials | Hex body |
| Material | Steel, stainless, aluminum, brass, etc. | Determines strength, corrosion resistance, cost | 304 stainless |
| Surface Finish | Zinc plating, anodizing, passivation, etc. | Enhances corrosion resistance or brand identity | Red anodized |
| Special Features | Seals, extended shank, integrated collar | Tailored for fluid sealing, standoffs, or alignment | Sealed rivet nut |
(Table 2: Key customization variables for rivet nuts. )
Balancing Function, Cost & Aesthetics
In a perfect world, we’d all design the most advanced rivet nut with every feature. But cost is a real concern. Each design tweak can mean different tooling, more complex CNC steps, or special finishing.
I often help clients weigh their must-haves against their nice-to-haves. Do they really need a hex body if a knurled body can provide adequate spin-out resistance at lower cost? Is a sealed rivet nut necessary if they’re not operating in a fluid environment? These questions shape the final design.
Examples from the Field
- Automotive Custom Hex Body
A manufacturer needed a hex body rivet nut for mounting a side mirror assembly. The torque on the screws was quite high, and standard round rivet nuts often spun out. We developed a custom hex rivet nut with a slightly wider flange to distribute load. - Electronics Countersunk Head
An electronics enclosure supplier needed countersunk rivet nuts so the surface of the enclosure would remain flush. They also chose aluminum for weight reasons. That combination was unusual, so we used CNC machining to ensure the countersink angle matched their enclosure design. - Furniture Extended Shank
A designer of modular office furniture wanted rivet nuts that extended beyond the panel’s back side. This extension served as a mini standoff, allowing cable routing behind the panel. We ended up with a custom length and built-in collar.
Key Points in Preparing a Design
- Accurate Technical Drawings: Provide a detailed drawing or 3D model. Indicate all critical dimensions, tolerances, and angles.
- Material & Finish: Specify the exact material grade and any required coating. If corrosion resistance is key, highlight that.
- Expected Volumes: The quantity you need can dictate the manufacturing method. Higher volumes might warrant dedicated tooling.
- Installation Method: If you have a specific setting tool or automation in mind, design the rivet nut to match that equipment’s parameters.
The Path to a Final Design
You might start with a baseline from an existing rivet nut. Let’s say you like the head style but want a different grip range. You work with an engineering team (or a rivet nut supplier’s design department) to produce a CAD model. That model is iterated until you find the sweet spot of dimension, head shape, and thread specification.
During this phase, you might also do some prototyping. CNC machining is great for small test runs. If the design is validated and you decide you need large volumes, you might invest in custom tooling for cold heading or forging, followed by finishing steps to refine threads or surfaces.
Why Customize Instead of Using Standard Rivet Nuts?
I sometimes get asked why a company should invest in custom rivet nuts when standard ones are widely available. The answer usually involves performance, fit, or branding.
- Performance: A standard rivet nut might not meet torque or spin-out requirements.
- Fit: The existing geometry might not match a product’s hole patterns or thickness ranges.
- Branding or Aesthetics: A standard silver rivet nut might not align with a premium product look.
Conclusion of Chapter 4
Customization is where rivet nut technology truly shines. It allows you to tailor every aspect of the fastener to your product, whether you need a specific thread pitch, a special head style, or a unique finish.
In the next chapters, we’ll dive into manufacturing processes—especially the critical role that CNC machining plays in making these custom rivet nuts a reality. We’ll also explore how to choose the right supplier and address common issues that arise during the development phase.
If you’re serious about rivet nut customization, remember that the design stage is your best opportunity to optimize for cost, performance, and aesthetics. Knowing what’s possible will help you shape a rivet nut that does precisely what you need—no more, no less.
Stay with me, and let’s explore how these designs come to life on the factory floor.
Chapter 5: Overview of Manufacturing Processes for Rivet Nuts
When I first got serious about custom rivet nut manufacturing, I realized there’s a fascinating variety of processes used to create these small but mighty fasteners. A rivet nut might look simple at a glance, but the technology behind its production can be surprisingly advanced. Selecting the right manufacturing process is crucial because it impacts cost, lead time, and performance characteristics.
In this chapter, I’ll walk through the main methods used to produce rivet nuts. I’ll also share what I’ve learned about which processes are best for different volumes, design complexities, and material choices. My hope is that by the end, you’ll have a clearer understanding of how rivet nuts travel from concept to finished product.
1. Cold Heading (Cold Forging)
One of the most common processes for making standard rivet nuts is cold heading (also referred to as cold forging). It starts with a wire or rod of the chosen material, typically carbon steel or stainless steel. In cold heading, you form the rivet nut’s initial shape through a series of powerful blows.
How It Works
- Cutting the Wire: A long coil of wire is cut into slugs.
- Heading Operations: The slugs are transferred into a machine with multiple stations, each applying tremendous force to shape the metal progressively.
- Trimming/Initial Shaping: Excess material is trimmed, forming a cylindrical blank.
- Piercing: A punch or tool can create the internal cavity.
- Threading: Threads may be rolled, tapped, or formed in a secondary operation if needed.
Because the metal is formed at room temperature (or close to it), the grain structure of the metal often ends up stronger than it would be if you heated it up. Cold heading also reduces waste compared to CNC machining from a solid bar.
Pros and Cons of Cold Heading
- Pros:
- High-volume efficiency: Once the tooling is set up, you can produce rivet nuts at a very fast pace.
- Lower material waste: The near-net-shape process means less scrap.
- Strong grain flow: Cold working can improve the rivet nut’s mechanical properties.
- Cons:
- High initial tooling cost: Setting up the machine and creating custom dies can be expensive.
- Less flexibility: Intricate or highly customized shapes may be hard to achieve with cold heading alone.
- Minimum order quantities: Many manufacturers require large production runs to justify tooling costs.
In my view, cold heading is great for standard or slightly modified rivet nut designs in high volumes. If your design is fairly common—like a round body with a standard thread—and you need thousands or millions of pieces, cold heading is often the way to go.
2. Secondary Machining Processes
Even in high-volume cold heading scenarios, a rivet nut might need additional machining steps. For example, you might want a specific countersink angle or an undercut that can’t be perfectly formed in the heading process.
Thread rolling or thread tapping can occur after cold heading to ensure the rivet nut has the precise threads needed. Some manufacturers also do a bit of milling or drilling for specialized features.
From personal experience, I’ve seen situations where the rivet nut body was cold-headed, but the final precision threading was done on a CNC lathe. This blend of methods can keep costs manageable while still allowing for a degree of customization.
3. CNC Turning & Milling (Fully Machined Rivet Nuts)
When we talk about truly custom rivet nuts—especially those with complex geometries, ultra-tight tolerances, or exotic materials—CNC (Computer Numerical Control) machining often comes into play.
In a CNC approach, we usually start with a solid bar or rod of material. The bar is fed into a CNC lathe, which can turn the outside diameter, cut the internal cavity, and create threads. If any complex milled features are needed (like slots, flanges, or custom head shapes), the rivet nut blank can then move to a CNC mill.
Why CNC for Rivet Nuts?
- Design Flexibility: You can create shapes that would be impossible or cost-prohibitive with cold heading.
- Low to Medium Volume: If you only need a few hundred or a few thousand custom rivet nuts, CNC might be more cost-effective than paying for cold heading dies.
- Exotic Materials: Some materials don’t lend themselves well to cold heading, especially if they’re very hard or have unique properties (e.g., titanium, certain stainless steels).
- Prototyping: CNC is invaluable if you’re still refining your rivet nut design. You can iterate quickly without investing in permanent tooling.
I’ve worked with clients who needed specialized hex or knurled outer profiles that extended in a non-uniform manner. CNC was the only viable method to achieve that geometry. Yes, the per-part cost can be higher than standard cold heading, but when you’re looking for tight tolerances or smaller production runs, CNC is usually the right call.
4. Hot Forging (Less Common for Rivet Nuts)
Occasionally, you might see hot forging used for certain heavy-duty rivet nuts. In hot forging, the metal is heated to a plastic deformation temperature and then shaped. This can be more forgiving if the material is extremely hard or if the geometry is complex. However, for most typical rivet nut designs, cold heading or CNC suffices.
I’ve only encountered hot forging in a scenario where extremely thick-walled rivet nuts were being made for high-load applications. The manufacturer found it easier to shape the steel when it was heated, reducing stress on the dies. But it’s not the mainstream approach.
5. Post-Processing & Heat Treatment
Heat treatment might be applied after the main forming process to adjust the rivet nut’s hardness or toughness. For instance, a carbon steel rivet nut might be case-hardened to improve wear resistance on the threads. Stainless steel rivet nuts might undergo annealing or other treatments to modify tensile properties.
Surface treatments (like zinc plating, anodizing, passivation, or e-coating) usually come last. This ensures the rivet nut has the desired corrosion resistance and finish. During a factory visit, I noticed that rivet nuts often travel along a conveyor to a plating or coating station. They might also undergo a final inspection or sorting process to ensure consistent quality.
6. Choosing the Right Process for Your Custom Rivet Nut
When clients ask me, “Which process should I use?” I usually walk them through a brief decision tree:
- Volume: High volume (tens of thousands or more) often points to cold heading with possibly minor secondary machining. Low or moderate volumes might lean toward CNC.
- Complexity: If you have a unique shape or tight tolerances, CNC might be the only practical solution.
- Material: Conventional steels and some stainless steels can be cold headed. Exotic or super-hard materials might need CNC (or specialized forging).
- Budget & Timeline: For large-scale production, cold heading’s efficiency is unbeatable. But the upfront tooling cost and lead time can be significant. CNC is more flexible but can be pricier per unit.
Sometimes, I see a hybrid approach: starting with a near-net-shape blank from cold heading, then finishing it on CNC machines. That’s a good compromise for mid-level complexity in moderate volumes.
7. The Role of Automation
As technology advances, automation is becoming more common in rivet nut production. Automated feeding systems, robotic arms, and inspection cameras help maintain consistency and reduce labor costs.
For instance, an automated line might take in wire stock on one end, produce cold-headed blanks, move them to a threading station, then pass them through a heat-treat oven, and finally deposit them in a surface coating bath. Automated vision systems can check for dimensional accuracy, rejecting any rivet nuts that fall outside spec.
CNC lathes also have bar feeders and robotic handling. I recall watching a system that could run overnight, churning out thousands of precision-machined rivet nuts by morning. If your custom rivet nut design is stable and well-tested, automated production can deliver high volumes with minimal waste.
8. Quality Control in Rivet Nut Manufacturing
Quality control is vital. A poorly made rivet nut might crack during installation or fail under load. Depending on the environment, a single fastener failure could have serious consequences—imagine a rivet nut failing in an aerospace or automotive application.
Common QC steps include:
- Dimensional Checks: Using calipers, micrometers, or optical comparators to measure outer diameter, head thickness, and thread pitch accuracy.
- Hardness Testing: Ensuring the rivet nut meets specifications after heat treatment.
- Spin-Out or Pull-Out Testing: Placing the rivet nut in a test coupon and applying torque or tensile force to verify performance.
- Surface Inspection: Checking for cracks, burrs, or incomplete plating.
Some of the best manufacturers I’ve worked with maintain robust documentation and traceability. Each batch of rivet nuts might have a lot number, linking back to the material supplier, the forging conditions, and even the heat treat furnace used. That level of detail can be critical if a defect is discovered later.
9. Lead Times & Production Scheduling
Lead times vary based on the chosen process. For cold heading, the major delay is often tooling design and fabrication. Once the tooling is set, the actual production run can be very fast. CNC lead times depend on machine availability and the complexity of the rivet nut design.
I’ve seen quick-turn CNC jobs produce small batches of custom rivet nuts in under a week. At the other end of the spectrum, large cold heading runs might take several weeks or more, especially if there’s a backlog or complex tooling.
10. My Personal Take on Manufacturing Routes
Over the years, I’ve advised different companies on rivet nut manufacturing. My typical approach goes like this:
- Prototype with CNC: Validate the design, test for spin-out, verify the threads.
- Decide on Volume: Estimate annual usage.
- Cost Analysis: Compare per-part CNC cost vs. the tooling and unit cost for cold heading.
- Finalize: If we expect stable, high-volume demand, invest in cold heading tooling. If volumes are low or the geometry is complex, stay with CNC or a hybrid approach.
This decision-making framework has saved me (and my clients) a lot of time and money. Sometimes, folks rush into designing specialized forging dies before they’ve fully tested the rivet nut. That can be a costly mistake if you discover a design flaw after tooling is completed.
Conclusion of Chapter 5
Rivet nut manufacturing is a multi-faceted world. From high-speed cold heading lines that crank out massive volumes to precision CNC machines producing specialized parts, there’s a suitable process for nearly every need.
The key is understanding your application, volume requirements, and cost constraints. A simple, high-volume rivet nut might flourish under cold heading. But if you need a unique shape, tight tolerances, or exotic materials, CNC machining can open up a realm of custom possibilities.
Next, I’ll dive deeper into the specifics of CNC machining for custom rivet nut production—its benefits, best practices, and how it ties into your design strategies. If you’re curious about what goes on behind the scenes in a CNC shop that specializes in rivet nuts, keep reading. That’s where the real magic happens, especially for those “impossible” designs you thought you couldn’t achieve with a standard rivet nut.
Chapter 6: CNC Machining for Custom Rivet Nut Production
I’ve always seen CNC machining as the ultimate way to bring complex, custom rivet nut designs to life. Standard off-the-shelf rivet nuts might be fine for everyday purposes, but if you need a non-standard head shape, unique thread pitch, or special tolerances, CNC machines can do remarkable work.
In this chapter, I’ll share everything I’ve learned about the CNC process as it applies to rivet nut production. From selecting the right type of CNC equipment to ensuring consistent quality, these insights can help you navigate the challenges of turning a conceptual design into a precision-machined rivet nut.
1. Why CNC for Rivet Nut Manufacturing?
CNC (Computer Numerical Control) is a manufacturing method where machine tools—lathes, mills, or multi-axis machining centers—are directed by computer programs. If you’re designing a custom rivet nut, CNC machining is appealing because:
- You can achieve tight tolerances on critical dimensions like the outer body diameter, thread pitch, and head thickness.
- Complex geometries are easier to produce, whether you need a hex body, custom grooves, or specialized flanges.
- You can prototype and iterate designs quickly without costly forging dies.
- Low to medium batch sizes become feasible, which is a big deal if you’re not sure how many rivet nuts you’ll ultimately need.
I recall a project where we needed a rivet nut with an extended collar and a partial knurl. Standard cold-heading equipment would have required multiple specialized dies, meaning a hefty tooling bill. We chose CNC, and although the per-piece cost was higher, the total project cost was actually lower because we avoided custom dies.
2. Types of CNC Machines Involved
There are several CNC machine types used in rivet nut manufacturing. The most common are CNC lathes, sometimes equipped with live tooling for extra operations.
- CNC Turning Centers
- Ideal for creating the basic cylindrical shape and internal threads.
- Equipped with precise tooling systems that can quickly cut external and internal profiles.
- CNC Swiss Lathes
- Popular for smaller-diameter parts with high precision.
- The bar stock is fed through a guide bushing, allowing continuous support close to the cutting area.
- Great for slender or delicate rivet nut designs.
- CNC Turning Centers with Live Tooling
- Can handle milling operations like flats, slots, or drilling radial holes without removing the part from the lathe.
- This reduces setups and keeps all critical features aligned.
- CNC Milling Machines
- If the rivet nut design calls for unusual cuts, side holes, or unique head shapes, a milling machine might be used after initial turning.
A typical workflow might involve starting with a round bar, turning the outer profile, boring and threading the inner diameter, and then moving the part to a secondary station for any intricate milling. The entire process is orchestrated by CAD/CAM software, which translates your 3D model of a custom rivet nut into machine-readable instructions.
3. CNC Machining Steps for a Rivet Nut
Step 1: Material Selection & Bar Preparation
You choose a material suitable for the rivet nut’s final purpose—carbon steel, stainless steel, aluminum, or something more exotic. This material is acquired as a round bar or rod, often in specific diameters that minimize waste.
Step 2: Programming
A CAM (Computer-Aided Manufacturing) program is used to generate toolpaths. You start with a 3D model of the rivet nut, and the software helps decide how the cutting tools will move. Speeds, feeds, tool changes, and depth of cut are all determined here.
Step 3: CNC Turning
The bar is clamped into the lathe chuck. The spindle rotates, and cutting tools remove material to create the rivet nut’s outer diameter, any shoulders or flanges, and the internal cavity. A boring bar or internal threading tool might be used to cut threads.
Step 4: Milling (If Needed)
If the design requires features like knurls, hex sections, radial holes, or angled cuts, the rivet nut might be milled either in a lathe with live tooling or in a separate CNC mill. This step can add cost, but it’s invaluable for truly unique designs.
Step 5: Deburring & Finishing
After the main cutting operations, sharp edges or burrs must be removed. A quick chamfer pass or manual deburring can ensure the rivet nut is safe to handle and ready for assembly.
Step 6: Secondary Treatments
Depending on the design, you might need heat treatment, plating, anodizing, or passivation. These steps mirror the processes described in the previous chapter, but they’re equally crucial in the CNC route.
Step 7: Inspection & Quality Control
The final rivet nut is measured for dimensional accuracy, thread quality, and cosmetic appearance. If the design demands tight tolerances, it’s common to do a sampling inspection—or even 100% inspection in critical aerospace or medical fields.
4. Keeping Consistency in CNC Production
One big concern with CNC machining is consistency across multiple parts. While CNC is inherently precise, variations in tool wear, material lot differences, and operator skill can introduce small deviations.
That’s why many shops rely on:
- Tool Presetters: They measure cutting tools offline to ensure the lathe or mill knows the exact tool length and diameter.
- In-Process Measurements: Automated probes or sensors inside the CNC machine can measure critical features mid-run and apply minor adjustments.
- Advanced Fixtures: For secondary operations, well-designed fixtures or collets maintain part-to-part repeatability.
- Regular Tool Changes: Cutting edges dull over time, so the machine program might automatically change inserts after a set number of parts.
When I worked on a short run of custom rivet nuts in stainless steel, we found that the thread quality diminished around part number 200 because the threading insert began to show wear. Our solution was to insert an automated tool change command every 150 parts, maintaining a higher-quality thread.
5. Advantages of CNC for Custom Rivet Nuts
Let me highlight why so many folks, including myself, see CNC as a go-to method for non-standard rivet nut designs:
- Design Freedom
You can add features like partial hex bodies, custom flanges, or slotted heads without incurring prohibitive tooling costs. - Quick Prototyping
If you’re unsure about a design, you can machine a small batch to test. If changes are needed, you adjust the CAD model and CAM program rather than scrapping expensive forging dies. - Lower Minimum Order Quantities
While cold heading might require tens of thousands of pieces to be cost-effective, CNC shops often handle runs as small as a few hundred. - Tight Tolerances
Achieving ±0.02 mm or even tighter specs can be done routinely on well-maintained CNC equipment. That’s especially crucial if your rivet nut must interface with precise mating parts. - Material Versatility
Exotic metals, hardened steels, or delicate alloys can be handled by skilled machinists using the right tooling and feeds.
6. Potential Drawbacks to Consider
Of course, CNC machining isn’t a silver bullet.
- Higher Unit Cost: Each rivet nut might cost more compared to bulk cold-headed parts, especially if the design is time-consuming to machine.
- Slower Production Rates: CNC machines remove material one part at a time (unless you have a multi-spindle setup). Large runs could take longer.
- Program & Setup Complexity: Each new design requires careful CAM programming and machine setup. There’s a learning curve if your design is highly intricate.
The tradeoff is often worth it if you value flexibility, quality, and moderate batch sizes. If your design stabilizes and your volume skyrockets, you might eventually switch to a custom forging approach with minor machining touches.
7. CNC Machining Tips for Rivet Nut Designers
Over time, I’ve picked up a few pointers that can save headache down the line:
- Minimize Sharp Edges
Rivet nuts that have extremely sharp corners can lead to stress concentrations. Adding small chamfers or radii helps the part withstand installation forces and reduces burrs. - Consider Tool Access
If you design a deep internal feature, think about how a tool will reach that area without chatter or deflection. Sometimes, adjusting the angle or length of a hole can make machining more feasible. - Plan for Thread Relief
Internal threading tools need clearance at the thread’s end. Incorporating a small thread relief or runout zone can improve thread quality and prolong tool life. - Tolerances vs. Cost
Tighter tolerances drive up machining time. Be realistic about which features truly need sub-0.01 mm accuracy and which can be more forgiving. - Prototyping is Your Friend
If possible, produce a small test run before committing to a large batch. That way, you can catch any design oversights or performance shortfalls early.
I once designed a rivet nut with a very small undercut behind the head. We discovered during the first prototype run that the undercut caused a tool chatter issue. Adjusting that detail saved us from scrapping a full production lot.
8. Balancing CNC and Other Methods
You might not rely solely on CNC for every step of your custom rivet nut. Sometimes, a hybrid approach works best. For instance, a near-net-shape blank could be cold-headed, then transferred to a CNC lathe for final shaping and threading.
This can reduce material waste and lower the overall machining time. It’s particularly useful if your rivet nut has a relatively standard outer form but still needs a few specialized features.
The biggest question is always volume. If you’re producing thousands or tens of thousands of the same custom rivet nut every month, you might consider investing in partial forging dies. Then you’d do the finishing operations on a lathe or mill. On the other hand, if your volumes are modest or your design is in flux, going full CNC is simpler.
9. Real-World CNC Case Study
I remember working with a marine equipment supplier who needed stainless steel rivet nuts with an extra-thick flange. They had consistent issues with spin-out in saltwater environments.
We decided on 316 stainless steel for corrosion resistance. We used CNC turning to create a thicker-than-normal flange plus a shallow knurl around the body. The design also specified a sealed end to prevent water intrusion.
During the prototyping phase, we iterated the knurl depth twice to achieve the best torque resistance. Thanks to CNC flexibility, that process only required a quick reprogramming. Once the final version was tested and approved, we ran a batch of 1,000 rivet nuts. The supplier installed them in a new line of offshore pumps.
Over the next six months, they reported zero spin-out failures. Another testament to the power of a well-executed CNC approach for custom rivet nut designs.
10. Conclusion of Chapter 6
CNC machining offers a world of possibility for anyone seeking a custom rivet nut solution. Sure, standard rivet nuts might be fine for many applications. But when you need precision, unique features, or exotic materials, CNC is the path to realize those specs without massive tooling investments.
From choosing the right lathe to planning careful design details, the process can feel intimidating. But once you see how CNC merges software-driven accuracy with mechanical prowess, you realize it’s a perfect match for creating specialized fasteners.
Chapter 7: How to Select a Custom Rivet Nut Supplier
I’ve seen plenty of situations where a promising rivet nut design stumbled because the chosen supplier lacked the right equipment or expertise. No matter how perfect your plans might be, a supplier’s capabilities and commitment to quality can make or break your project.
In this chapter, I’ll share my personal checklist for evaluating custom rivet nut suppliers. I’ve honed these points through firsthand factory visits, phone calls with engineers, and unfortunate moments when I realized a supplier’s promises didn’t match reality.
1. Assessing Technical Capabilities
Equipment matters. If you’re aiming for cold heading with secondary CNC work, does the supplier have the right forging presses and multi-axis lathes? If you need a pure CNC solution, do they have enough machines to handle your order without crazy lead times?
It’s not just about owning machines. Skilled operators and programmers are critical. I once toured a plant that showcased impressive CNC lathes, but their staff was brand new and still learning how to maintain consistent output. The result was frequent scrap and delays.
Don’t be shy about asking:
- How many parts can you produce per shift?
- Do you handle both prototyping and high-volume runs?
- What CNC control systems and brand machines do you use?
2. Quality Assurance & Certifications
ISO standards like ISO 9001 can be a strong indicator of systematic quality control. In automotive or aerospace, you might need suppliers certified to ISO/TS 16949 or AS9100. These certifications aren’t a guarantee, but they’re good signs the supplier follows standardized procedures.
Look for specifics in their QA process:
- Do they conduct in-process checks using gauges or CMM (Coordinate Measuring Machines)?
- How do they trace material lots?
- Do they have documented work instructions for each step of rivet nut production?
When I was working on a large rivet nut order for an automotive client, we insisted the supplier provide a PPAP(Production Part Approval Process) package. That included material certs, dimensional reports, and process flow diagrams. It’s a bit more bureaucracy, but it ensures everything is locked down before full-scale production.
3. Communication & Engineering Support
You want a supplier who can collaborate, not just one who takes orders. Ideally, their engineers will review your drawings and suggest tweaks that might lower cost or improve performance. A supplier who never questions your design might be ignoring potential red flags.
Ask:
- Can your engineering team provide DFM (Design for Manufacturability) feedback?
- How quickly do you respond to technical inquiries?
- Do you have an English-speaking point of contact if you’re working with an overseas manufacturer?
I’ve had suppliers catch an undercut radius mistake on my drawing before it caused real production problems. That saved both time and money.
4. Lead Times & Flexibility
Some suppliers excel at large, repeat orders but struggle with quick turnarounds. Others are nimble with prototypes but can’t handle tens of thousands of rivet nuts per month. Decide what your priority is.
- Prototyping: If you need small test runs, do they offer short-run CNC options?
- Scaling Up: If your product succeeds and you need 50,000 rivet nuts a month, can they ramp up?
- Expedited Production: Will they do rush orders if your timeline gets squeezed?
I’ve worked with a niche supplier who was fantastic at small custom batches but not equipped for large-scale automotive supply. Having clarity on your volume needs (present and future) avoids mismatched expectations.
5. Price & Payment Terms
Cost is always a factor. My approach is to get a few quotes but also consider each supplier’s level of service and quality track record. A cheaper quote might come from a shop that lacks comprehensive quality checks or has unreliable delivery.
Discuss payment schedules—some suppliers might ask for a deposit upfront to cover tooling or raw materials. Others might allow net-30 or net-60 terms. Consider how stable the supplier’s financial situation is. You don’t want them going under mid-production.
6. Tooling & Setup Fees
For cold heading, custom dies can be a major expense. For CNC, you might face programming or fixture fees. Evaluate how these costs are structured:
- Are tooling fees amortized over a minimum order quantity?
- If your design changes, do you pay again for new tooling?
- Can you own or retrieve the tooling if you switch suppliers?
I once encountered a case where a supplier insisted on building custom tooling but refused to release it if the client switched vendors. That locked the client in. If you think you might shop around in the future, clarify who owns the tooling.
7. Production Samples & Prototyping
Before committing to a huge order, you’ll likely want production samples. A reliable supplier should be willing to produce a small batch for testing. They might charge a bit more per piece, but it’s worth it if you can validate fit, function, and performance.
If the supplier is hesitant to provide samples or wants to skip that step, it might be a red flag. Even a well-documented design can run into hiccups once it hits the production floor. Seeing real rivet nuts and testing them in your assembly is essential.
8. Logistics & Shipping Considerations
Shipping times and costs can add up, particularly if you’re sourcing rivet nuts from overseas. Ask about:
- Preferred Freight Carriers: Does the supplier have partnerships for discounted rates?
- Incoterms: Who handles customs clearance, insurance, and import duties?
- Packaging Standards: Rivet nuts are small, but they can get damaged if just tossed in a box.
I once lost several days because a rivet nut shipment was held up at customs. Getting clarity on responsibilities early prevents such delays.
9. Red Flags to Watch For
- Unrealistic Promises: If a quote is significantly cheaper than everyone else, question how they plan to meet those numbers.
- Poor Communication: Slow or vague responses might foreshadow difficulties during production or if issues arise.
- No References or Case Studies: Reputable suppliers often show off past successful projects (with client permission). If they have none, they might be new or lack real-world experience.
- Lack of On-Site Inspection: In some industries, you can send an inspector or arrange a virtual tour. If the supplier avoids transparency, that’s concerning.
10. Visiting the Supplier (If Possible)
If your order is large or your requirements are extremely tight, consider visiting the facility. I remember walking through a rivet nut factory that claimed to have cutting-edge CNC lathes. The machines turned out to be older models with limited precision. A physical visit or a detailed virtual tour can reveal a lot about a supplier’s true capabilities.
During a visit, note the cleanliness of the shop floor, how materials are stored, and how work-in-progress inventory is tracked. A well-organized environment typically reflects well on product consistency.
11. Cultural and Language Barriers
If you’re working with a supplier in another country, be mindful of cultural differences and language barriers. Even small misunderstandings can lead to big production errors.
- Provide clear documentation with annotated drawings.
- Confirm all specs in writing—avoid only verbal agreements.
- If needed, hire a local liaison or translator to ensure nothing gets lost in translation.
I’ve personally had success with overseas suppliers who were eager to communicate well, but I’ve also seen deals sour due to misunderstandings about tolerances or materials. Being proactive goes a long way.
12. Ongoing Supplier Relationship Management
Selecting a custom rivet nut supplier isn’t a one-time event. You’re likely going to reorder, possibly scale up, and maybe refine your design. Maintaining a healthy relationship pays dividends.
- Regular Quality Reviews: Schedule periodic check-ins to ensure part specs remain consistent.
- Forecast Sharing: If you anticipate higher volumes in the future, give the supplier a heads-up so they can plan capacity.
- Open Feedback: If you encounter any issues—like delayed shipments or small quality lapses—communicate right away. Good suppliers value the chance to fix mistakes quickly.
Building mutual trust can lead to better deals, priority scheduling, and collaborative R&D down the line.
13. Example Scenario: Choosing Between Two Suppliers
Recently, I helped a client compare two potential rivet nut suppliers. One was local with slightly higher unit costs but excellent communication and short lead times. The other was overseas, offering a lower price but requiring a large minimum order.
We mapped out total landed cost (including shipping, customs, potential delays) for a 6-month horizon. Factoring in the client’s uncertain demand forecast, we chose the local supplier. That allowed smaller production runs and quick turnarounds if the design needed tweaks.
Had the client been sure of stable high-volume demand, the overseas supplier might have become more attractive after an initial tooling investment. But in the uncertain scenario, the local supplier’s flexibility was invaluable.
14. Conclusion of Chapter 7
Finding the right custom rivet nut supplier can be a lengthy process, but it’s worth the investment. The right partner will have the technical know-how, a dedication to quality, and enough production capacity to handle your project’s needs. They’ll communicate openly, work with you on design improvements, and deliver on time.
As you evaluate potential suppliers, keep the big picture in mind—technical capabilities, certifications, communication style, and cost structure. A good supplier isn’t just a vendor; they’re an extension of your own operation.
Chapter 8: Common Questions in Rivet Nut Development
Over the years, I’ve encountered a range of recurring questions that pop up whenever someone considers custom rivet nut manufacturing. At first, I thought these concerns were unique to a few projects. But as my experience grew, I noticed the same themes kept surfacing. This chapter compiles those frequently asked questions into a general discussion of the biggest obstacles and dilemmas in rivet nut development.
1. How Long Does Mold (Tooling) Development Take for Rivet Nuts?
If you’re using cold heading as your primary production method, you often need custom dies (molds) that shape the rivet nut body. Designing, fabricating, and testing those dies can take anywhere from four to twelve weeks, depending on complexity and the workload of the tooling shop.
I’ve seen cases where a simple, near-standard rivet nut design needed only minor modifications to an existing die set, cutting lead time to two or three weeks. On the flip side, a highly specialized design that required multiple forming stations took nearly three months to get right.
During that tooling stage, the manufacturer might produce short samples in small test runs and then refine the tooling. A wise approach is to do thorough dimensional checks at each step. If something’s off, it’s easier to tweak the tooling early rather than after the final finishing.
2. Can We Skip the Tooling Stage and Go Straight to CNC?
Yes, you can. If your design is relatively low-volume or extremely complex, CNC machining might let you bypass the need for dedicated cold heading dies. You’ll still face programming and setup fees, but it’s usually far less than the cost and lead time of building custom forging dies.
For small batches—a few hundred or a few thousand rivet nuts—CNC can be the most cost-effective route. If you eventually decide to scale up, you can invest in cold heading tooling once the design is finalized.
3. How Do We Solve Spin-Out and Thread Failure Issues?
Spin-out occurs when the rivet nut rotates instead of staying locked in place. Thread failure happens when the internal threads strip under torque or tension. Both can stem from poor material choice, insufficient grip length, or an inadequate body design (like a smooth round body in a high-torque application).
Potential Remedies:
- Switch to a knurled or hex body rivet nut.
- Increase the flange size to spread load.
- Use a harder material or apply heat treatment to strengthen the threads.
- Adjust the grip range so the rivet nut deforms properly during installation, creating a tighter clench.
I recall one project where the client struggled with spin-out in a thick steel chassis. They had used a standard round rivet nut that was too short. We shifted to a slightly longer hex-body rivet nut, and spin-out vanished.
4. What if We Need Very Tight Tolerances on Thread Pitch or Body Diameter?
That’s where CNC machining truly shines. Cold heading can produce consistent parts, but extremely tight tolerances (like ±0.02 mm on the outer diameter or the thread pitch diameter) usually require a finishing operation. You might do a blend: cold head for near-net shape, then CNC-turn the critical areas.
If your product demands absolute precision—for instance, in aerospace or medical devices—discuss tolerances with your supplier early. They might need specialized tooling, stable temperature controls in the factory, or advanced measurement equipment (like CMMs) to verify each batch.
5. Is It Possible to Use Rivet Nuts in Plastic or Composite Materials?
Yes, though it’s trickier than installing a rivet nut into metal. In plastic or composite structures, a rivet nut can distort the substrate if the material is too soft or thin. I’ve seen successful integrations in carbon fiber parts, for instance, but it often requires:
- A large flange or integrated washer to spread load, preventing pull-through.
- Body features like knurls or splines for extra grip in the softer material.
- Careful consideration of the installation force. Over-compressing a rivet nut in a brittle composite can cause cracking.
If you’re planning a high-torque scenario, consider running a few test installations in real material samples. That’s the only surefire way to confirm the rivet nut won’t rotate or tear out.
6. Can We Partially Thread a Rivet Nut or Use a Custom Thread Pitch?
Absolutely. Some designs need partial threads or a non-standard pitch to match a specialized bolt. CNC machining is ideal for this since you can program the exact threading pattern. Cold heading might require special rolling tools if you want a unique pitch.
However, keep in mind that custom thread pitches can raise lead times and costs. You’ll also need to ensure the rest of your supply chain (like the screws or bolts that mate with these rivet nuts) is ready to handle non-standard threads.
7. How Do I Balance Cost and Performance in Small Batches?
In small batches (a few hundred or thousand rivet nuts), you face a trade-off. CNC production might yield a higher per-piece cost than cold heading, but you avoid large tooling investments. If you’re worried about performance, you can still choose high-grade materials and specialized features.
It comes down to your project’s priorities. If you anticipate bigger orders soon, you might accept a higher initial tooling fee for cold heading. If your design might change, or you’re not sure of volumes, CNC is a safer bet to avoid wasted tooling.
8. Is a Sealed Rivet Nut Truly Leakproof?
A closed-end rivet nut can be quite effective at preventing fluid intrusion through the fastener itself. But you need to ensure the seal around the flange is also secure. Some designs integrate an O-ring or sealant beneath the rivet nut flange. Others rely on the close fit and proper deformation of the rivet nut to create a seal.
I’ve used sealed rivet nuts in a marine application, and they held up well. We also added a small bead of silicone to the flange area for extra assurance. If you’re dealing with critical fluid-tight requirements, do pressure or leak testing on your final assembly.
9. Can We Produce Rivet Nuts with Integrated Collars or Extended Shanks?
Yes. Extensions and collars are common customizations. The CNC approach makes it straightforward to add length beyond the standard grip range. I’ve seen designs where the rivet nut extends several millimeters past the back side of the panel to serve as a built-in standoff.
Make sure you specify the dimensions clearly, including wall thickness at the transition points. Extended shanks might need extra reinforcement to prevent bending or cracking during installation.
10. How Do I Know If My Rivet Nut Design Is “Over-Engineered”?
It’s tempting to throw every feature onto a rivet nut—knurls, hex body, extended flange, special coatings, you name it. But every extra feature adds cost or complexity. Over-engineering usually shows up when your project’s unit cost climbs, and you’re not sure why.
Ask yourself:
- Do you truly need hex if knurling suffices for your torque requirements?
- Must the flange be that thick?
- Will a standard thread pitch meet your assembly needs?
Working closely with a supplier or fastener engineer can help you strip away unneeded features while retaining functional integrity.
11. Is Reusability a Concern With Rivet Nuts?
A rivet nut remains installed in the base material, so reusability typically pertains to how many times you can thread and unthread the mating screw. Good-quality threads in a properly installed rivet nut can handle multiple cycles, though eventually, wear might occur.
In high-cycle applications (like a cover panel you remove often), I suggest picking a strong material (steel or stainless), ensuring proper thread engagement, and possibly using thread inserts or a removable thread locker if repeated vibration is a concern.
12. Do We Need Automated Rivet Nut Installation Equipment?
Automation can speed up assembly, especially in automotive or large-scale manufacturing. Pneumatic or hydraulic rivet nut setters can be mounted on robotic arms or used with fixture-based systems.
For smaller shops, manual or handheld pneumatic tools might suffice. The big advantage of automation is consistency. A robot will apply the same pull force and the same dwell time every cycle, reducing the chance of a loose or improperly set rivet nut.
13. How Can We Confirm Rivet Nut Quality After Assembly?
Common methods include:
- Pull-Out Testing: Mount the rivet nut in a sample panel, then pull axially until failure. This indicates if the rivet nut meets specified tensile load.
- Spin-Out Testing: Attempt to torque the installed rivet nut to failure to see if it rotates in the hole.
- Visual Inspection: Look for cracks, uneven flange deformation, or incomplete setting.
Some OEMs and big manufacturers require random testing from each batch to maintain consistent quality.
14. Can I Use the Same Rivet Nut for Multiple Material Thicknesses?
Each rivet nut has a grip range—the minimum and maximum material thickness it can handle. If your application involves panels of varying thickness (e.g., 1 mm in one area, 3 mm in another), you might need different rivet nut sizes or a design with a broader grip range.
In a pinch, a rivet nut can sometimes install in a thickness slightly outside its rated range, but it’s risky. You could end up with partial deformation or insufficient clamp force. That leads to spin-out or loosening over time.
15. Do We Need Separate Rivet Nuts for Left-Hand Threads or Metric vs. Imperial?
Yes, threads are obviously specific. If you need a left-hand thread for your assembly, or you’re building for a region that uses imperial threads while you prefer metric (or vice versa), you’ll have to produce or source the corresponding rivet nuts.
This scenario is another reason custom CNC is helpful, since you can create left-hand threaded rivet nuts without completely different forging dies. However, watch out for confusion on the assembly line. Clear labeling is a must when both left-hand and right-hand threaded fasteners are in the same plant.
Conclusion of Chapter 8
These are the questions I encounter most often, and they highlight the diversity of challenges in rivet nut development. Whether it’s spin-out concerns, intricate material demands, or the quest for perfect tolerances, each query underscores how rivet nuts can become surprisingly complex when you move beyond off-the-shelf solutions.
Custom rivet nuts aren’t just a matter of making a different shape. They involve an entire ecosystem of tooling, manufacturing processes, engineering decisions, and supply chain considerations. Hopefully, these answers shed light on your next steps.
Chapter 9: Appendix – Common Specs & Technical Drawing Templates
I’ve always found it useful to keep a reference section on hand for quick checks and clarifications. When designing or sourcing custom rivet nuts, we end up revisiting certain specifications and best practices repeatedly.
In this last chapter, I’ll share some generic tables, plus a few notes on preparing technical drawings. While these are not universal or exhaustive, they serve as a helpful starting framework. You should still collaborate with your engineering team or supplier to refine the details.
1. Common Rivet Nut Size Chart (Standard Metrics)
Below is a sample chart of typical metric rivet nuts—mostly “standard” sizes. This can help you see common dimensions before diving into custom modifications.
| Thread Size | Body Diameter (mm) | Grip Range (mm) | Head Diameter (mm) | Head Thickness (mm) | Typical Material (Examples) |
|---|---|---|---|---|---|
| M3 | 4.0–4.2 | 0.5–1.5 | 6.5–7.0 | 0.8–1.0 | Aluminum, Steel |
| M4 | 5.0–5.2 | 0.5–2.0 | 8.0–8.5 | 1.0–1.2 | Steel, Stainless |
| M5 | 6.8–7.0 | 0.5–3.0 | 9.5–10.0 | 1.0–1.3 | Steel, Stainless, Aluminum |
| M6 | 8.8–9.0 | 0.5–3.5 | 11.0–11.5 | 1.2–1.5 | Steel, Stainless, Aluminum |
| M8 | 10.8–11.0 | 1.0–5.0 | 14.0–14.5 | 1.2–1.6 | Steel, Stainless |
| M10 | 12.8–13.0 | 1.0–5.0 | 16.0–16.5 | 1.3–1.7 | Steel, Stainless |
| M12 | 14.8–15.0 | 1.0–5.0 | 18.0–18.5 | 1.4–1.8 | Steel, Stainless |
(Table 3: Typical rivet nut metrics. Actual specs vary by manufacturer.)
These values are rough guidelines. When we go custom, we might enlarge the head diameter to improve load distribution, or we might extend the grip range by lengthening the body.
2. Example Tolerance Guidelines
Tolerances can make or break an assembly, especially if your rivet nuts need to interface with other precision parts. Below is an example tolerance matrix that I’ve used as a starting point.
| Feature | Typical Tolerance | Notes |
|---|---|---|
| Outer Diameter | ±0.05 mm | For simpler round bodies; can tighten if needed |
| Head Diameter | ±0.08 mm | If aesthetics or flush fit is crucial |
| Thread Pitch | ±0.03 mm | Fine threads may need tighter control |
| Head Thickness | ±0.05 mm | Important for countersunk or flush designs |
| Grip Length | ±0.1 mm | Some wiggle room might be acceptable |
| Concentricity | 0.05 mm TIR (max) | Thread center vs. outer body center |
| Surface Finish | As specified (Ra µm) | If friction or sealing is critical, define Ra |
(Table 4: Representative tolerance guidelines for custom rivet nuts. Adjust as needed.)
If you’re in aerospace or medical device manufacturing, you might see even tighter tolerances on critical features. Always talk with your supplier about which tolerances are feasible at each stage—cold heading vs. CNC turning vs. secondary ops.
3. Sample Technical Drawing Template (Description)
When I create a technical drawing for a rivet nut, I try to include:
- Front View: Showing overall length, body diameter, head diameter, and thickness.
- Section View: Cutting through the center to illustrate the internal thread, depth, any transitions, chamfers, or undercuts.
- Callouts for Tolerances: Next to each critical dimension.
- Material Specification: The exact alloy (e.g., “304 Stainless Steel, HRB ≤ 90”).
- Surface Finish: “Zinc-plated (10–15 µm thickness)” or “Anodized – color X, thickness Y.”
- Revision History: So changes can be tracked.
If your rivet nut needs knurling or hex segments, show a detail view that zooms in on that feature. Label the angles, the knurl depth, and any radius transitions.
Below is a short textual representation of what such a drawing might reference (this isn’t an actual blueprint, just a guideline):
Title: Custom Rivet Nut – Model RN-XYZ-001
Material: 6061 Aluminum (T6 temper)
Finish: Clear Anodizing (5–10 µm)
Dimensions:
- Outer Body Diameter: 9.00 ± 0.05 mm
- Head Diameter: 11.50 ± 0.05 mm
- Head Thickness: 1.20 ± 0.05 mm
- Total Length: 16.00 ± 0.10 mm
Thread: M6 x 1.0, Depth 10.0 mm, Tolerance Class 6H
Features:- Knurled Section: 6.0 mm length from underside of head
- Undercut: 0.5 mm radius beneath head
Notes:
- Edges to be free of burrs.
- Concentricity between internal thread and outer body: 0.05 mm TIR max.
- All dimensions in millimeters.
That’s just an example. You can adapt it to your specific needs. If you want a hex body, show a top view that clarifies the flat-to-flat distance and angle references.
4. Reference for Knurled vs. Hex Body
One of the common design decisions is knurled vs. hex to prevent spin-out. Both approaches aim to lock the rivet nut in place, but they differ in how they engage the surrounding material.
- Knurled: Small ridges pressed or machined around the cylinder. Better for soft materials or where you don’t want to remove too much base material (a simple round hole can suffice).
- Hex: A full or partial hex profile that requires a hex-shaped hole. Provides very strong anti-rotation but demands more precise hole creation in the workpiece.
The table below offers a quick comparison:
| Feature | Knurled Body | Hex Body |
|---|---|---|
| Hole Shape | Round hole | Hexagonal hole |
| Anti-Rotation | Good (depends on friction) | Excellent (mechanical lock) |
| Installation | Simpler, standard hole | More complex, needs hex punch |
| Material Use | Common in metal/plastics | Typically metal panels |
| Cost Implication | Lower (no special punch) | Higher (custom punch/dies) |
(Table 5: Knurled vs. hex body comparison.)
5. Example Installation Drawings
While not everyone includes installation diagrams in a rivet nut’s technical file, it’s often beneficial to visualize how the rivet nut deforms. A simple cross-sectional diagram might show:
- The pre-drilled hole in the panel.
- The rivet nut inserted, with its flange resting on the surface.
- An illustration of the rivet nut after it’s pulled and collapsed behind the panel.
Marking the ideal grip thickness range on that diagram helps end-users know if their panel is too thick or too thin.
6. Guidelines for CAD File Submission
When you’re collaborating with a supplier, 3D CAD models reduce ambiguity. I usually provide:
- A STEP or IGES file for universal compatibility.
- A PDF of the 2D drawing with callouts.
- Any special notes about thread standards or surface finishes not easily captured in the 3D model.
To minimize confusion, align your model’s zero point or origin with a logical reference (like the rivet nut’s center axis). Label major planes or sketches so your supplier’s team can interpret them correctly in their CAM software.
7. Real-World Example: File Sharing & Revision Control
I once worked on a project that included multiple rivet nut designs for different panel thicknesses. We used a file naming convention like:
RN-AL6-ShortGrip-V1.1.STEP
RN-AL6-LongGrip-V1.1.STEP
We also had a shared revision log, so if we changed something—like the head diameter or the thread relief length—we’d increment the version. The supplier always knew which version to produce. That saved us from the nightmare of mixing up old and new designs on the shop floor.
8. Quick Tips for Appendix Use
- Always Double-Check Dimensions: Using standard reference tables is helpful, but each manufacturer might have slight differences in their “standard” rivet nuts.
- Document Everything: The more information you put on the drawing or model, the fewer phone calls or emails you’ll get from a confused production engineer.
- Plan for Installation Clearances: If you’re adding a big flange, ensure your assembly has enough space to accommodate it.
- Include Tolerance Stacks: If your final assembly is extremely tight, factor in the potential variation of the rivet nut, the panel thickness, and the hole diameter.
9. Conclusion of Chapter 9
This appendix provides a snapshot of the specs, tables, and drawing practices I’ve found most useful in custom rivet nut projects. Of course, every situation differs. Some people need deeper data on heat treatment curves, others might require specialized finishing instructions.
But even a basic reference like this can help you organize your thoughts before reaching out to suppliers or starting your in-house production. Rivet nuts are small components with significant implications—so clarity in your documentation ensures you get exactly what you need, whether you’re going for a knurled aluminum rivet nut or a hex-bodied stainless solution.
FAQ
- What is a rivet nut, and how does it differ from a normal nut?
A rivet nut is a blind fastener with internal threads, allowing you to install it from one side of a workpiece. A normal nut requires backside access. - Can I customize the head diameter and shape of a rivet nut?
Yes. You can create larger flanges, countersunk heads, or special contours to match your application. - How do I choose the right material for my rivet nut?
Consider factors like corrosion exposure, required load capacity, and budget. Common choices include steel, stainless steel, and aluminum. - What’s the typical lead time for a custom rivet nut order?
It varies. Simple designs might take 3–4 weeks. More complex projects with new tooling can extend to 8–12 weeks or more. - Why are some rivet nuts knurled?
Knurling increases grip in the hole and helps resist spin-out, especially in softer materials. - Is it possible to install rivet nuts automatically on an assembly line?
Yes. Many automotive plants use pneumatic or hydraulic rivet nut setters integrated with robotic arms for speed and consistency. - Can I anodize a steel rivet nut?
Anodizing is typically for aluminum. Steel is usually plated or coated (zinc, e-coat, etc.) to prevent corrosion. - What’s the difference between open-end and closed-end rivet nuts?
Open-end rivet nuts have an opening at the bottom for the bolt or screw to pass through. Closed-end rivet nuts are sealed, preventing liquids or debris from entering. - Can I use rivet nuts in plastic or composite panels?
You can, but you need to ensure the panel can handle the installation forces and that the rivet nut’s design (e.g., knurled or large flange) provides enough grip. - What if I need a left-hand thread?
That’s possible by adjusting the threading operation. CNC machining is best for such custom requests. - How do I prevent stripping the threads in a softer material like aluminum?
Use a higher-quality screw with proper lubrication if necessary, and avoid overtightening. You can also increase the thread engagement length in your rivet nut design. - Are rivet nuts reusable?
Yes, the rivet nut stays in place. You can insert and remove the screw multiple times as long as the threads are not worn out. - Do I need special tools to install a rivet nut?
A dedicated rivet nut setting tool (manual, pneumatic, or hydraulic) is typically required. A simple pop-rivet gun won’t work because rivet nuts require a specific pull force and thread engagement. - Can rivet nuts be used for high-load or high-vibration environments?
Yes, if you select an appropriate material, design (like hex body for anti-rotation), and proper grip range. Automotive and aerospace industries often rely on rivet nuts in harsh conditions. - What if my design changes after we start production?
If you’re using cold heading with custom tooling, changes can be expensive and time-consuming. If it’s a CNC-based process, you can modify the program more easily, but it still adds cost and potential delays. - Is there a standard for rivet nut threads?
Threads typically follow metric (ISO) or imperial (UNC/UNF) norms. Check your region’s standards or your customer’s requirements. - Can I color-code my rivet nuts for different sizes or brand identity?
Yes, especially if you choose aluminum and have them anodized. Steel rivet nuts can be painted or coated with a color finish, though it’s slightly more complex.
Conclusion & Authoritative References
I’ve shared a lot of my personal insights on rivet nut manufacturing, from material selection to CNC machining and beyond. While this guide captures my own experiences, I also encourage you to explore some well-regarded sources to deepen your understanding of rivet nut technology, design guidelines, and machining principles. Here are several knowledge-based websites you can consult directly (they are not commercial sellers but rather informational or educational platforms):
- Rivet Nut (Wikipedia)
https://en.wikipedia.org/wiki/Rivet_nut- Provides an overview of the rivet nut concept, its basic types, and general applications.
- Threaded Insert (Wikipedia)
https://en.wikipedia.org/wiki/Threaded_insert- Explores various inserts and how rivet nuts compare to other threaded inserts.
- Numerical Control (Wikipedia)
https://en.wikipedia.org/wiki/Numerical_control- Explains the fundamentals of CNC (Computer Numerical Control), helpful for understanding custom rivet nut machining processes.
- NASA Technical Reports Server (NTRS)
https://ntrs.nasa.gov- Search for fastener or rivet-related technical documents. NASA’s research can offer insights into extreme performance requirements, materials, and advanced engineering methods.
- AZoM – Materials Science
https://www.azom.com- Offers articles on metals, alloys, and surface treatments that may be relevant to custom rivet nut manufacturing and corrosion resistance.
I find these sources helpful in validating design decisions, checking mechanical data, or exploring innovative approaches to rivet nut production. They also provide a more formal, broad perspective on the topics I’ve discussed here. Feel free to dive deeper into any area that sparks your curiosity—rivet nut technology is continually evolving, and there’s always more to learn.
Thanks for reading, and I hope these references help you further your rivet nut projects. If you ever have questions that go beyond what’s covered here, I encourage you to reach out to engineering communities or specialized forums armed with the fundamentals you’ve learned.
Good luck with your custom rivet nut journey!
Other Articles You Might Enjoy
- Mastering CNC Drilling: Creating Exact Fits for Pull Through Rivets
CNC machining has become an essential part of modern manufacturing, offering unmatched precision and efficiency. One of the most critical aspects of CNC machining is drilling, particularly when creating holes…
- Types of Rivets: A Comprehensive Guide
Introduction: The Critical Role of Rivets in Multiple Industries Rivets are permanent mechanical fasteners that are critical in the assembly of everything from simple structures to complex machinery across numerous…
- Nuts and Bolts Machining Explained: Methods, Standards, and CNC Tips
Introduction: Why Nuts and Bolts Are More Complex Than They Look If you’ve ever walked into a machine shop or looked at a mechanical assembly, you’ve probably noticed one thing…
- Precision Lock Washer Manufacturing: Best Practices, Challenges, and Solutions
I. Introduction If you've ever assembled machinery or mechanical equipment, you know how crucial small components like the lock washer can be. Despite its small size, a lock washer plays a huge…
- Understanding Screw Head Types : Design, Standards, CNC Machining & Optimization
I. Introduction I’ve worked with many different screw head types throughout my career in manufacturing. I remember the first time I had to figure out why a certain screw head…
- Brass Screws Custom Machining Guide: Techniques, Tools, and Best Practices
Introduction Brass screws are among the most popular fasteners used across various industries due to their unique combination of aesthetics, corrosion resistance, and excellent machinability. If you're considering CNC machining…
- Stainless Steel Fasteners: What Designers and CNC Machinists Must Know
Why Stainless Steel Fasteners Matter in CNC Applications As someone who has spent significant time around CNC machines and designing mechanical assemblies, I've learned one critical truth: the smallest parts…
- Choosing the Right Metal Fasteners: A Practical Guide for CNC Customization or Purchasing
Introduction: Why Metal Fasteners Matter in CNC Projects If you're involved in CNC machining or design, you've likely realized metal fasteners aren't just a small detail. They're often the deciding…