I. Introduction
Creating resin molds has become one of my favorite ways to turn unique ideas into physical reality. Resin molds allow creators like us to reproduce detailed items, ranging from jewelry and keychains to art objects and prototypes. Over the past few years, I’ve seen resin art explode on social media, craft fairs, and online marketplaces like Etsy. This has turned resin molds into a necessity for artists and small business owners.
But if you’re anything like me when I first started, you probably struggled with choosing the right resin molds. Silicone molds were great at first, but soon I noticed their limitations—especially in precision, durability, and reusability. That’s when I discovered CNC machining for making resin molds, and it completely changed my workflow.
In this comprehensive guide, I’ll show you exactly how to make precise resin molds using CNC technology. We’ll dive deep into the entire process—design, machining, materials selection, and even finishing. By the end of this guide, you’ll have everything you need to start producing high-quality resin molds right at home or in your workshop.
II. Understanding Resin Molds
Before diving into CNC, let’s clarify some basics about resin molds. When I talk about resin molds, I mean specifically the form or template that we use to shape liquid resin into solid, detailed parts. These molds are crucial because they determine the quality and appearance of the finished piece.
Common Types of Resin Molds:
In my experience, resin molds usually come in several categories:
- Open-face molds: simple, one-sided, used mostly for jewelry pendants or coasters.
- Two-part molds: used for 3D items like figurines or complex shapes.
- Flexible molds: typically silicone, easy to demold but not always highly precise.
- Rigid molds: plastic or metal, providing high precision and durability.
Each type has pros and cons, and here’s a quick overview from my own trials:
| Mold Type | Material | Precision | Durability | Cost | Reusability |
|---|---|---|---|---|---|
| Open-face flexible | Silicone | Medium | Medium | Low | Medium |
| Two-part flexible | Silicone | Medium | Low | Medium | Medium-low |
| Open-face rigid | CNC Plastic/Aluminum | High | High | Medium | High |
| Two-part rigid | CNC Aluminum | Very High | Very High | High | Very High |
| Hybrid molds | CNC + Silicone | High | Medium-high | Medium | Medium-high |
| 3D-printed molds | Resin or Plastic | Medium-low | Medium-low | Low | Low |
As you can see, CNC-machined rigid molds clearly excel when precision, durability, and repeated use are priorities.
Key Design Principles I’ve Learned:
When designing resin molds, a few things have made a huge difference in my outcomes:
- Draft Angles: Slight angles (usually 1°-3°) on mold walls to ensure smooth demolding.
- Parting Lines: Careful placement where mold halves meet to avoid visible seams.
- Surface Finish: The smoother the mold surface, the clearer and shinier the final resin product.
- Tolerance Control: Precise dimensions matter, especially if you’re making functional parts.
Initially, I overlooked these principles and had to discard several batches of resin. Over time, incorporating these aspects improved my results dramatically.
Why Material Matters in Resin Molds
The choice of material significantly affects how resin molds perform. Let me share a quick comparison based on my experiments:
| Mold Material | Precision | Durability | Ease of Use | Cost | Suitable For |
|---|---|---|---|---|---|
| Silicone | Medium | Medium | High | Low | Jewelry, simple crafts |
| Plastic CNC | High | High | Medium | Med | Home-based batch production |
| Aluminum CNC | Very High | Very High | Medium | High | Professional molds, industrial use |
| 3D Printed | Low-med | Low-med | High | Low | Prototyping, basic DIY projects |
| HDPE CNC | High | High | Medium-high | Med | Durable home workshop use |
| PMMA CNC | Very High | Medium-high | Medium | Med | Crystal-clear, glossy castings |
After switching to CNC-machined aluminum and HDPE molds, I never turned back to silicone for detailed projects.
Why Choose CNC Machining for Resin Molds?
So, why exactly did I move from silicone to CNC? It boils down to these key advantages:
- Precision: CNC milling can achieve tolerances as tight as ±0.001 inches—perfect for detailed jewelry and intricate items.
- Durability: CNC molds can last hundreds or thousands of casts without degrading. In contrast, silicone molds often deteriorate after several dozen uses.
- Surface Finish: CNC molds, especially when polished, produce incredibly glossy finishes. I struggled for months trying to get that mirror shine with silicone, but CNC made it easy.
- Reusability: I now run batches efficiently without constant replacement or repair.
In the next sections of this guide, I’ll take you step-by-step through the entire CNC mold-making process. We’ll look at choosing materials, designing molds, running the CNC machine, and achieving the perfect finish.
III. Why Use CNC for Resin Mold Making?
When I first started making resin molds, I used silicone molds exclusively. They were affordable, easy to use, and widely available. But as my projects became more ambitious and detailed, silicone molds often fell short. For instance, when creating jewelry or detailed art pieces, precision was critical—and silicone molds didn’t always deliver consistent results.
That’s when I discovered CNC machining for resin molds. CNC, or Computer Numerical Control, uses automated, computer-guided cutting tools to carve molds from solid blocks of material like plastic or aluminum. After my first CNC resin mold, the differences in quality and precision were so remarkable, I wondered why I’d waited so long.
Precision and Accuracy
One of the biggest advantages I noticed with CNC-machined resin molds was the extraordinary precision achievable. CNC machines operate on digital designs, cutting with remarkable accuracy—often to within ±0.001 inches (±0.025 mm). For my intricate jewelry designs and complex artistic pieces, this precision became a game-changer.
With silicone molds, slight distortions occurred regularly, especially after multiple casts. Details would become blurry, edges less defined. By contrast, CNC molds consistently retained their precise shapes. Here’s a direct comparison from one of my recent projects:
| Mold Type | Accuracy | Detail Preservation | Typical Error Margin |
|---|---|---|---|
| Silicone molds | Moderate | Degrades over use | ±0.02–0.05 inches |
| 3D printed molds | Moderate-Low | Surface imperfections | ±0.01–0.03 inches |
| CNC resin molds | Extremely High | Consistent | ±0.001 inches |
The measurable precision from CNC molds significantly enhanced the overall quality of my resin products.
Durability and Longevity
Durability is another key reason why I shifted to CNC-made resin molds. I remember a project where I made custom keychains. Using silicone molds, I found myself constantly replacing molds after just 30-50 casts. The molds began degrading, tearing, or deforming under repeated stress.
By contrast, my CNC-machined aluminum molds lasted hundreds—even thousands—of casts without significant wear. For someone like me who does small-batch production, this meant reduced downtime and costs.
Here’s a summary of my experience with durability:
| Mold Material | Maximum Effective Casts | Common Issues Encountered |
|---|---|---|
| Silicone | 50-100 | Tears, deformation, loss of detail |
| CNC Aluminum | 1000+ | None significant, minimal wear |
| CNC Plastic | 300-500 | Surface scratches, minor warping |
| 3D Printed | 20-50 | Layer delamination, distortion |
Switching to CNC molds was like investing in quality tools: higher upfront costs, but huge savings in the long run.
Surface Quality and Finish
Another benefit I love about CNC molds is the superior surface finish. Resin castings mirror the mold’s surface directly. With silicone molds, achieving glossy, glass-like finishes took a lot of post-processing—sanding, polishing, or coating the resin afterward. Even then, consistency was tough.
CNC molds changed everything. By using CNC-machined molds polished to mirror finishes, I drastically reduced post-processing. Resin poured into CNC-polished molds consistently yielded flawless, glossy finishes straight out of the mold.
Scalability and Repeatability
As my resin projects expanded, CNC molds allowed easy scalability. Instead of creating multiple silicone molds—which were prone to variations—I designed multi-cavity CNC molds. Each cavity was identical, ensuring every cast had the same quality.
With CNC molds, you program once, cut multiple identical cavities, and scale your production efficiently. This consistency and scalability made CNC resin molds ideal for small businesses and serious hobbyists alike.
Flexibility in Design
CNC machining also gave me total control over mold design. Complex shapes, undercuts, or precise cavities that were challenging with silicone molds became straightforward. CNC machining can handle intricate details and tight tolerances effortlessly, unlocking creative possibilities previously unavailable to me.
Overall, CNC resin molds delivered precision, consistency, longevity, and freedom that transformed my resin-casting projects. Though the initial investment was higher than silicone molds, the long-term benefits—precision, reduced costs, and greater flexibility—far outweighed initial costs.
IV. Design Workflow for CNC-Made Resin Molds
When designing resin molds for CNC machining, following a structured workflow made my process seamless. Here, I’ll share my personal workflow—from concept sketch to ready-to-machine mold files.
Step 1: Idea and Concept Development
Every mold starts with an idea. Often, I’ll sketch my concepts by hand first. For more complex designs—like jewelry or detailed figurines—I start with rough sketches to explore shapes, dimensions, and details.
Once I have clear concepts, I move to digital design. For beginners, software like Fusion 360 is intuitive and user-friendly. It’s my go-to software because it integrates CAD and CAM, allowing easy transitions from design to machining.
Step 2: Digital CAD Design
In this stage, I transfer my sketches into CAD software to create precise, dimensioned 3D models. Several points I always keep in mind:
- Draft angles: For ease of demolding, I use 1°–3° angles on vertical surfaces.
- Wall thickness: Ensuring minimum wall thickness of at least 0.125 inches (3mm) prevents distortion during machining.
- Shrinkage allowance: Resin shrinks slightly when curing. I typically add about 0.5%–2% extra dimensions, depending on resin type.
Here’s an example of shrinkage allowance guidelines from my experience:
| Resin Type | Shrinkage Rate | Recommended Allowance |
|---|---|---|
| Epoxy Resin | ~0.5%–1.0% | Add 0.75% to design |
| Polyurethane Resin | ~1.0%–2.0% | Add 1.5% to design |
| UV Resin | ~0.5% | Add 0.5% to design |
| Polyester Resin | ~1.5%–2.5% | Add 2% to design |
| Casting Acrylic | ~2% | Add 2% to design |
| Silicone-Resin Hybrids | ~1%–1.5% | Add 1% to design |
I learned the importance of shrinkage allowances the hard way after a batch of resin pendants came out slightly smaller than intended.
Step 3: Designing Mold Features (Vents, Gates, and Pins)
Successful resin molds need specific design features:
- Venting channels: Small channels (typically 0.02–0.05 inches wide) allow trapped air to escape, preventing bubbles in finished resin products.
- Gates and sprues: Openings through which resin enters the mold cavity, typically slightly wider than vents.
- Locating pins: Essential for aligning two-part molds perfectly.
Missing these elements in early designs resulted in trapped bubbles or misaligned castings, significantly increasing post-processing effort. Incorporating them into my mold designs from the start made the process far smoother.
Step 4: CAM Programming
Once the CAD design is complete, the next step is CAM (Computer-Aided Manufacturing). Here, I program how the CNC machine will cut the mold from the material block. Fusion 360 provides built-in CAM tools, simplifying toolpath generation. Key considerations:
- Tool selection: End mills, ball mills, and engraving bits vary according to detail needed.
- Feed rate and spindle speed: Critical for surface finish and tool life.
- Cutting strategy: Roughing first to remove large volumes of material, finishing pass for detail.
Careful programming ensures efficiency and high-quality molds.
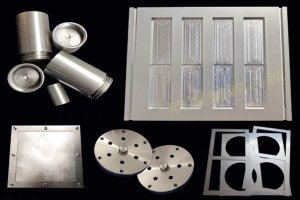
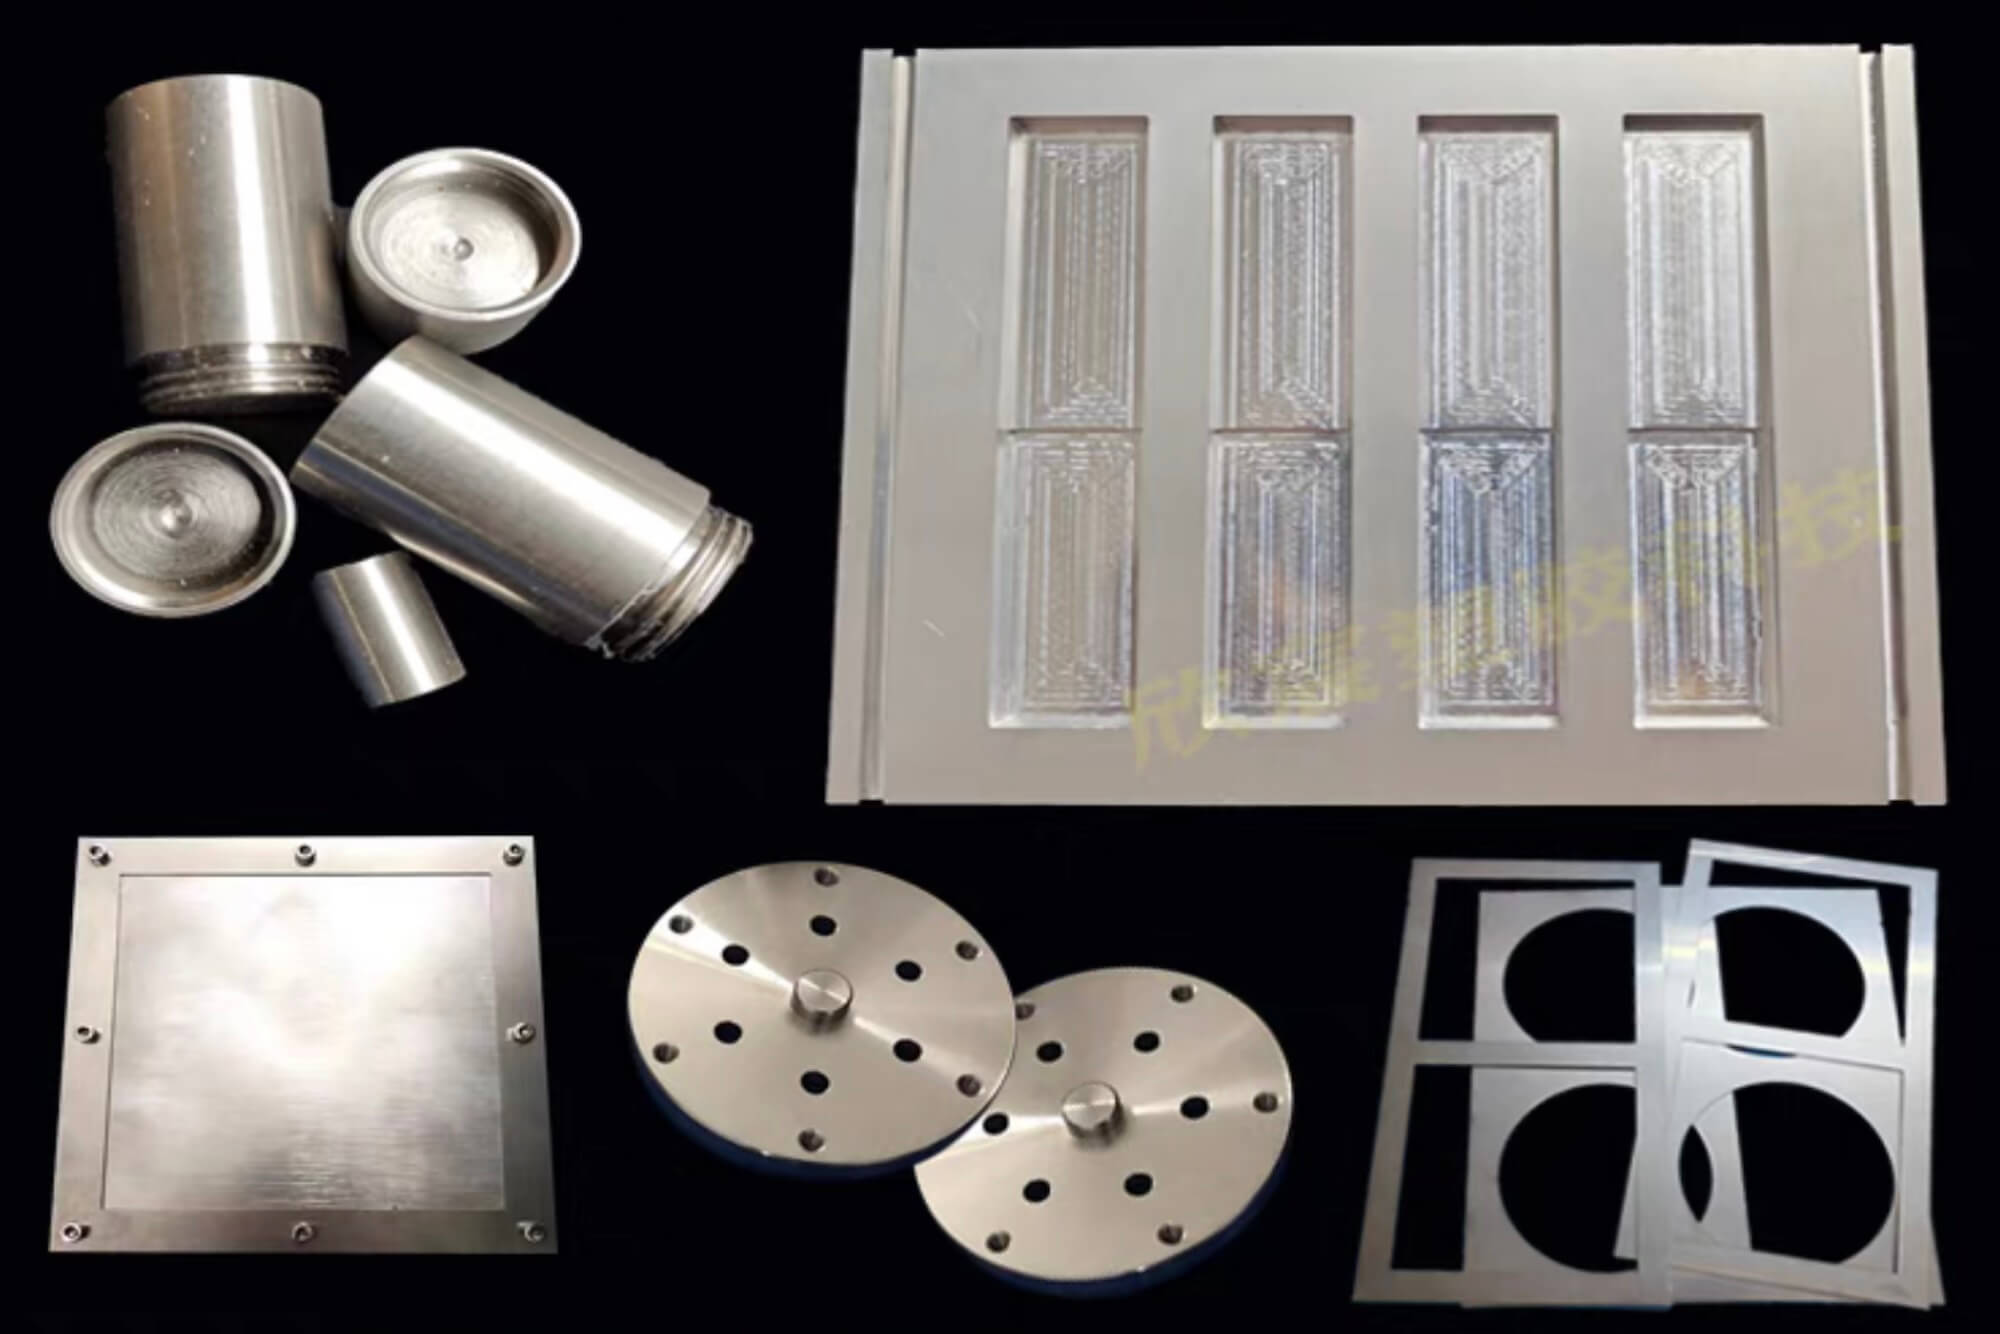
V. CNC Machining Process for Resin Molds
After designing and programming your resin molds in CAD and CAM software, it’s time for CNC machining. In my experience, mastering this part significantly improved my resin molds’ precision, durability, and overall quality. Here’s exactly how I approach CNC machining to create exceptional resin molds every time.
Step 1: Choosing the Right Material for Resin Molds
When I started CNC machining resin molds, choosing the right material was crucial. The material directly impacts mold durability, detail retention, and ease of use. After extensive trials, here’s what I found:
| Material | Precision | Durability | Machinability | Cost | Best For |
|---|---|---|---|---|---|
| Aluminum | Excellent | Excellent | Moderate | High | Industrial-quality resin molds |
| HDPE Plastic | Good | Very Good | Easy | Medium | Durable molds for frequent reuse |
| Acrylic (PMMA) | Excellent | Good | Moderate | Medium | High-gloss finish molds |
| Delrin (POM) | Very Good | Excellent | Easy | Medium | Small, intricate jewelry molds |
| PVC | Good | Good | Easy | Low | Budget-friendly detailed molds |
| MDF | Moderate | Low | Very Easy | Low | Prototypes, single-use mold trials |
For high-volume and precision, aluminum and Delrin became my go-to materials. Acrylic was ideal when surface finish mattered most.
Step 2: Setting Up Your CNC Machine
Proper setup of your CNC machine is essential for accurate resin molds. Here’s the process I follow closely:
- Secure Material: I use clamps or double-sided tape to ensure stability during machining. Any slight movement can ruin a mold.
- Set Tooling Parameters:
- End mills for rough cuts (e.g., 1/4-inch)
- Ball nose mills for finishing (1/8-inch or smaller)
- Engraving bits for intricate details
- Zeroing Your Machine: I always carefully set my machine’s zero points (X, Y, Z) before starting. Accuracy here ensures dimensional correctness.
Step 3: Cutting Strategy for Resin Molds
A well-planned cutting strategy ensures precise molds and extends tool life. Through experience, I’ve found this strategy works best:
- Roughing Passes:
Quick removal of excess material with larger end mills.- Spindle speeds: 12,000–16,000 RPM
- Feed rates: 60–100 IPM (inches per minute)
- Finishing Passes:
Slower, more precise cuts using smaller ball mills or tapered bits.- Spindle speeds: 16,000–20,000 RPM
- Feed rates: 30–50 IPM
Here’s my typical CNC setting chart for making detailed resin molds:
| Operation | Tool Diameter | Spindle RPM | Feed Rate (IPM) | Pass Depth |
|---|---|---|---|---|
| Roughing | 1/4″ | 14,000 | 80 | 0.125″ |
| Semi-Finishing | 1/8″ | 16,000 | 50 | 0.040″ |
| Finishing | 1/16″ | 18,000 | 35 | 0.010″ |
| Engraving | 1/32″ | 20,000 | 20 | 0.005″ |
| Polishing | 1/16″ ball | 20,000 | 20 | 0.002″ |
Using these settings, I achieved consistent accuracy and mold detail preservation.
Step 4: Inspecting and Testing the Mold
After machining, I carefully inspect each mold. I look for imperfections—uneven surfaces, burrs, or unwanted tool marks. Typically, minor imperfections are easily resolved with manual sanding (fine grit sandpaper 400–2000) and polishing compounds.
The inspection process ensures your resin molds produce perfect casts consistently.
Step 5: Surface Finishing for Perfect Resin Molds
Surface finish directly influences resin mold quality. To achieve crystal-clear, glossy resin products without extra post-processing, I polish my molds extensively:
- Sand mold surfaces progressively from 400 to 2000 grit wet sandpaper.
- Finish polishing with automotive polishing compound or fine plastic polish.
- For aluminum molds, a final metal polish or buffing compound provides mirror-like finishes.
In my experience, polished CNC molds significantly reduce resin casting post-processing—saving time and improving quality.
VI. Use Case Examples of CNC Resin Molds
Throughout my journey creating resin molds, several projects highlight CNC machining’s unique advantages. Here are three examples showing real-world applications of CNC resin molds that significantly improved my creations.
Example 1: Resin Jewelry—Intricate Pendants and Charms
Jewelry molds require ultra-high precision and exceptional detail. Silicone molds previously limited the clarity of delicate patterns.
After switching to CNC-machined aluminum molds, intricate pendant designs became sharp and consistent. My necklace charms had clearer edges, detailed engraving, and mirror finishes straight from the mold. My online customers immediately noticed—and sales increased dramatically.
Example 2: Custom Coasters and Home Decor
For resin coasters with intricate geometric or floral designs, precision molds are vital. I struggled initially with silicone molds; designs wore quickly, and edges blurred.
By using CNC-cut HDPE plastic molds, I consistently produced sharp, clear patterns. Coasters were repeatable in high quality, reducing product defects. This boosted my efficiency and customer satisfaction.
Example 3: Small-scale Industrial Prototyping
A local electronics startup asked me to help create resin molds for rapid prototyping small components. The molds needed exact dimensions and durability for multiple castings.
Using CNC aluminum molds, we achieved exact tolerances required for fitting electronic parts. CNC molds lasted hundreds of cycles—far surpassing initial silicone prototypes. This success secured me ongoing orders and expanded my customer base into industrial prototyping.
Each example illustrates CNC molds’ unmatched benefits—accuracy, durability, repeatability—that traditional methods simply couldn’t provide.
VII. CNC vs. Other Mold Making Methods for Resin Molds
Throughout my journey creating resin molds, I’ve experimented with several different mold-making methods. Each technique has strengths and weaknesses, but CNC machining consistently stands out in ways that others simply can’t match.
Let’s break down how CNC-made resin molds compare with other popular methods based on real-world experience.
Silicone Resin Molds vs. CNC Resin Molds
Silicone molds were my starting point. They’re inexpensive and easy to make, perfect for beginners or simple designs. However, when I moved toward more professional, detailed projects, silicone molds revealed significant limitations:
- Durability Issues: Silicone molds degrade quickly. After 40–50 casts, molds tore or lost detail.
- Limited Precision: Complex designs lose clarity over time, reducing quality.
- Surface Finish: Silicone molds rarely achieve perfect gloss without extra finishing work.
CNC resin molds resolved these problems instantly. The detailed precision remained consistent after hundreds or even thousands of casts. CNC molds eliminated constant mold replacements, lowering long-term costs significantly.
3D Printed Resin Molds vs. CNC Resin Molds
When I first got into mold-making, 3D printing seemed like an exciting option. Easy, accessible, and low cost—what’s not to like? Unfortunately, I quickly encountered limitations:
- Surface Imperfections: Visible layer lines from printing left uneven surfaces. Significant sanding and finishing were always required.
- Limited Durability: Printed molds warped or degraded quickly after minimal usage.
- Precision Constraints: Small details often blurred, especially after repeated resin casts.
In comparison, CNC molds delivered consistent, ultra-smooth finishes and unparalleled precision. The initial investment was higher, but the long-term savings in labor and materials far outweighed the upfront costs.
Injection-Molded vs. CNC Resin Molds
Injection molds represent the industrial standard for large-volume manufacturing. But injection molding requires expensive tooling and isn’t practical for low to medium-scale production, such as my resin projects.
| Criteria | Injection Molds | CNC Resin Molds |
|---|---|---|
| Initial Cost | Very High | Moderate |
| Scalability | Excellent | Good |
| Small-Run Costs | Very High | Low |
| Flexibility | Limited | Excellent |
| Detail Quality | Excellent | Excellent |
| Lead Time | Weeks-Months | Days-Weeks |
For small businesses or creators like me, CNC machining offered professional-quality molds without injection molding’s enormous upfront costs.
Hybrid Mold Systems (CNC + Silicone)
Combining CNC machining and silicone has also been beneficial. In my projects, I often use CNC-machined rigid molds as masters for creating silicone molds. This hybrid approach blends CNC precision with silicone’s ease-of-use and flexibility. It’s particularly useful when creating limited-run products with intricate details requiring both precision and flexibility.
When is CNC the Clear Winner?
Based on extensive experience, CNC resin molds are ideal when:
- Precise detail is crucial (e.g., jewelry, small parts, art).
- Durability and repeated use are needed.
- Consistent quality in small-batch production is essential.
- Time-consuming post-processing should be minimized.
My Verdict:
CNC machining for resin molds offers unmatched precision, durability, and scalability. While initial investments seem high, the long-term savings and superior results quickly justify the cost. For creators serious about resin crafting—whether hobbyist or professional—CNC resin molds provide unmatched value.
VIII. Getting Started as a Beginner with CNC Resin Molds
I remember clearly when I first began working with CNC machining for resin molds—it seemed intimidating at first. But once I took the plunge, CNC machining quickly became manageable, practical, and rewarding. Let me share my best tips and resources to help you smoothly enter the world of CNC resin mold making.
Tip #1: Choosing a Beginner-Friendly CNC Machine
Starting with a simple yet reliable CNC machine is crucial. Based on my personal experience, here are some excellent starter CNC machines suited for creating resin molds at home or in small workshops:
| CNC Machine Model | Work Area (X/Y/Z) | Materials Supported | Price Range | Ease of Use |
|---|---|---|---|---|
| Shapeoko 4 | 17″x17″x4″ | Plastics, Aluminum | ~$1,800 | Very Easy |
| Inventables X-Carve | 29″x29″x4.5″ | Plastics, Aluminum | ~$2,200 | Easy |
| Onefinity CNC Woodworker | 32″x32″x5″ | Plastics, Aluminum | ~$2,500 | Easy |
| Genmitsu PROVerXL 4030 | 16″x12″x4″ | Plastics, Aluminum | ~$1,000 | Easy |
| Carbide 3D Nomad 3 | 8″x8″x3″ | Plastics, Aluminum | ~$2,800 | Very Easy |
| Snapmaker 2.0 A350T | 13″x13″x13″ | Plastics, Aluminum | ~$1,700 | Easy |
Personally, I started with the Shapeoko—it balanced affordability, ease of use, and capability. It gave me confidence quickly.
Tip #2: Easy-to-Learn Software for CNC Resin Mold Design
Software was another hurdle I initially struggled with. Fortunately, these user-friendly software options significantly simplified my CNC mold creation process:
- Fusion 360 (Recommended): Powerful, intuitive, free for hobbyists.
- Easel (Inventables): Great for beginners, limited capabilities.
- Vectric Aspire: Beginner-friendly, excellent tutorials, moderately priced.
Fusion 360 quickly became my favorite due to its integration of design and CAM (machining instructions) in one interface.
Tip #3: Learning Resources for CNC Resin Mold Making
When learning CNC machining, resources matter. Here’s what genuinely accelerated my progress:
- YouTube Channels:
- Carbide 3D Tutorials
- Winston Moy
- John Saunders (NYC CNC)
- Community Forums:
- CNC Zone
- Inventables Community Forum
- Shapeoko Forum
- Online Courses & Tutorials:
- Udemy: CNC Machining Courses
- LinkedIn Learning: Fusion 360 tutorials
These resources made CNC accessible, even fun.
Tip #4: Budgeting and Initial Investment
Budget wisely. While CNC resin molds cost more initially, they’re an investment in quality. My startup costs were around $3,000—including the CNC machine, cutting tools, materials, and software subscriptions. Within months, these investments paid off through reduced mold costs, improved product quality, and increased sales.
Tip #5: Start Simple, Then Scale
I initially tried complex molds immediately, which overwhelmed me. Starting with simple projects—basic open-face molds—built my confidence and skills progressively. Once comfortable, scaling to complex, multi-part molds became intuitive and manageable.
Encouragement for Beginners
CNC machining opened endless creative possibilities for my resin molds. With patience, planning, and gradual learning, CNC mold making can significantly elevate your craft. So, don’t be intimidated—get started, experiment, learn, and soon CNC resin molds will feel second nature.
IX. Advanced Tips and Techniques for CNC Resin Molds
Once you master the basics of creating resin molds with CNC machining, there’s room to refine and enhance your skills further. These advanced techniques helped elevate the quality and efficiency of my mold-making process significantly.
Multi-Cavity Resin Molds for Efficient Production
As my projects expanded, making one resin item at a time became inefficient. I began designing multi-cavity CNC resin molds, enabling simultaneous casting of multiple identical items.
Benefits of Multi-Cavity CNC Resin Molds:
- Increased Production Efficiency: Make several items in one pour.
- Consistent Quality: Identical mold cavities guarantee consistent product dimensions and finish.
When creating multi-cavity molds, precision alignment and spacing are critical. Always ensure at least 0.5–1 inch spacing between cavities for structural integrity and easy demolding.
Hybrid Mold Systems (CNC + Silicone Inserts)
Combining rigid CNC molds with silicone inserts is ideal for complex geometries requiring flexibility during demolding. I successfully implemented this method for intricate jewelry designs or decorative items with undercuts.
Here’s how it works:
- CNC-machined outer rigid mold provides structural integrity and precision.
- Internal silicone inserts allow flexible removal of complex shapes without damage.
Overmolding and Insert Molding with CNC Resin Molds
Overmolding involves casting resin around inserts (e.g., metal parts, magnets, or electronic components). I frequently use CNC molds to ensure precise alignment and professional-quality results.
Tips for Successful Overmolding:
- Design precise insert slots within your CNC mold.
- Secure inserts firmly before casting.
- Select resin compatible with your insert material.
Mold Temperature Control for Perfect Resin Castings
Temperature significantly affects resin curing. To achieve optimal results consistently, I control mold temperature carefully. CNC-machined aluminum molds excel at heat conduction, ensuring even curing throughout the resin casting.
Ideal Resin Mold Temperature Ranges:
| Resin Type | Optimal Mold Temp. Range |
|---|---|
| Epoxy Resin | 70°F–80°F (21°C–27°C) |
| Polyurethane Resin | 75°F–85°F (24°C–29°C) |
| UV-curing Resin | Ambient (68°F–77°F) |
| Polyester Resin | 70°F–80°F (21°C–27°C) |
| Casting Acrylic | 70°F–75°F (21°C–24°C) |
Controlled temperatures significantly improved the clarity and consistency of my resin products.
CNC Texturing for Creative Resin Effects
Beyond smooth finishes, CNC machining can add textures to resin molds for creative visual effects. Examples include geometric patterns, engraved designs, or embossed logos. CNC texturing instantly elevated my resin projects’ uniqueness and marketability.
X. Conclusion
Discovering CNC machining for resin molds profoundly transformed my creative and entrepreneurial journey. It offered precision, repeatability, durability, and endless design possibilities that traditional molds couldn’t deliver.
Initially intimidating, CNC mold-making quickly became an indispensable skill, boosting my craftsmanship quality and business profitability. While the upfront investment was significant, it paid for itself repeatedly through higher-quality products, lower production costs, and growing customer satisfaction.
If you’re considering taking your resin crafting to the next level, I wholeheartedly recommend diving into CNC-made resin molds. Embrace experimentation, stay patient through early learning curves, and let your creativity lead you. The results, I promise, are absolutely worth it.
Your first CNC resin mold might be closer than you think. Start simple, learn continuously, and soon you’ll master precision mold-making, transforming your artistic ideas into tangible reality.
FAQ
- Can beginners use CNC machines for resin molds?
Yes, absolutely. Modern desktop CNC machines and user-friendly software have made CNC mold-making accessible even for beginners. - How expensive is CNC mold-making equipment?
Starter CNC setups typically range from $1000–$3000. Professional machines cost more but offer greater precision and durability. - What’s the best CNC machine for beginners?
Machines like Shapeoko 4 or Inventables X-Carve are excellent entry-level choices. - How long do CNC-made resin molds last?
CNC aluminum molds can last thousands of uses; plastic CNC molds typically last hundreds. - Are CNC resin molds better than silicone molds?
For precision, durability, and repeated usage, CNC molds significantly outperform silicone molds. - Which materials can I use in CNC molds?
Ideal CNC mold materials include aluminum, HDPE, acrylic (PMMA), Delrin (POM), and PVC. - Can CNC molds handle complex shapes?
Yes, CNC machining easily creates intricate geometries, though extreme undercuts may require hybrid silicone inserts. - Do CNC molds require special care?
Minimal. Keep clean, occasionally polish, and store carefully to maintain surface quality. - Can CNC molds be modified after machining?
Yes, minor adjustments can be made by sanding or further CNC machining. - What software is best for CNC mold design?
Fusion 360 is an excellent, beginner-friendly software combining powerful CAD/CAM features. - How can I ensure resin doesn’t stick to CNC molds?
Use mold release agents or choose materials like aluminum and HDPE which resist resin adhesion naturally. - How much shrinkage should I anticipate in resin molds?
Resins typically shrink between 0.5%–2%. Adjust CAD designs accordingly. - What safety precautions are essential with CNC molds?
Always wear safety glasses, hearing protection, dust masks, and maintain proper ventilation. - Can CNC resin molds handle high temperatures?
Aluminum molds withstand high temperatures easily, ideal for heat-curing resins. - Where can I find CNC mold-making communities or inspiration?
Online forums like CNC Zone, Shapeoko forums, Facebook groups, YouTube tutorials, and platforms like Reddit offer active communities.
References & Further Reading
To support the insights shared in this guide and provide additional depth for readers interested in CNC machining and resin mold manufacturing, here are several reputable sources with authoritative information:
- CNC Machining in Tooling and Manufacturing
This scientific article outlines the role of CNC machining in tooling applications, emphasizing accuracy, scalability, and industrial relevance.
👉 https://www.sciencedirect.com/science/article/pii/S2772369021000074 - Injection Molding and CNC Tooling (Wikipedia)
A detailed overview of injection molding, including the use of CNC-machined molds in manufacturing and prototyping.
👉 https://en.wikipedia.org/wiki/Injection_moulding - Cast Urethanes and Mold Production (Wikipedia)
A comprehensive look at how CNC master patterns are used in casting urethane parts and making high-quality molds.
👉 https://en.wikipedia.org/wiki/Cast_urethane - Stereolithography and Rapid Prototyping
This article explains stereolithography (SLA), which is often used alongside CNC for rapid mold development and prototyping.
👉 https://computer.howstuffworks.com/stereolith.htm - How Jelly Shoes Are Made Using CNC Mold Techniques
An educational article that demonstrates how CNC molds are used in the fashion industry, showing their broad application in consumer products.
👉 https://people.howstuffworks.com/jelly-shoe.htm - Overview of CNC (Wikipedia)
A foundational article introducing Computer Numerical Control (CNC) and its use across industries, including mold production.
👉 https://en.wikipedia.org/wiki/Numerical_control
These resources are excellent starting points if you want to explore more about the technologies behind CNC resin molds or dive deeper into mold-making science and techniques. They helped shape my understanding—and I’m confident they’ll do the same for you.
Other Articles You Might Enjoy
- Master Mold Creation: CNC Techniques and Tips
What is a Master Mold and Its Role in Manufacturing In the manufacturing world, a master mold is a critical component that serves as a precise template for producing multiple…
- Cam Bearing Machining with CNC: Precision Fit, Installation, and Repair Guide
Introduction: Why Cam Bearings Matter in CNC Applications Cam bearings may seem minor, but in precision machining and engine performance, their importance is substantial. Over my years working with engine…
- Custom Ball Bearing Manufacturing with CNC: Who Needs It and What’s Possible
Introduction: Why Custom Ball Bearings Are Gaining Popularity I’ve been fascinated by mechanical components ever since I first saw the inside of a small gearbox in college. Back then, I…
- Machining Techniques for Parts: Unlocking CNC and Cutting-Edge Tech
I. Introduction I remember the first time I realized how critical machining is to modern manufacturing. I was interning at a small shop, watching a CNC machine carve intricate features…
- How to Make Silicone Molds with CNC: A Complete Guide
Why Choose Silicone Molds and the Role of CNC Technology Creating high-quality silicone molds can be a game-changer in prototyping and small-batch production. Silicone molds offer an efficient way to…
- Vacuum Casting Material Selection: Find the Best-fit Resin
Introduction to Vacuum Casting Vacuum Casting is a highly versatile and efficient manufacturing process widely recognized for its ability to produce high-quality prototypes and small to medium-sized production runs. This…
- Grinding Techniques and CNC Machining in Rubber Compression Molding Machine Production
Rubber compression molding machines are essential in various industries that require precise and durable rubber components. One of the key processes in manufacturing these machines is ensuring that all parts,…
- Plastic Rivets Prototyping and Production machining: A Modern Solution for Complex Fasteners
Understanding Plastic Rivets: Types, Uses, and Materials Plastic rivets are versatile fasteners used to join materials in various applications. Unlike metal rivets, plastic rivets are lightweight, corrosion-resistant, and non-conductive, making…