Introduction – Polishing Aluminum and Why It Matters
I remember the first time I tried polishing aluminum. I wanted a clean, glossy finish but ended up with swirl marks and uneven patches. Later, I realized that polishing aluminum can be simpler once you understand the right techniques, tools, and alloy traits. My goal here is to share how polishing aluminum fits into machining, why it can be so challenging, and what solutions can help along the way. Whether you work on prototypes, automotive parts, architectural details, or electronics casings, polishing aluminum can elevate the final product. For unique designs, polishing aluminum ties in perfectly with Custom Machining, enhancing tailored components. It’s not just for appearances either. Many CNC machined parts—like brackets or casings—benefit from polished aluminum surfaces for both looks and function. Polishing aluminum can protect surfaces and improve machine performance.
In this guide, I use “I” to show my experiences and viewpoints, but I’ve also learned from machinists, engineers, and designers who regularly polish aluminum for their projects. I want this to be comprehensive yet friendly to anyone curious about polishing aluminum. I’ll walk through all the key aspects: from basic finishing terms to advanced techniques, from everyday obstacles to step-by-step solutions. Let’s begin.
Why Polishing Aluminum Matters in Machining
Aluminum is everywhere. It’s one of the most common metals in manufacturing. It’s light, strong for its weight, and resists corrosion. It’s also a great candidate for polishing, partly because polishing aluminum can yield a beautiful metallic shine. But polishing aluminum goes beyond looks. The process can remove tiny burrs, reduce friction, and enhance surface protection.
People in industries like automotive, aerospace, architecture, and consumer electronics often care about polishing aluminum. Some want a near-mirror finish for decorative parts, like trim pieces or casings. Others want a smooth surface to improve functionality. There are even machinists who polish aluminum to ensure less wear on moving parts. Each group has different reasons for polishing aluminum, yet they share a need for consistent, effective methods.
Polishing aluminum can be done by hand or with machines. It’s often one of the finishing steps that come after CNC milling or turning. When we mention machining, we might also think about the burrs or tool marks on the workpiece. Polishing aluminum can handle many of these marks, but only if done right. I’ve had projects where a sloppy polish made the part look worse. It matters to know the correct sequence, supplies, and finishing strategies.
Understanding Aluminum Surface Finishing
Basic Concepts
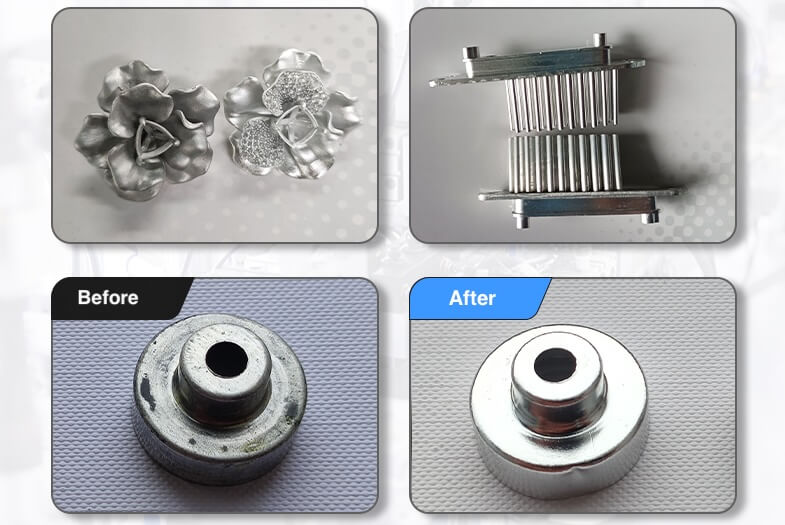
When polishing aluminum, we’re dealing with the top layer of the metal. There might be scratches, oxidation, or leftover tool marks. Polishing helps smooth that out until the surface reflects light more uniformly. The result can range from a soft glow to a full-blown mirror. Machinists, hobbyists, and engineers usually polish aluminum to achieve one or more of these benefits:
- Enhanced Aesthetics
- Surface Protection
- Reduced Friction
- Consistent Reflectivity
Sometimes, you also see polishing used as a precursor to plating or anodizing. Polishing aluminum in that context evens out the surface before additional coats go on. That can lead to a smoother final product. If you ask me, polishing aluminum is as much about planning as execution. You need to pick the right grit sizes, the correct tools, the right angles, and the best coolant or lubricant.
Surface Finishing Methods Compared
Surface finishing for aluminum can include more than just polishing. People sometimes confuse these processes:
- Grinding
- Buffing
- Polishing
- Honing
- Lapping
Grinding usually removes larger amounts of material. Buffing might be a final finishing step, often with a softer wheel or buffing compound. Polishing aluminum typically targets the step between coarse removal and that high-luster buffing. But these definitions can overlap. You’ll see some shops call a final step “polishing aluminum,” even if they’re buffing. It helps to know the difference so you can specify exactly what you want when ordering services or selecting equipment.
Mechanical vs. Chemical
There are both mechanical and chemical ways to polish aluminum. Mechanical polishing involves abrasives, from coarse to fine, while chemical or electrochemical methods might dissolve or smooth the surface. Electrochemical polishing can yield a high shine, but it requires specific solutions, safety measures, and careful control of parameters like voltage and temperature. We’ll dig deeper into advanced techniques later.
Aluminum Alloys and Polishing
Polishing aluminum can vary in difficulty depending on the alloy. Pure aluminum polishes differently from alloys that contain copper, magnesium, or silicon. I once tried polishing an alloy that was very hard and found it needed longer polishing times, more aggressive compounds, and a higher skill level to avoid swirl marks. Softer alloys, by contrast, can be easier to polish but scratch more easily. Let’s check a table comparing some common aluminum alloys, their typical hardness or strength, and recommended polishing approaches.
Table A: Common Aluminum Alloys and Polishing Suggestions
| Alloy | Major Alloying Elements | Typical Hardness | Typical Uses | Polishing Aluminum Difficulty | Recommended Abrasive Range | Notes on Machining |
|---|---|---|---|---|---|---|
| 1100 | ~99% Al | Low | Decorative items | Easy | 320–600 grit | Very soft, be gentle |
| 3003 | Mn | Low–Medium | Sheet metal work | Moderate | 320–600 grit, buffing compound | Good formability, easy to bend |
| 5052 | Mg, Cr | Medium | Marine parts, enclosures | Moderate | 240–600 grit | Good corrosion resistance |
| 6061 | Mg, Si | Medium–High | General machining | Moderate | 240–800 grit | Widely used, balanced properties |
| 6063 | Mg, Si | Medium | Architectural profiles | Moderate | 240–600 grit, potential buff | Good for extrusions |
| 7075 | Zn, Mg | High | Aerospace, high-stress | More Difficult | 220–600 grit | Harder alloy, can require more steps |
| 2024 | Cu | High | Aircraft structures | More Difficult | 220–600 grit, final buff | Prone to corrosion if not finished properly |
In general, 1100 or 3003 are simpler to polish but may not be strong enough for load-bearing parts. Alloys like 7075 or 2024 have superior mechanical properties but require more elbow grease or specialized machinery to polish effectively. Machinists often note that 6061 is a sweet spot: it’s workable, has good mechanical strength, and can be polished to a bright finish without too much trouble.
Polishing Aluminum: Techniques and Tools
Hand Polishing vs. Machine Polishing
Hand Polishing
This is a go-to for small parts, prototypes, or places that a polishing machine can’t reach. You’d typically use sandpaper or abrasive pads in different grit sizes. You work gradually from coarse to fine, removing scratches each time. The final step might be a polishing compound or paste. I used to do hand polishing for custom motorcycle parts or small housings because it let me target intricate corners. It can be slow, though, and consistent results require patience.
Machine Polishing
When you’re handling large volumes or need uniform finishes, machine polishing is best. You might use a bench polisher with a wheel, an orbital polisher, or a specialized robotic system. The advantage is speed and repeatability. You can also reduce the muscle fatigue that comes with hand polishing large surfaces. Some shops have entire lines dedicated to polishing aluminum extrusions or sheets, feeding them through multiple heads with different abrasive grades. Machine polishing still needs you to choose the correct combination of discs, pads, and compounds.
Key Polishing Tools
Polishing aluminum typically calls for these items:
- Abrasive Wheels or Discs
- Sandpaper Sheets or Rolls
- Buffing Pads
- Polishing Compounds (coarse, medium, fine)
- Power Drill Attachments (for small-scale machine polishing)
- Specialized Polishing Machines (for industrial setups)
Grit selection matters. Lower grit (80–220) can remove deeper scratches or milling marks. Then you move to medium grit (240–400), followed by higher grit (600–800 or beyond) for a near-mirror finish. Some might go up to 2000 grit or even micro-abrasive films for truly glossy surfaces.
Polishing Stages
We usually talk about stages: rough cut, intermediate, and final. Rough cut might involve removing oxidation or big tool marks. Intermediate is about refining the surface. Final is for the real shine or gloss. Each stage requires time, the right abrasive, and consistent technique. If you jump grit levels too quickly, you’ll miss scratches that show up under bright light.
CNC Machining and Post-Polishing
CNC Machining ( CNC milling or turning…) can leave tool marks on the aluminum. These might be fine lines or deeper grooves. Polishing aluminum after CNC can drastically enhance the look. Some machinists design tool paths that minimize surface variation so they can skip to a medium or fine polish stage. Others might do a manual deburr before any serious polishing. Another trick is to consider the direction of tool paths. If the CNC leaves lines all going one way, it might be simpler to polish along that direction, saving time.
Industry Applications: Where Polished Aluminum Shines
Automotive and Aerospace
In cars, polished aluminum wheels, trim, or engine parts are popular. Mechanics or auto enthusiasts might spend hours perfecting a mirror-like finish. It’s the same for aircraft, where polished aluminum can reduce drag on certain aerodynamic parts or create a signature look. However, the aerospace sector often demands not just looks but precise tolerances. Polishing might be necessary to remove stress risers and micro-cracks. I’ve seen aerospace components that combine polished surfaces with complex coatings for both performance and aesthetics.
Consumer Electronics
Phones, laptops, and high-end audio equipment frequently use polished aluminum casings. This finish looks premium, feels good in the hand, and offers scratch resistance if sealed properly. Some electronics makers also do partial polishing, highlighting edges or corners to give devices a sleek aesthetic. If you enjoy working with gadgets, you might notice the difference between a brushed finish (more lines) and a polished finish (more reflection). Each approach suits different design themes.
Architectural and Decorative Uses
Architects sometimes specify polished aluminum for railings, window frames, or decorative panels. It adds brightness without the heft of stainless steel. It can also be cheaper and easier to shape. Exterior surfaces might need protective coats to keep the shine in harsh weather. But indoors, polished aluminum can stay gleaming for years with minimal maintenance. I’ve seen offices with polished aluminum highlights that look modern and stand out nicely from typical dull metal parts.
Challenges in Polishing Aluminum and How to Solve Them
Common Issues
Polishing aluminum can be tricky. One big problem is swirl marks that remain if you skip grits or move too quickly. Another issue is heat buildup. Aluminum is a good thermal conductor, but friction from polishing can still cause local hot spots. Overheating can lead to warping or softening the surface. If you press too hard or use a worn disc, you might create new scratches. Another annoyance is oxidation. Bare aluminum can oxidize quickly, dulling the surface or forming a haze if you don’t seal or treat it.
Solutions and Tips
To deal with swirl marks, adopt a systematic approach to grits. Don’t jump from 120 to 600. Fill the gap with a 240 or 320 step. Also, check your pressure. Light to moderate pressure is enough in most cases. If heat is your problem, use lubricants or polishing compounds that can help dissipate friction. Some shops do wet polishing, keeping surfaces cool. For oxidation, apply a protective layer soon after you’re done. That might be a clear lacquer, wax, or even an anodizing process.
Detailed Troubleshooting
Let’s include a table that covers specific challenges, possible causes, and solutions.
Table B: Polishing Aluminum Challenges and Solutions
| Challenge | Possible Cause | Common Indicator | Recommended Fix | Notes |
|---|---|---|---|---|
| Swirl Marks | Skipping intermediate grits | Visible circular lines | Use progressive grits, consistent stroke pattern | Keep consistent angle during sanding |
| Overheating | Excessive pressure or speed | Surface discoloration | Add lubricant, reduce tool RPM | Check abrasive condition |
| Surface Oxidation | Delayed sealing or humidity | Grayish or dull finish | Seal quickly or store in dry space | Anodizing can help long-term |
| Sanding Lines Too Deep | Starting with extremely coarse grit | Deep linear scratches | Begin with mid-range grit if marks aren’t severe | Evaluate CNC finish before polishing |
| Buildup on Abrasive | Soft alloy clogging the media | Polish disc turns black | Use open-coat abrasives, clear dust often | Add slight coolant or lube |
| Inconsistent Finish | Uneven pressure or belt tension | Variations in reflection | Maintain stable feed rate or technique | Automated systems can help consistency |
| Residue or Smudges | Improper compound removal | Sticky or hazy patches | Wipe with suitable solvent, re-polish lightly | Polishing compounds can cake if overheated |
I like these quick references. They let you identify a problem fast and try a straightforward solution. When you polish aluminum in a busy shop, time is money, so it helps to have checklists or procedures that everyone follows. That way, your entire team can produce uniform results.
Advanced Techniques in Aluminum Polishing
Electrochemical Polishing
While most small to medium shops rely on mechanical polishing, some use electrochemical methods to achieve a smooth or mirror-like finish with minimal manual labor. This can be more precise but requires safety measures, special solutions, and a thorough understanding of the anodic process. The results are often uniform, even in tight corners. But it can be costly for small runs. Still, if you’re producing high-volume parts or critical aerospace or medical components that demand an ultra-smooth surface, electrochemical polishing might be worth exploring.
Automated Polishing Systems
Large manufacturers often use robotic arms or conveyor-based polishing lines for consistent, high-volume polishing of aluminum. The advantage is repeatability. A robotic system can apply exactly the same pressure and pass count each time. Sensors can detect changes in surface reflectivity or temperature. If you want me to be honest, though, it’s not cheap to set up. But once it’s running, it can outperform manual methods in speed and uniformity.
Sustainability in Polishing
Polishing aluminum can produce dust or use compounds that need safe disposal. In big operations, you might see wet polishing systems that collect slurry in filters or tanks. That prevents particles from going airborne. Some shops recycle or recondition spent abrasive media, reducing waste. Also, using water-based compounds can lower environmental impact. If you’re a small-scale machinist, you can still do your part by wearing protective gear, properly disposing of used abrasives, and ventilating your workspace.
Step-by-Step Guide: Polishing Aluminum for Beginners
I’ve helped a few newbies get started. Here’s a quick outline that might help if you’re new to polishing aluminum or want a refresher:
- Prepare the Work Area
- Clear debris, gather safety gear (mask, goggles, gloves).
- Inspect the Aluminum
- Identify deep scratches, old anodizing, or oxidation spots.
- Start with Appropriate Grit
- If the surface has big defects, maybe 220 or 320 grit. Otherwise, 400 might be enough.
- Sand or Polish in a Single Direction
- Maintain a consistent pattern to avoid swirl marks. Keep moderate pressure.
- Move Through Grits Step by Step
- For example: 320 → 400 → 600 → 800. Or even higher if you want a mirror.
- Check Work Often
- Wipe off dust, see if any scratches remain from the previous step.
- Final Compound or Buff
- Use a fine compound with a soft cloth or buffing wheel for that extra glow.
- Clean and Seal
- Wipe the surface, check for uniformity, then apply a protective coat (wax, clear lacquer, or similar).
Beginners often skip too many grit levels or press too hard. That can lead to swirl marks or uneven polishing. Patience is key. I usually suggest practicing on scrap pieces first. Once you’re confident in the results, move to your final project.
Conclusion
Polishing aluminum is more than just an aesthetic choice; it’s a functional process that improves performance, durability, and usability across a wide range of industries. From creating flawless surfaces for consumer electronics to optimizing aerospace components, polishing aluminum bridges the gap between precision machining and perfect finishing.
Throughout this guide, I’ve shared not only practical techniques but also insights into challenges and solutions I’ve encountered. Whether you’re a machinist fine-tuning your process or a DIY enthusiast experimenting with aluminum projects, the principles remain the same: patience, precision, and the right tools make all the difference.
Now, equipped with this knowledge, I hope you’ll find polishing aluminum to be an achievable and rewarding skill.
FAQ
Q: How long does it take to polish aluminum to a mirror finish?
A: It depends on size, alloy, and starting condition. A small piece might take 20 minutes. A large panel could take hours.
Q: Can I polish aluminum at home without fancy tools?
A: Yes, you can. Hand sanding and buffing are possible. It’s more time-consuming, but you can get good results with patience and the right compounds.
Q: Which compound is best for polishing aluminum?
A: It varies by preference. Many use a brown tripoli compound for medium stages, then a white rouge for final shining.
Q: Do I need to anodize after polishing aluminum?
A: Not always. Anodizing can protect the finish, but you can also use clear lacquers or waxes. It depends on your application.
Q: Why does my polished aluminum surface lose shine over time?
A: Oxidation. If you don’t seal it or if the environment is humid, aluminum can dull. Regular maintenance or sealing helps retain the shine.
Q: Can I use a regular steel wire brush to polish aluminum?
A: Steel brushes can leave scratches or even steel deposits that might cause galvanic corrosion. It’s better to use brushes or abrasives designed for aluminum.
Q: Is it possible to remove old anodizing before polishing?
A: Yes, typically with a chemical etch or sanding through the anodized layer. Once you get down to bare aluminum, you can proceed with polishing.
Q: What tools are best for polishing aluminum edges after CNC machining?
A: For edges, soft abrasive pads or polishing wheels work well. A Dremel with appropriate attachments can also handle intricate corners effectively.
Q: Can I use water as a coolant while polishing aluminum?
A: Yes, water can act as a simple lubricant and coolant. It prevents overheating and helps carry away debris, but make sure to dry the aluminum thoroughly afterward to avoid oxidation.
Q: How do I achieve a brushed look instead of a mirror finish?
A: Use abrasive pads or sandpaper in the 220–400 grit range. Move in one consistent direction, avoiding circular motions to maintain the brushed texture.
Q: Is polishing aluminum safe for food-grade applications?
A: Yes, but ensure you use non-toxic polishing compounds and properly clean the surface afterward. An anodized or clear coat finish can add extra safety.
Other Articles You Might Enjoy
- Brushed Aluminum Demystified: From Elegance to Engineering
I’ve spent a fair amount of time working with different metals, and Brushed Aluminum has always caught my eye. It’s a material that combines an appealing, decorative surface with properties…
- Surface Treatment After CNC Machining Applications of the Anodized Aluminum Colors Chart
In the world of manufacturing, CNC machining is a cornerstone of precision and efficiency, especially when it comes to working with aluminum. However, the journey of a part doesn’t end…
- Understanding the Density of Aluminum for Better CNC Results
Why Aluminum Density is Crucial for CNC Machining and Procurement Understanding the density of aluminum is essential for multiple reasons, from material selection to cost control and even logistics, especially…
- CNC Machining Materials: Acrylic vs. Polycarbonate for Transparent Components
CNC Machining: An Introduction and the Importance of Material Type Computer Numerical Control (CNC) machining is a manufacturing process where pre-programmed computer software dictates the movement of factory tools and…
- How Wire Brushed Finish Complements CNC Machining for Superior Surface
CNC machining has revolutionized the manufacturing industry by enabling the precise production of complex parts. However, even with the advanced capabilities of CNC machines, the surface quality of the final…
- Optimizing Your Supply Chain with CNC Customized Aluminum Sheet Components
Introduction In today's competitive manufacturing environment, efficiency and precision are key to meeting market demands. Custom aluminum sheet components play a critical role in many industries, from automotive to aerospace,…
- Glass Bead Blasting Material and Its Impact on CNC Machining Performance
In the world of CNC machining, precision, quality, and surface finish are critical factors, especially for industries that demand high-performance components. Among the various surface finishing techniques used to improve…
- Precision CNC Machining for High-Performance Industrial Machinery
Precision CNC Machining for High-Performance Industrial Machinery The process of Precision CNC (Computer Numerical Control) machining is at the core of manufacturing high-performance industrial machinery. This technique leverages a computer's…


