Introduction
Stress relieving has always been a point of fascination for me. I remember the first time I discovered how much of a difference it makes in CNC machined parts. I was visiting a friend’s small fabrication shop in the Midwest. We were working on a batch of steel components for a heavy machinery client. One day, we noticed random distortions that appeared after final machining. Those distortions added hours of rework. They also led to delays that upset our delivery schedule. That was the moment I realized how crucial stress relieving can be.
So, what is stress relieving? In simple terms, stress relieving is a process used to reduce or eliminate residual stresses in metal parts. We see these stresses develop because of custom manufacturing steps like milling, turning, welding, and even heat buildup from friction. When I noticed how a properly timed stress relieving cycle brought those steel parts back under tolerance, I knew I had to learn more.
In this guide, I will dive into everything about stress relieving for CNC parts. I will explain what it is, when to use it, and why it is so important. Then, we’ll get into the details of different methods, how to choose the right parameters for each material, and where stress relieving fits into your overall workflow. I want this resource to be easy to follow, practical, and helpful. Since we are talking about CNC parts, a major goal here is to achieve consistent dimensional stability. I believe stress relieving is a vital step toward that goal.
I am writing in first person because I genuinely want to share personal experiences. I’ve visited numerous job shops, and I’ve seen how ignoring stress relieving can lead to misalignments or rejections. I’ve also visited large-scale production facilities. In those places, stress relieving is part of a well-oiled process that consistently delivers top-quality parts. If you’re curious about how to reduce internal stresses, avoid dimensional surprises, or simply get more mileage out of your CNC setup, you are in the right place.
We will start by exploring the basics of residual stress in Chapter 2. Then, we’ll check when you should opt for stress relieving. We will go over the common stress relieving methods, each with its benefits and drawbacks. We’ll discuss materials like steel, stainless steel, and aluminum. We’ll also look at how to integrate stress relieving into your workflow. By the end, I hope you will see how stress relieving is not just an extra cost. It’s an essential investment that can save you time and money while raising your product quality.
Understanding Residual Stress in CNC Machined Parts
Residual stress forms the backbone of every discussion related to stress relieving. So, let’s go deeper into what it is, why it happens, and how it impacts CNC machined parts. I’ve had a few eye-opening conversations over the years with manufacturing engineers, material scientists, and even heat-treatment specialists. Every single person I talked to agreed that residual stress can make or break the success of a machined part.
What Is Residual Stress?
Residual stress is the stress that remains within a material after all external forces or thermal gradients have been removed. Imagine you machine a block of steel at high speed. Heat builds up in localized zones near the cutting tool. At the same time, mechanical forces press against the metal’s microstructure. When you shut down the spindle and remove the block from its fixture, all these internal imbalances do not magically disappear. Many of them remain locked inside the part. That leftover tension is called residual stress.
Some residual stress is relatively harmless. However, certain levels or distributions of it can cause part distortion, cracking, or poor fatigue performance. Stress relieving is the deliberate act of reducing or rearranging these internal stresses to prevent such problems.
Why Does Residual Stress Matter?
I once worked on a small project that involved manufacturing a series of aluminum brackets for a commercial drone. We needed tight tolerances for these brackets because the drone’s flight stability depended on them. Despite careful CNC programming, the brackets consistently warped after we removed them from the fixtures. We finally performed a stress relieving cycle. To my surprise, that simple step solved the warping issue and stabilized the production process.
Residual stresses can manifest in several ways:
- Distortion or Warping
A part may bend or twist once clamps are released. This can happen if certain regions contain more internal tension than others. - Cracking or Fracture
High tensile stress inside a part can initiate microscopic cracks, which sometimes extend into larger fractures during service. - Reduced Fatigue Life
Repeated cyclic loads can lead to premature fatigue failure if there are stressed regions or microcracks. - Unpredictable Machining Outcomes
If a part is not stable, finishing passes can become a gamble. Dimensional tolerances may shift mid-process. - Inspection and Quality Issues
Residual stress can alter how a part measures, especially on sensitive coordinate measuring machines (CMMs). This can cause you to scrap or rework parts unnecessarily.
From my perspective, failing to manage residual stress means playing a game of chance with your final product. Stress relieving is a reliable solution to tilt the odds in your favor.
How Does CNC Machining Cause Residual Stress?
Stress relieving often becomes relevant right after CNC machining. But how does CNC machining introduce internal stress in the first place?
- Mechanical Cutting Forces
Every cut generates a combination of forces. The tool tries to shear material off the workpiece, which compresses some regions while stretching others. When these forces are uneven or when the part geometry is complicated, residual stress accumulates. - Thermal Gradients
High-speed machining, especially in metals like steel or titanium, can produce substantial heat. If the heat is not dissipated evenly, thermal expansion creates pockets of stress that remain after cooling. - Clamping and Fixturing
I used to think clamping pressure was inconsequential. Over time, I learned that an overly tight vise can induce stress. Once the part is removed from that vise, the part tries to “spring back,” and you end up with dimensional changes. - High Material Removal Rates
Aggressive milling strategies are popular for boosting efficiency. Yet, removing large amounts of material in short cycles can lead to significant residual stress. Rapid temperature and force fluctuations create internal imbalances. - Material Properties
Different alloys have different responses to machining. For instance, hardened steel might react differently from annealed steel. Even the grain structure of the metal affects how residual stresses form during CNC operations.
Examples of Residual Stress in Action
- Example 1: A Large Steel Plate
A friend of mine used to mill enormous steel plates for the mining industry. He told me about frequent dimension shifts after final machining. Once they started adding a stress relieving step, the rework rate dropped drastically.
In that scenario, the high volume of material removal, combined with heat generation and the part’s geometry, triggered leftover tension. - Example 2: Thin-Walled Aluminum Components
Thin-walled parts are especially prone to warping. I saw an aerospace supplier produce a series of ring-shaped aluminum frames. The frames had tight tolerances around the outer diameter. After rough machining, they performed a stress relieving cycle. That practice prevented the kind of distortion that often ruins thin-walled parts. - Example 3: High-Precision Mold Cavity
Mold cavities often require extremely tight tolerances and polished surfaces. Those cavities usually start as large steel blocks. Machining out huge pockets can release stresses deep within the block. Mold makers often rely on stress relieving before final finishing to maintain dimensional stability.
Consequences of Ignoring Stress Relieving
I’ve personally observed a few catastrophic outcomes in places that chose to skip stress relieving. One was a batch of welded frames for an automated assembly line. The frames showed microcracks along welded seams. Those cracks eventually grew under vibration, causing failures in a live production environment. Another time, I saw a client’s large forklift bracket begin to distort in the field, leading to costly downtime. In each instance, a targeted stress relieving step could have minimized these outcomes.
When residual stress is left to accumulate or remain unaddressed, the cost extends beyond the immediate rework. You can deal with unexpected downtime, lower product reliability, and even catastrophic failures. Customers might lose confidence in your quality. Worse, your brand reputation can suffer if word spreads about repeated part failures. Stress relieving is the standard remedy to avoid these hidden costs.
The Role of Inspection and Material Testing
Residual stress is often invisible to the naked eye. In my experience, I’ve learned that thorough inspection is the only way to detect issues early. Techniques like X-ray diffraction or hole-drilling methods can measure residual stress. However, these are generally specialized tests. Most small shops rely on dimensional checks after rough machining. If they see unexpected shifts, they suspect residual stress.
Stress relieving addresses these dimensional issues in a predictable manner. Instead of waiting for problems to surface, many manufacturers schedule stress relieving steps as a preventive measure. This works particularly well for large or complex components. Once you do that, your inspection results become more stable, making it easier to pass audits or meet tight customer requirements.
Stress Relieving vs. Other Heat Treatments
I have heard folks confuse stress relieving with annealing or tempering. While all these processes involve heat treatment, they serve different purposes.
- Annealing
Usually performed at higher temperatures to soften the metal. It helps refine the grain structure and enhances ductility. - Tempering
Applied after quenching hardened steel to reduce brittleness. - Stress Relieving
Typically done at lower temperatures than annealing, just enough to let the metal microstructure “relax” without significantly changing hardness or mechanical properties.
Stress relieving stands out because its principal aim is to release or redistribute internal stresses. If you need to maintain your part’s mechanical properties while simply reducing residual stress, stress relieving is the go-to choice.
Recognizing When Stress Relieving Is Overkill
Although I am a big proponent of stress relieving, I also realize it is not a blanket solution for every scenario. Simple parts that undergo minimal machining might not require a dedicated stress relieving step. If the final tolerances are loose (say ±0.010 inches) and the material is stable, you might not see any warping or cracking anyway. Knowing when stress relieving can improve your process can save money and lead to better part outcomes. But adding it to every single job might be counterproductive if you do not see a real benefit.
Summary of Chapter 2
In this chapter, I wanted to establish why stress relieving is so critical for CNC machined parts. Residual stress can creep in from mechanical forces, heat, fixturing, and the nature of the material itself. The consequences range from slight distortions all the way to catastrophic failures. Stress relieving is your best line of defense against these hidden troubles. By reducing internal stresses, you boost dimensional stability, product reliability, and overall quality.
When Do You Need Stress Relieving?
Stress relieving can feel like a mysterious extra step. Some shops do it almost out of habit. Others avoid it because it seems like an added cost. The truth lies somewhere in between. In this chapter, I will discuss the scenarios in which stress relieving becomes a vital process. I’ve personally seen both ends of the spectrum. In one case, we minimized warpage in large aluminum plates by factoring in stress relieving from the start. In another situation, we skipped stress relieving and paid for it later with excessive rework. My hope is that you will come away from this chapter with clear guidelines on when you should incorporate stress relieving into your CNC workflow.
3.1 Thin-Walled Parts and Delicate Geometries
Anytime you have a design with thin walls, slender ribs, or complex internal cavities, you are inviting residual stress to cause trouble. Let’s say you are milling a 2 mm thick aluminum bracket for a precision drone assembly. That bracket may come off the machine looking fine. Yet, if residual stress remains inside, it may spring out of shape when you remove it from fixturing or after secondary processing. Stress relieving gives you a chance to stabilize the material so it stays true to form.
I once consulted on a medical device project that involved titanium housings. These housings had thin walls, and the customer demanded extremely tight tolerances. Without stress relieving, we saw micro distortions that caused the parts to fail final inspection. After adding a stress relieving cycle, we had a more reliable process and fewer rejects. That alone justified the extra step.
3.2 Large or Complex Components
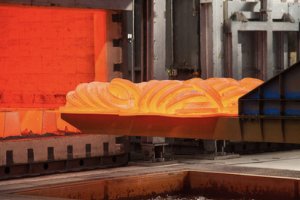
Big parts often undergo multiple machining operations, long cycle times, and heavy clamping forces. All of these factors can generate substantial residual stress. It’s not uncommon for large steel plates to bow or twist after rough machining. If you are working on massive weldments, big castings, or forging blanks, you should consider stress relieving early.
I remember a series of CNC-milled plates for an industrial press. Each plate weighed over 200 pounds. When we first attempted to skip stress relieving, the warping became so severe that we had to do additional finishing passes. We lost time, tooling, and money. Once we integrated stress relieving after rough machining, the final passes stayed within tolerance. That sequence was far more efficient.
3.3 Welded Assemblies
Welding is notorious for introducing internal stress. You heat localized areas to extreme temperatures, then allow them to cool quickly. That uneven thermal cycle creates huge gradients of tension inside the material. When you combine welding with CNC machining (for instance, machining weld beads flat or adding mounting holes), it becomes almost certain that stress relieving will be helpful.
I recall a project involving welded steel frames that needed finishing operations like drilling and tapping. Those frames often distorted by several millimeters once they cooled after welding. We introduced a stress relieving step before the final machining. That simple change cut rework in half and improved the assembly fit. If you frequently deal with welded frames or brackets, stress relieving can save you from alignment headaches.
3.4 Precision Requirements and Tight Tolerances
If your part requires extremely tight tolerances, even minor warping or changes in geometry can be unacceptable. Let’s say your customer wants a positional tolerance of ±0.001 inches on a critical hole. You machine that feature perfectly, but then the surrounding material “relaxes” once you unclamp it. Now your hole is out of position. Stress relieving aims to release those internal tensions in a controlled way, so your final geometry stays put.
In my experience, molds, dies, and aerospace components often fall into this category. These parts usually have zero room for surprise. When we introduced a stress relieving step in mold manufacturing, we discovered we could hold tighter tolerances during final finishing. That also extended the tool’s service life by avoiding micro-cracks that sometimes form in highly stressed regions.
3.5 High-Performance or Safety-Critical Parts
Certain components operate under high loads or harsh conditions. Parts that go into aircraft, automobiles, or medical devices often encounter cyclical stresses in the field. If internal residual stress is present, these parts are at greater risk of fatigue or cracking. Stress relieving can reduce these internal tensions and extend the component’s service life.
I remember talking to a team that manufactured suspension components for off-road vehicles. They used thick steel control arms, which experience repetitive impact loads. Initially, they had a problem with small cracks forming in stress-riser areas. By adding a stress relieving step, they minimized crack initiation points, boosting reliability under rough usage. That was a big deal for their brand reputation in motorsports.
3.6 Materials Known for Residual Stress Issues
While nearly all metals can benefit from stress relieving, certain alloys are more notorious than others. Hardened steels, high-strength aluminum alloys (like 7075), and stainless steels can store significant amounts of residual stress after machining or forming. If you work with these materials, or if your suppliers mention they are prone to warping, you should consider stress relieving at some stage.
I learned the hard way how 7075 aluminum can distort after major material removal. At first, I thought only steel parts needed stress relieving. Then I machined a large chunk of 7075 for a fixture plate. It curled like a banana once it was fully machined. That fiasco taught me the value of a targeted stress relieving approach for aluminum.
3.7 Production Runs with High Scrap Rates
Sometimes you only realize you need stress relieving after you see an abnormally high scrap rate. If your yield is falling short, and every fix seems temporary, consider adding a stress relieving cycle. You may find that the cost of that extra step is far less than the cost of scrapped parts, rework, or customer returns.
In one job, we produced steel brackets in batches of 200. At first, about 15 percent of each batch was failing final inspection. It turned out that internal stress was causing subtle twists near the mounting surfaces. The fix was a quick stress relieving cycle. Suddenly, the scrap rate dropped to 1 or 2 percent. That alone justified the cost and time of stress relieving.
3.8 Prototype to Production Transition
During prototyping, you might not worry too much about stress relieving. You might focus on quick iterations. However, once you move to production, any warping or dimensional stability issue gets magnified. If you plan to scale up, it’s wise to incorporate stress relieving early. This prevents late-stage surprises when you are ramping up your output.
I remember a robotics startup that tested small runs of specialized brackets without stress relieving. Those prototypes worked fine. But once they ordered hundreds of units, they discovered the material batch was slightly different. That shift in material properties introduced enough residual stress to cause warping. They scrambled to add stress relieving mid-production. That delayed deliveries, which frustrated investors. Had they tested stress relieving earlier, they would have been prepared for large-scale production.
3.9 Regulatory or Contractual Requirements
In some industries, stress relieving is far more than just a best practice. It can be a strict requirement spelled out in contractual documents or regulatory guidelines. That was an eye-opener for me when I first dealt with aerospace components. I was under the impression that we could simply deliver parts that met dimensional specs and call it a day. Then I discovered how major aerospace firms often enforce multi-step heat treatment procedures, including stress relieving, to ensure parts meet rigorous safety margins.
One particular incident comes to mind. We had bid on a project for custom brackets destined for a helicopter assembly. The request for quotation (RFQ) clearly stated that any welded sections needed a documented stress relieving cycle prior to final machining. They wanted to prevent microcracks that could lead to catastrophic failures mid-flight. At first, I questioned the necessity. But after reviewing the specs and analyzing the risk, I realized skipping stress relievingcould disqualify us from the contract. We ended up adding a thorough stress relieving process. We also provided the client with detailed furnace charts to prove compliance.
Regulations can extend beyond aerospace. Medical device manufacturers often face strict guidelines, particularly if the component will endure repetitive loads or come into contact with living tissue. Cracks or distortions could be life-threatening. Stress relieving in that context is not optional. It is a mandatory part of the validation process. Some medical device standards even require evidence of effective stress relieving, including hardness tests, microstructure analysis, or residual stress measurements.
That level of scrutiny might feel like a burden. However, it ensures that the final product can withstand real-world conditions without failing. If your contract includes a clause mentioning stress relieving, you should see it as part of a bigger system designed for safety and reliability. Skipping or altering that procedure without permission can lead to severe legal or financial consequences. In my experience, these clients do not leave much room for error. If you are hoping to build a reputation in sectors like aerospace or medical, fulfilling stress relieving requirements is a must.
3.10 Deciding Factors: Cost vs. Benefit
Even though I advocate using stress relieving whenever residual stress poses a threat, I also know it is not a magic cure-all. Implementing stress relieving at the wrong time or for the wrong reason might inflate your budget or slow your production. You need to weigh the cost against the benefit. One of the first questions I typically ask is, “What will happen if we do not do stress relieving?” If the worst-case scenario is a mild dimensional shift that your tolerances can accommodate, maybe you can skip it. On the other hand, if you risk scrapping expensive parts or jeopardizing safety, stress relieving becomes a bargain.
I once had a friend who ran a small CNC job shop focusing on short-run prototype parts. These prototypes were mostly single pieces or very small batches. The tolerances were flexible because these parts were for proof-of-concept assemblies. He rarely bothered with stress relieving because the prototypes would either be tweaked or thrown away after testing. For him, spending money on a stress relieving cycle did not make sense financially. However, he told me he would reconsider if he moved into higher-volume production or faced tight-tolerance demands.
On the flip side, I have also seen situations where skipping stress relieving led to outrageous scrap rates. A colleague of mine worked on a production job for an automotive supplier. That job involved large steel arms for heavy-duty suspension systems. They did not factor stress relieving into their initial quote, assuming they could handle any warping with a few extra finishing passes. That plan backfired. The arms twisted more than expected. They had to re-machine almost every part, blowing their budget in the process. Eventually, they integrated a mid-process stress relieving cycle. They recouped their losses by reducing scrap and rework.
Sometimes you can also use partial or alternative methods, like vibratory stress relief, if the cost of thermal heat treatment is prohibitive. The key is to figure out the real cost of dimensional instability. Add up the rework hours, the scrapped material, the lost goodwill with customers, and the risk of field failures. If those potential costs exceed the price of stress relieving, then it is an easy choice.
Some shops approach stress relieving like an insurance policy. If a particular project has a high value, they add stress relieving as a standard step. If a project is low-value or low-risk, they skip it. Neither approach is wrong. It is about making an informed decision that aligns with your production goals and your client’s expectations.
3.11 Quick Reference Table
Below is an updated reference table that summarizes various part types, materials, indicators for stress relieving, consequences if you skip it, and rough cost implications. I expanded it to help you see even more scenarios. Keep in mind these numbers and descriptions are for illustration only; real-world results vary by region, shop capabilities, and the specifics of your project.
| Part Type | Material | Indicators for Stress Relieving | Possible Consequences if Skipped | Approx. Stress Relieving Cost Range | Notes |
|---|---|---|---|---|---|
| Thin-Walled Bracket | Aluminum 6061 | Warping after fixturing, tight tolerances needed | Persistent distortion, excessive scrap rate | Low to Moderate | Often done after rough machining |
| Large Steel Plate | Mild Steel (1018) | Bowing or twisting post-machining, heavy milling passes | Bowing, extra finishing passes, rework | Moderate (heat treat furnace) | Common in heavy industrial components |
| Welded Framework | Steel/Stainless | Noticeable shrinkage post-weld, alignment issues | Cracks, misalignment, assembly issues | Moderate to High | Often mandated in structural welding codes |
| High-Precision Mold | Hardened Tool Steel | Tolerances under ±0.001″, complex geometry | Dimensional drift, micro-cracks near corners | High (precision environment) | Standard procedure in mold manufacturing |
| Aerospace Bracket | Aluminum 7075 | Subject to fatigue, cyclical loads, strict quality standards | Fatigue failures, potential in-flight safety hazard | Moderate to High | Commonly required by aerospace clients |
| Industrial Gear Blank | Alloy Steel (4140) | Extensive material removal, heat build-up during rough milling | Inconsistent tooth geometry, gear failure | Moderate | Often stress relieved before final grinding |
| Medical Device Housing | Titanium | Regulatory demands, high liability, repeated load cycles | Distortion, potential device malfunction in critical use | High (strict documentation required) | Must meet FDA or equivalent medical guidelines |
| Prototype Part | Various (Steel/Aluminum) | Early design phase, low volume, loose tolerances | Minor distortion may be acceptable in prototypes | Low (often skipped) | Usually not required unless testing critical fit |
| High-Performance Car Chassis | Chromoly Steel | Race or off-road applications, welding intensive | Cracking under stress, compromised driver safety | Moderate to High | Often stress relieved to avoid fracture |
| Pressure Vessel Component | Carbon Steel | High internal pressures, code requirements (ASME, etc.) | Catastrophic failure, hazardous leaks | High (strict standards) | Stress relieving may be a code requirement |
You might notice how each scenario lists possible outcomes if stress relieving is skipped. I find that focusing on these outcomes helps me communicate the value of stress relieving to clients or team members who view it as an unnecessary cost.
3.12 Summary of Chapter 3
When do you need stress relieving? The simplest answer is that you need stress relieving whenever residual stress threatens your part’s geometry, function, or safety. This includes thin-walled components, large welded assemblies, parts requiring high precision, and any scenario where warping or cracking would mean big trouble. If your contract or industry standards demand stress relieving, you have no real choice but to comply. If your scrap rate is rising or if you face repeated distortions, stress relieving might be the solution that saves you time and money.
The cost-benefit equation should guide your decision. If skipping stress relieving could lead to catastrophic failures or a high volume of rework, it is probably more expensive not to do it. If the risk is minimal and your tolerances are roomy, you may be able to skip it. Think about the lessons I learned from my friends’ experiences in job shops and industrial settings. Anytime ignoring stress relieving led to dimensional mayhem, they wished they had included it from the start.
Common Stress Relieving Method
4.1 Introduction to Stress Relieving Methods
Many of us get stuck thinking that stress relieving is strictly a thermal process. That’s not entirely wrong, but I’ve learned there are multiple ways to reduce or redistribute residual stress in CNC parts. Thermal stress relieving is the gold standard. Vibratory stress relief is a popular alternative. There’s also a technique called natural aging, and in some specialized scenarios, even cryogenic treatments. Each method has its benefits, drawbacks, and costs. In this chapter, I want to share everything I’ve picked up so you can pick the method that best matches your parts, budget, and schedule.
I remember the first time I questioned whether thermal stress relieving was always required. A colleague mentioned vibratory stress relieving could be cheaper. It also wouldn’t alter the metal’s microstructure the same way high-temperature processes might. That sparked my curiosity, leading me to visit several shops. I saw them using different methods, each claiming success. Let’s look at the main methods and help you cut through the confusion.
4.2 Thermal Stress Relieving
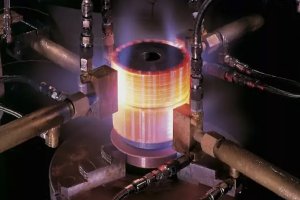
Thermal stress relieving is the most common and widely accepted approach. It involves heating a machined or welded part to a specific temperature below its critical transformation point. Then, you hold it at that temperature for a set period, followed by a controlled cooldown. The goal is to allow the metal’s microstructure to “relax” and release internal stresses without significantly changing hardness or tensile strength.
4.2.1 How It Works
Metals have crystalline structures that get distorted when exposed to uneven forces or thermal gradients. By heating the part to a moderate temperature—often in the range of 900°F to 1,300°F (depending on the alloy)—you allow those distortions to ease. Because the temperature is well below the annealing range, you don’t fully recrystallize the metal. That means you keep most of the mechanical properties intact. Cooling must be slow and uniform to prevent reintroducing new residual stress.
4.2.2 Advantages
- Proven Track Record: Thermal stress relieving is validated by countless industry standards. Aerospace, automotive, and heavy machinery sectors often specify it as a default solution.
- Predictable Outcomes: If you have a qualified furnace and follow a documented recipe, you can expect consistent results across multiple batches.
- Scalable: You can process large parts or entire batches simultaneously if your furnace can accommodate the workload.
4.2.3 Drawbacks
- Cost and Logistics: Not every shop has an in-house furnace or the capacity for large workpieces. Outsourcing can add lead time and shipping costs.
- Energy-Intensive: Running a furnace consumes substantial power, especially if you need precise temperature control.
- Oxidation and Surface Changes: If not done in a protective atmosphere, you might get scale or discoloration on the part’s surface. Additional finishing steps could be needed.
4.2.4 My Experience
I once worked on a series of steel gear blanks for a heavy equipment client. We tried skipping stress relieving because the hardness specs were already met through normalizing and tempering. After final machining, about half the gear blanks showed minor warping. Adding a thermal stress relieving cycle (around 1,100°F) before finishing passes solved the warping issue. It did extend our timeline, but the client was happier with the end product.
4.3 Vibratory Stress Relief
Vibratory stress relieving is sometimes met with skepticism. I was initially cautious too. The method involves placing a part on a vibration platform or attaching a vibrating device, then “shaking” it at certain frequencies. The idea is that mechanical vibrations allow microscopic shifts in the metal’s structure, reducing internal stress.
4.3.1 Mechanism of Action
During vibratory stress relieving, the applied frequencies cause tiny relative movements in the lattice. Areas with high stress can shift or settle into a lower-energy configuration. This doesn’t usually involve significant heat. It’s more about mechanical energy distribution. Some supporters claim it can be as effective as thermal stress relieving in certain cases, especially for large weldments that are expensive to heat.
4.3.2 Pros
- Lower Cost: No need for a large furnace.
- Portable: You can bring the equipment to the job site, which is handy for huge or fixed installations that can’t be moved into a furnace.
- Minimal Heat Effects: This approach won’t significantly alter hardness or surface finish.
4.3.3 Cons
- Limited Standardization: Many industry codes prefer thermal methods because vibratory stress relieving has fewer established specifications.
- Inconsistent Results: The effectiveness can vary widely depending on the shape, mass distribution, and type of welding or machining performed.
- Skepticism: Some engineers remain unconvinced and may require additional testing or data before approving it.
4.3.4 Personal Observations
I’ve visited a structural fabrication shop that used vibratory stress relieving to handle big frame assemblies. They showed me data comparing distortion levels before and after. The results were promising. However, they noted it was not a miracle solution for everything. For highly critical aerospace parts or extremely thick sections, they still relied on thermal stress relieving.
4.4 Natural Aging (Ambient Stress Relieving)
Natural aging might sound too simple to be true. This method involves letting your part rest at ambient or slightly elevated temperatures over an extended period. Sometimes, days or weeks are enough for residual stress to partially equalize. This is more common with certain aluminum alloys or castings that benefit from “seasoning” before final machining.
4.4.1 How It Works
Over time, minute structural movements occur in the metal, especially if there are no external forces. The metal eventually relaxes to a lower-energy state. Although not as effective or controlled as thermal stress relieving, natural aging can reduce the immediate warp or shift that might happen if you go straight to final machining.
4.4.2 Advantages
- Cost-Effective: No expensive furnace or special equipment required.
- Minimal Intervention: You basically store the parts for a set period.
- Simplicity: This method can be a fallback for prototypes or small runs where you can’t justify the cost of thermal stress relieving.
4.4.3 Disadvantages
- Time: You need patience. Natural aging can take days or even months to yield measurable results.
- Unpredictable: Environmental factors like temperature and humidity might influence the outcome.
- Not a True Replacement: If your application is critical, you may still need a more robust stress relievingmethod.
4.4.4 My Take
I once dealt with a cast aluminum fixture plate that consistently warped after final machining. We let the rough-machined plates “sit” for about two weeks in a dry environment before we finished them. That helped reduce warping, though not as effectively as a proper thermal stress relieving cycle. Still, if you have spare time in your schedule, natural aging can be a viable supplementary step.
4.5 Cryogenic Treatments
Cryogenic treatments freeze a part to extremely low temperatures (around -300°F) using liquid nitrogen. While often associated with improving wear resistance in tooling, cryogenic procedures can also relieve certain residual stresses.
4.5.1 Why Cryogenics?
Metals sometimes have retained austenite or other unstable microstructural phases. Ultra-cold temperatures can transform or stabilize these phases, reducing internal stress. This is more common in high-carbon tool steels, or in parts where you want dimensional stability for high-precision work.
4.5.2 Downsides
- Complex Equipment: You need specialized cryogenic chambers and proper safety measures.
- Limited Application: Not every alloy benefits from cryogenic stress relieving. It’s often more useful as a finishing step for wear parts, such as cutting tools or injection molds.
- Cost: Liquid nitrogen can be pricey, and the process must be done carefully to avoid thermal shock.
4.5.3 Personal Note
I tested cryogenic treatments on a batch of small A2 tool steel punches. We wanted to see if it improved wear life. Surprisingly, it also reduced distortion. The process stabilized the geometry, but we had to weigh the cost of liquid nitrogen against the savings in rework and extended tool life. For high-value parts, it can be worthwhile. For everyday CNC jobs, it might be too specialized.
4.6 Comparing Methods: Pros, Cons, and Costs
One of the biggest questions I get is which stress relieving method is best. The reality is that each approach addresses a specific need. If you have regulatory pressure or critical parts, thermal stress relieving is often the default. If you need a quicker, cheaper option for large fabrications, vibratory stress relieving might do the trick. Natural aging is a slow but cheap fallback. Cryogenic treatments are niche. I find it helpful to see a quick comparison in a table, so here’s an overview.
| Method | Pros | Cons | Best For | Typical Cost Range |
|---|---|---|---|---|
| Thermal Stress Relieving | Established standards, predictable | Requires furnace, can be expensive, potential surface scale | High-precision parts, weldments | Moderate to High |
| Vibratory Stress Relief | Portable, lower energy cost | Less standardized, results vary, some skepticism | Large or assembled structures | Low to Moderate |
| Natural Aging | No special equipment, very cheap | Time-intensive, unpredictable, minimal effect | Low-volume prototypes, castings | Very Low |
| Cryogenic Treatments | Stabilizes certain steels, reduces wear | Specialized equipment, niche usage, expensive | Tool steels, high-end precision parts | Moderate to High |
I remember a local fabrication shop that ran vibratory stress relieving on huge steel frames because transporting them to a furnace was impossible. Another mold manufacturer insisted on cryogenic finishing for injection mold cavities. Meanwhile, high-end aerospace companies rely on documented thermal stress relieving cycles for every critical bracket. It all depends on your situation.
4.7 Conclusion of Chapter 4
The more I see of different stress relieving strategies, the more I appreciate that no single method rules them all. If you’re dealing with CNC parts that need stable dimensions, any one of these options could be the perfect fit or a total miss. Understand your materials, part geometry, budget, and client expectations. From there, you can decide which path offers the best balance of cost and effectiveness.
Thermal stress relieving remains the industry benchmark, especially when you have to comply with formal specifications. Vibratory stress relieving can work wonders for large, welded structures. Natural aging is a slow but sometimes handy approach for basic prototypes or cast parts. Finally, cryogenic methods are fascinating but somewhat specialized, mainly for high-carbon or tool steels.
Material-Specific Stress Relieving Parameters
5.1 Why Different Materials Need Different Approaches
No two metals are exactly the same. Steel has a wide range of grades and heat-treatment behaviors. Aluminum alloys vary dramatically in their strength, hardness, and response to temperature. Titanium is altogether a different beast. When I first started exploring stress relieving for diverse alloys, I assumed I could just pick a universal temperature. That was a big mistake.
Thermal expansion, phase transformations, and microstructural changes differ from one alloy to another. Understanding these differences is crucial. If you apply the wrong stress relieving parameters, you might do more harm than good. You could soften a part too much, cause unwanted grain growth, or not relieve enough stress to prevent warping.
In this chapter, I’ll share guidelines and real-world data for some of the most common materials used in CNC machining. Please remember these are general recommendations. Always cross-check with official heat-treatment data or consult a qualified metallurgist if your application is especially critical.
5.2 Stress Relieving Steel
Steel is where stress relieving usually gets the most attention. From mild carbon steels to high-strength alloys, steel is ubiquitous in heavy industry, automotive components, tooling, and structural fabrications. The typical stress relievingtemperature range for steel is between 900°F (480°C) and 1,300°F (700°C), depending on the alloy and the hardness requirements.
5.2.1 Mild/Carbon Steel (e.g., 1018, 1045)
For simple carbon steels like 1018 or 1045, a stress relieving temperature around 1,000°F (540°C) is a good starting point. Hold the part for about one hour per inch of thickness. Then cool it slowly in the furnace until it’s close to ambient temperature. This approach reduces residual stress without significantly changing hardness.
5.2.2 Alloy Steels (e.g., 4140, 4340)
Alloy steels with higher hardenability, like 4140 or 4340, may require slightly higher temperatures, ranging from 1,050°F (565°C) up to 1,200°F (650°C). The exact temperature might depend on whether the steel is already hardened or tempered. Sometimes, combining a tempering cycle with a stress relieving cycle is beneficial. If the part was quenched to a high hardness, you want to avoid drawing it back too far. Check the recommended tempering range in the data sheets.
5.2.3 Tool Steels (H13, D2, A2, etc.)
Tool steels often undergo complex heat treatments to achieve specific hardness levels. Stress relieving typically occurs around 50°F (28°C) below the final tempering temperature. For example, if you tempered a D2 part at 1,000°F, you might stress relieve it around 950°F. This ensures you do not inadvertently drop its hardness. I’ve seen tool steel molds warp if they skip stress relieving after a major roughing pass.
5.3 Stress Relieving Stainless Steels
Stainless steels bring a twist to stress relieving because of their chromium content and potential for carbide precipitation. If the temperature is too high, you might sensitize the steel, making it more susceptible to corrosion at grain boundaries. Austenitic grades like 304 or 316 are especially prone to this issue.
5.3.1 Austenitic Stainless (e.g., 304, 316)
A common stress relieving temperature is around 750°F to 900°F (400°C to 480°C). You need to keep the soak time relatively short, often in the 1 to 2-hour range, and then cool carefully. If you exceed 900°F, you risk chromium carbide precipitation, which can degrade corrosion resistance. Some data sheets refer to this range as a “low-temperature anneal,” but in practice, it’s used for stress relieving.
5.3.2 Martensitic Stainless (e.g., 410, 420)
Martensitic grades might allow higher stress relieving temperatures (900°F to 1,150°F) without losing too much corrosion resistance. Still, you must check whether the part was already hardened and tempered. Overheating might reduce hardness more than you’d like. I once stress relieved a batch of 420 stainless molds at 1,100°F. We saw a drop of about 2 points in Rockwell hardness, which the client accepted for the trade-off in dimensional stability.
5.3.3 Ferritic Stainless (e.g., 430)
Ferritic stainless steels are often stress relieved in the 1,000°F to 1,200°F range. They do not transform like martensitic steels, but you still need to avoid excessive temperatures that might cause grain growth. The hold time can vary, but 1 hour per inch of thickness is a typical guideline. If you go too high, you risk scaling and potential embrittlement.
5.4 Stress Relieving Aluminum Alloys
Aluminum can be deceptively tricky. Many people assume aluminum is too soft to worry about residual stress. That’s not true. High-strength grades like 7075 can distort significantly, especially after major material removal. The stress relieving temperature range is much lower than steel, typically between 300°F (150°C) and 500°F (260°C).
5.4.1 Series 2xxx, 6xxx, and 7xxx
The most common aluminum alloys in CNC machining belong to the 2xxx, 6xxx, or 7xxx series. For instance, 6061 is a popular choice, as is 7075. A typical stress relieving procedure for 6061 might involve holding the part at 340°F (170°C) for 2 to 4 hours, then cooling it slowly. This mild heat cycle helps reduce internal stress without overaging the material or hurting mechanical properties.
5.4.2 Overaging Risk
Some aluminum alloys (especially 2xxx and 7xxx) rely on precipitation hardening to achieve their strength. If you exceed certain temperatures, you may overage the alloy, reducing its tensile strength. Always check your T-temper designation. If it’s T6 or T651, you want to remain below the recommended threshold. For 7075 T6, going above 400°F might start to degrade mechanical properties.
5.4.3 Natural Aging for Aluminum
I often see shops rely on natural aging when they produce large aluminum plates or extrusions. They rough-machine the stock, let it sit for a week or two, then perform final machining. This partial stress relieving can reduce warping, especially for big plates that can’t fit a standard oven. It’s not as foolproof as a thermal process, but it’s better than doing nothing.
5.5 Stress Relieving Titanium Alloys
Titanium is notorious for its sensitivity to temperature and potential for oxygen pickup at high heat. Most stress relieving cycles for titanium occur in the 900°F to 1,200°F range, under vacuum or inert atmosphere to prevent alpha-case formation. Alpha-case is a brittle layer that forms on the surface when titanium is exposed to oxygen at elevated temperatures.
5.5.1 Beta vs. Alpha-Beta Alloys
Titanium has multiple alloy categories, like alpha, alpha-beta, and beta. Their response to stress relieving can differ. For alpha-beta alloys (like Ti-6Al-4V), a typical stress relieve might be around 1,000°F (540°C) for 2 hours. Then you do a controlled cooldown. Beta alloys might require different parameters. Always reference your supplier’s data because titanium is expensive, and guesswork can lead to costly failures.
5.5.2 Inert Atmosphere or Vacuum
I once visited a facility that built custom racing components in Ti-6Al-4V. They had a dedicated vacuum furnace for stress relieving. That furnace prevented oxygen contamination and gave them precise control. They told me a single batch of incorrectly stress relieved parts could cost tens of thousands of dollars. Titanium’s price tag alone makes the extra caution worthwhile.
5.6 Less Common Metals (Nickel Alloys, Copper Alloys)
Stress relieving also applies to nickel-based superalloys (Inconel, Hastelloy) and copper alloys (bronze, brass). Superalloys often need very specific cycles. They can have complex precipitation-hardening mechanisms, so you must be careful not to degrade corrosion resistance or high-temperature strength. Copper alloys are typically more forgiving, but large bronze castings can still warp if not stabilized.
5.7 Recommended Temperatures and Times (Data Table)
I’ve put together a reference table that combines general guidelines for stress relieving temperatures, soak times, and cooling methods. This table won’t replace a formal heat-treatment spec, but it gives you a ballpark. Always refine these numbers based on your particular alloy specification, part geometry, and end-use requirements.
| Material / Alloy | Typical Stress Relieving Temp (°F) | Typical Soak Time | Cooling Method | Key Considerations |
|---|---|---|---|---|
| Mild Steel (1018) | 1,000 – 1,100 | 1 hr/in thickness | Furnace Cool | Low risk of over-tempering, good for general use |
| Alloy Steel (4140) | 1,050 – 1,200 | 1–2 hr/in thickness | Furnace or Air Cool | Check if part is hardened, watch final hardness |
| Tool Steel (D2) | 25–50°F below final temper | 1 hr/in thickness | Controlled Cool | Avoid dropping hardness too much, watch structure |
| Austenitic SS (304) | 750 – 900 | ~1–2 hours total | Slow Cool | Limit carbide precipitation, maintain corrosion res |
| Al 6061 (T6) | 320 – 360 | 2–4 hours total | Furnace Cool | Avoid overaging, maintain T6 properties |
| Al 7075 (T6) | 330 – 370 | 2–4 hours total | Controlled Cool | 7xxx easily overages, keep lower soak times |
| Ti-6Al-4V | 900 – 1,000 | ~2 hours | Vacuum or Argon | Prevent alpha-case, ensure inert environment |
| Bronze (C932) | ~500 – 600 | ~2 hours | Air or Furnace Cool | Not very common, but can reduce warping in large castings |
| Inconel (718) | 1,000 – 1,200 | Varies by section thickness | Furnace Cool | Maintain superalloy properties, strict atmosphere |
These parameters should serve as a starting point. Always confirm with your material supplier or refer to recognized standards (ASTM, AMS, or OEM specifications).
5.8 Summary of Chapter 5
Stress relieving is not a one-size-fits-all operation. Each material family—steel, stainless, aluminum, titanium—responds differently based on microstructure, phase transformations, and heat sensitivity. If you’re machining mild steel brackets that only require moderate stability, you might be safe at around 1,000°F. If you’re dealing with a 7075 T6 aluminum part, you might only go up to 350°F to avoid overaging. And if you’re working with titanium, you probably need a vacuum furnace to prevent alpha-case.
I’ve learned that the most critical part is balancing your mechanical property requirements with the need to release residual stress. If you overshoot your stress relieving temperature or time, you can alter hardness, corrosion resistance, or other key specs. On the other hand, if you underdo it, you might still face warping or cracking. Always keep the final application in mind. Are you delivering a safety-critical aerospace bracket? Or are you making a simple fixture for an internal assembly?
Where in the Process Should Stress Relieving Be Done?
6.1 Introduction to Process Positioning
Deciding where in your manufacturing process to insert stress relieving can feel confusing. Some shops do it right after rough machining. Others stress relieve parts once the entire machining cycle is finished. I’ve met folks who do multiple rounds of stress relieving, especially for massive or critical parts. The right approach depends on your design requirements, the material, and your tolerance for risk.
When I first got into this, I assumed you did stress relieving at the end. That way, the final part would have minimal residual stress. But I later discovered that if the part warped during final machining, it was too late to fix it without re-machining. That’s why many experienced shops do a stress relieving pass early in the process. We’ll look at the common strategies in this chapter, along with the pros and cons of each.
6.2 Stress Relieving Before Rough Machining
The idea of stress relieving before you even start cutting might seem odd. However, it can make sense if your raw stock (cast, forged, or welded) is known to have high residual stress. In these cases, a pre-machining stress relief cycle can stabilize the material so that it behaves more predictably during roughing.
6.2.1 Pros
- Reduced Warping During Roughing: Minimizes distortion, saving you from multiple re-cuts.
- Longer Tool Life: Tools may encounter fewer hard spots or micro-cracks caused by internal stress.
- Better Predictability: If you know your material is stable from the start, you can plan your tool paths more confidently.
6.2.2 Cons
- Extra Handling: You might handle raw stock more times than you’d like.
- Cost: If it’s not strictly necessary, you’re adding a heat-treatment step that increases expenses.
- Overkill for Some Materials: Mild steels or stable aluminum extrusions may not need pre-machining stress relief.
6.2.3 Real-World Example
I once worked with a foundry that produced large cast housings for pump systems. These castings had inherent shrinkage stress from uneven cooling. When we tried to machine them without a pre-machining stress relief cycle, we saw consistent warping. A single stress relieving session at about 1,100°F stabilized them enough for worry-free roughing. That upfront cost was offset by a more reliable process downstream.
6.3 Stress Relieving Between Rough and Finish Machining
This is probably the most popular strategy I’ve encountered. You perform the initial rough cuts to remove a good chunk of material. Then, before final finishing, you do a stress relieving cycle. The premise is that roughing can introduce new residual stresses. Plus, removing large amounts of material often “unlocks” stress that was hiding within the thicker sections. By stress relieving at this stage, you allow the part to settle into a stable shape before you machine the critical features.
6.3.1 Process Flow
- Rough Machining: Remove ~70–80% of the excess material, leaving enough stock for finishing.
- Stress Relieving: Heat (or vibrate) the part based on the chosen method. Let it cool under controlled conditions.
- Finish Machining: Final cuts to achieve the specified tolerances, surface finishes, and geometry.
6.3.2 Benefits
- Dimensional Stability: Most warping happens during roughing, so stress relieving after roughing prevents those distortions from appearing in final cuts.
- Reduced Scraps in Finishing: Finish passes are often critical for tolerance. A stable part yields higher success rates.
- Time Savings: Yes, you add a step, but you usually save on rework or inspection headaches later.
6.3.3 Potential Drawbacks
- Added Lead Time: You must schedule the part for stress relieving and possibly outsource it. That can stretch delivery.
- Handling Risks: Moving a partially machined part in and out of a furnace can lead to accidental damage if you’re not cautious.
- Overprocessing: If the geometry or material is not prone to distortion, this step might be unnecessary.
6.3.4 My Personal Take
I’ve found this approach to be a sweet spot for most complex steel parts or for aluminum parts with tight tolerances. I recall a large forging project for a gearbox housing. We roughed the internal cavities, then stress relieved the blank. In the final pass, the distortion was nearly zero. Without that mid-process step, we risked cutting oversize or having to chase geometry that drifted.
6.4 Stress Relieving After Final Machining
The third common approach is to complete your entire CNC process and then stress relieve. If you do this, be aware that some parts can still distort during the stress relieving cycle or right after it. Also, the geometry you achieve in final machining might shift slightly if there’s a lot of locked-in stress.
6.4.1 Why Bother Then?
In some industries, the final geometry is less important than the part’s long-term stability in service. Consider a large weldment that must resist cracking under heavy loads. You might fully weld and machine it, then do a stress relieving cycle to enhance durability. The dimensional outcome could be less critical than the internal integrity. Another scenario is a robust part that has wide tolerances. The end user cares more about preventing future distortions than preserving extremely tight tolerances.
6.4.2 Pros and Cons
- Pros
- Reduced Residual Stress in Service: The final product is more stable under operational loads.
- Minimized Additional Operations: You don’t do multiple stress relieving cycles.
- Cons
- Risk of Post-Treatment Warping: If the material is still carrying big stress loads, it might move.
- Surface Changes: If done thermally, scale or discoloration might appear, requiring extra finishing.
- Rework Potential: If the part distorts significantly, you might have to do a second finishing pass.
I recall a heavy equipment manufacturer that stress relieved large loader arms after all the drilling and cutting were complete. They focused on preventing in-field cracks rather than achieving super-tight tolerances. They accepted that some minor dimensional changes might occur, but the end goal was a robust, crack-free arm in a harsh environment.
6.5 Multiple Stress Relieving Cycles
For some high-end or critical components, especially in aerospace or heavy industry, you might see multiple stress relieving cycles: one after roughing, another after semi-finishing, and sometimes even a final one. This is more common with extremely thick sections or parts that undergo iterative welding and machining.
- Cycle 1: After welding or forging, pre-machining stability.
- Cycle 2: After rough machining, before semi-finish or finish.
- Cycle 3: A final pass if the material is known to shift even after moderate heat cycles.
Yes, this can be expensive and time-consuming. But if you’re dealing with multi-million-dollar aerospace components, or if you want zero tolerance for cracks or dimensional shift, it might be worthwhile. I’ve seen rocket engine parts that underwent repeated stress relieving cycles to ensure absolute stability at cryogenic temperatures. That’s an extreme case, but it highlights the principle.
6.6 Making the Decision
Selecting the best positioning for stress relieving depends on a few key factors:
- Material Type: Some metals, like aluminum, may not need multiple cycles. Others, like hardened steel, can benefit from a stress relieve before finishing.
- Part Complexity: Thin walls, intricate cavities, or deep pockets often distort more. Mid-process stress relieving is ideal.
- Tolerances: Tighter tolerances usually justify a mid-process cycle. Looser tolerances might let you skip it.
- Budget and Schedule: If you’re constrained on time or funds, you might have to choose the simplest approach, which is often after roughing.
- Service Conditions: Parts exposed to heavy loads, thermal cycling, or strict safety standards might need a final stress relieving pass for maximum reliability.
I typically advise shops to do a roughing pass, stress relieve, then finish. That’s the safest route for complex or important parts. If the part is huge or the furnace cost is too high, vibratory stress relief can be a substitute. If your part is simple, stable, and the cost of distortion is low, you might skip mid-process stress relieving entirely. Always weigh the risk of warping and rework.
6.7 Summary of Chapter 6
Figuring out where stress relieving fits into your CNC process requires a bit of strategy. Doing it before rough machining helps if your raw stock is highly stressed. Doing it between rough and finish machining is probably the sweet spot for most moderate-to-complex parts. Doing it after final machining might make sense if you care more about in-service reliability than perfect tolerances. In rare cases, you might even do multiple cycles at different stages.
There’s no one-size-fits-all formula. I’ve seen shops that flourish by incorporating a standard mid-process stress relieving cycle for any large or critical component. Others do fine skipping it because their parts are inherently stable or they only do small production runs. My advice is to test a sample batch, measure any warping or distortion, and then decide if or when stress relieving is worth the cost and time.
Process Integration Tips
7.1 Introduction to Integration
We’ve covered the “why,” the “when,” and the “how” of stress relieving. The next question is how to seamlessly integrate it into your workflow without causing bottlenecks. This can be tricky because stress relieving often requires specialized equipment, external vendors, or specific scheduling. If you handle it poorly, you can end up with piles of WIP (work in progress) waiting around. If you handle it well, stress relieving becomes just another standard step in your route sheet.
When I was new to manufacturing, I assumed we could just toss parts into a heat treatment furnace any time. That’s rarely the case, especially if you outsource. Even if you have in-house capability, furnace capacity might be limited. Vibratory stress relieving also requires scheduling the machine or platform. Natural aging might mean clearing up physical space to let parts rest for days or weeks. Let’s look at how to handle these logistical challenges.
7.2 Scheduling and Lead Times
7.2.1 Planning for Furnace Availability
If you use thermal stress relieving, the furnace is often the bottleneck. You can’t just run it at the drop of a hat. You may have multiple jobs needing the same resource. Some shops batch parts together to save energy and reduce costs. But that means you might have to wait until other parts are ready. I’ve seen shops post a furnace schedule on a board, updating the plan weekly based on job priorities.
7.2.2 External Vendor Coordination
Outsourcing stress relieving can free you from furnace investment, but it introduces transportation and vendor lead times. You must factor in:
- Pickup and drop-off schedules.
- The vendor’s backlog.
- Their turnaround time for each cycle.
I recall a scenario where we shipped parts out of state for stress relieving because no local facility could handle the size. That alone added a week to our lead time. Once we accounted for it upfront, we avoided chaos. We built that time into our project plan so the client knew when to expect deliveries.
7.2.3 Making vs. Buying
Some shops eventually invest in their own furnace or vibratory system when their volume justifies the cost. In-house stress relieving can speed up production. You control the schedule and reduce shipping risks. But you also take on the capital expense, maintenance, and energy bills. The break-even point differs for every operation. If you do multiple stress relieving runs a week, in-house might be more economical in the long term.
7.3 Fixturing and Handling
7.3.1 Securely Loading Parts
Thermal stress relieving often involves carefully positioning parts inside the furnace so they heat evenly. If parts are stacked too tightly, you can get hot or cold spots. That leads to uneven stress relief. I once watched an operator carefully separate each large plate with ceramic standoffs. He said it helped ensure better heat flow around each surface.
7.3.2 Avoiding Damage
Partially machined components can be fragile. Thin walls or delicate features might bend if handled carelessly. Vibratory stress relieving also demands stable fixturing. If the part bounces or flexes, you can create new damage. I learned to put protective padding on contact points. We also used specialized fixtures to clamp the part in a neutral position.
7.3.3 Post-Process Cleaning
Thermal methods, especially those done in open-air furnaces, can leave scale or oxidation. If your part requires a pristine finish, plan on a shot-blasting, chemical dip, or light machining pass. This step can be integrated right after stress relieving, so you deliver a clean part to the next operation.
7.4 Inspecting After Stress Relieving
7.4.1 Dimensional Checks
It’s wise to re-check critical dimensions after stress relieving, particularly if you suspect the part might shift or warp. Some shops do a partial inspection (like measuring key datums) before moving on. This approach helps identify if the part moved out of tolerance so you can correct it in the next machining stage.
7.4.2 Surface Analysis
Look for cracks, scale, or discoloration. I once discovered fine cracks in a thin steel bracket after a stress relieving cycle. Turns out the furnace had an issue with temperature uniformity. Half the bracket overheated. Catching that defect early saved us from assembling a compromised component.
7.4.3 Documentation
Certain clients (especially in aerospace or defense) want detailed records of the stress relieving process. That means time-temperature charts, furnace calibration certificates, and post-process inspection reports. I’ve found it’s easier to set up a template for these documents rather than scramble at the last minute. Keep them in your job folder, so you can quickly share them if needed.
7.5 Workflow Optimization
7.5.1 Grouping Similar Parts
If you have multiple jobs requiring the same temperature and soak time, batch them together. You’ll save on furnace ramp-up time and energy costs. Just be sure they can physically fit in the furnace without stacking them in a way that causes heat distribution problems.
7.5.2 Standard Operating Procedures (SOPs)
Create a standard approach for each major alloy and geometry. For instance, “6061 T6 large plate: rough machine, stress relieve at 350°F for 3 hours, air cool to 150°F, then finish machine.” This kind of SOP clarifies the entire sequence so new employees or contract shops understand the plan. Updating these SOPs over time leads to continuous improvement.
7.5.3 Parallel Operations
While a batch of parts is in the furnace, keep your machines busy on other jobs. This is where scheduling software or a well-coordinated production manager shines. If you line up tasks so that there’s no idle time on the CNC side, stress relieving feels less like a bottleneck. Some shops even run the furnace overnight. That way, they can unload it in the morning and jump right into finishing operations.
7.6 Communication with Clients
7.6.1 Setting Expectations
Let your customers know upfront if their parts will require stress relieving. That might affect cost, lead time, or the final surface condition. It’s better to be transparent. If your client is new to manufacturing, they might not understand why the part needs an extra heat cycle. Educating them fosters trust and reduces unpleasant surprises.
7.6.2 Handling Extra Costs
Stress relieving is rarely free. If it’s mandated by a specification, that’s straightforward. If it’s just your recommendation, the client might balk at the added expense. Show them the risk of skipping it, such as warping or scrapping entire runs. Often, they’ll see it as a worthwhile investment.
7.6.3 Documentation Delivery
Clients in regulated industries will want proof that stress relieving occurred under correct parameters. It’s wise to have a standard report template. Include furnace charts, times, and temperatures. If you used vibratory stress relieving, you might log frequency data or amplitude settings. This level of detail can be a selling point, showing you take quality seriously.
7.7 Troubleshooting Common Hiccups
- Excessive Distortion Post-Relief
- Possibly overheated or cooled too fast. Revisit your soak temperature and ramp down.
- Check if the part was uniformly supported in the furnace or vibratory setup.
- Surface Cracking
- Furnace hot spots can cause localized overheating. Inspect thermocouples, furnace layout, or environment.
- Some brittle materials need a gentler cycle or multiple stress relieving steps at lower temps.
- Incomplete Stress Relief
- If you still see warping after finishing, you might not have held the temperature long enough. Or the temperature was too low.
- For thick sections, consider more time or a different approach like vibratory stress relief.
- Excess Lead Time
- Coordinate earlier with the heat treat vendor or run overnight cycles.
- Explore in-house solutions if your volume is high enough.
I remember one fiasco where a job shop tried to “rush” the cool-down step on thick steel plates by spraying water. That reintroduced new residual stresses and led to cracks. We had to scrap thousands of dollars in material. The lesson? Stress relieving is as much about controlled cooling as it is about the soak temperature.
7.8 Summary of Chapter 7
Integrating stress relieving into your CNC production requires thoughtful scheduling, clear communication, and proper handling. If you rely on an external vendor, plan for lead times. If you have an in-house furnace, manage your capacity and consider batching. Always handle parts gently, especially if they are partially machined or have delicate features. Document everything to satisfy both quality standards and client requirements.
When done right, stress relieving is just another bullet on the job traveler, not a dreaded hurdle. You can keep the CNC spindles spinning while your parts bake in the furnace. You can train your team to do quick dimensional checks after stress relieving. You can maintain short lead times if you schedule carefully. The payoff? More predictable geometry, happier customers, and fewer midnight phone calls about warped or cracked parts.
Case Studies: Real Examples
8.1 Introduction to Real-World Insights
Sometimes, the best way to understand stress relieving is by seeing how it works in actual manufacturing environments. I have visited countless shops, from small CNC job houses to sprawling aerospace plants. Every place has its own stories about tackling residual stress. In this chapter, I’ll share real-life case studies that highlight the practical value of stress relieving. Each scenario had unique challenges, which led to specific process decisions. I find these stories often stick in my mind longer than any theoretical explanation.
8.2 Case Study 1: Large Aluminum Plate for an Automotive Fixture
8.2.1 Background
An automotive supplier needed a large aluminum plate to serve as a fixture for robotic arm alignment. The plate measured roughly 36 x 24 inches and was machined from a 2-inch thick block of 6061-T6. The initial approach was to skip stress relieving because the part had fairly generous tolerances, around ±0.010 inches.
8.2.2 The Problem
Once the plate was machined, the edges curled upward by nearly 0.030 inches. This was enough to cause alignment problems in their robotic cell. The distortion led to poor repeatability. The client tried to clamp the plate down, but it still caused issues since the fixture needed to sit flat on the machine table.
8.2.3 The Fix
We recommended doing a rough machining pass, removing about 70% of the material. Then, the plate was placed in a low-temperature oven at 350°F for four hours. We let it furnace-cool to 150°F before removing it. After that, the plate underwent a final machining pass to achieve the required thickness and flatness.
8.2.4 Results
The plate remained within ±0.005 inches of flatness. That single stress relieving cycle eliminated the curling problem. The fixture worked flawlessly on the assembly line, and the client saw fewer alignment errors.
8.2.5 Lessons Learned
Even a relatively “stable” alloy like 6061 can harbor enough residual stress to cause trouble in large plates. Investing in a mid-process stress relieving step saved time and improved the overall product quality.
8.3 Case Study 2: Welded Steel Frames for Construction Equipment
8.3.1 Background
A fabricator specializing in construction equipment frames produced large steel weldments. These frames supported hydraulic cylinders and had to withstand extreme loads. They were welded from thick plates of A36 steel, with multiple passes to achieve full penetration in critical joints.
8.3.2 The Problem
The frames consistently showed misalignment of mounting points by as much as 0.125 inches. This misalignment wreaked havoc on final assembly. Workers had to force-fit pins and brackets, leading to additional welding rework and potential stress cracks in service.
8.3.3 The Fix
A mid-process thermal stress relieving cycle was introduced after the main weld passes but before the final machining of mounting holes. The frames were loaded into a large furnace at 1,100°F. They were soaked for one hour per inch of thickness, then furnace-cooled to ambient. Afterward, the frames received their final machining in the critical areas.
8.3.4 Results
The alignment improved drastically. The frames now fit together with minimal forcing. The client reported a 60% reduction in assembly rework. Field failures also declined, since the frames carried fewer locked-in stresses that could lead to fatigue cracks.
8.3.5 Lessons Learned
When thick welds are involved, stress relieving is crucial to mitigate shrinkage and distortion. This approach is common in construction, mining, or heavy machinery, where robust steel frames are standard.
8.4 Case Study 3: Mold Core in Hardened Tool Steel
8.4.1 Background
A mold-making shop handled an intricate core for an injection mold. The core was made from H13 tool steel and needed extremely tight tolerances around the cavity details. The part was hardened to about 46-48 HRC prior to finishing.
8.4.2 The Problem
After roughing out the core’s major features, the shop noticed micro-cracks forming around sharp corners. The shape was complicated, and residual stress from both the hardening process and the rough machining was likely to blame. A few critical corners showed signs of chipping during finishing operations.
8.4.3 The Fix
They performed a stress relieving cycle at 50°F below the final tempering temperature. This allowed internal stresses to relax without softening the steel too much. The soak time was one hour per inch of thickness. The part cooled slowly in the furnace.
8.4.4 Results
The micro-cracks did not propagate further. The shop successfully finished the cavity to the required dimensions. The final mold performed well in production, with no premature corner wear.
8.4.5 Lessons Learned
When dealing with hardened tool steels, small stress concentrations can quickly turn into cracks. A targeted stress relieving step after roughing, but before final finishing, can preserve mechanical properties while removing the worst internal tensions.
8.5 Case Study 4: Aerospace Bracket in 7075-T6
8.5.1 Background
An aerospace supplier needed a lightweight, high-strength bracket from 7075-T6 aluminum. The bracket had multiple pockets and ribs, which were prone to distortion. The client specified a flatness requirement of ±0.002 inches to ensure proper fit in a wing assembly.
8.5.2 The Problem
Despite careful CNC programming and moderate feeds, the bracket twisted about 0.010 inches after rough machining. The client refused to accept any warping that exceeded ±0.004 inches because it could compromise the assembly alignment.
8.5.3 The Fix
A mid-process stress relieving cycle at 360°F for three hours helped the bracket “relax.” Once cooled to 150°F, the part was finish-machined, focusing on consistent cutting forces to avoid reintroducing stress.
8.5.4 Results
The bracket ended up well within ±0.002 inches of flatness. The client accepted the parts without reservation. This success story cemented the practice of stress relieving 7075 brackets for future production runs.
8.5.5 Lessons Learned
High-strength aluminum alloys can be just as tricky as steel when it comes to residual stress. A small shift can ruin an entire part if the tolerances are tight. Stress relieving helps reduce the odds of that happening.
8.6 Case Study 5: Vibratory Stress Relief for a Large Machined Base
8.6.1 Background
A manufacturer of precision equipment needed a massive steel base to hold advanced measuring instruments. The base was too large for any local furnace to handle. Shipping it out of state was cost-prohibitive.
8.6.2 The Problem
After rough milling, the base warped by several thousandths in key mounting areas. Traditional thermal stress relievingwasn’t feasible due to size and cost constraints. They considered re-machining, but that would only address the symptom, not the root cause.
8.6.3 The Fix
They hired a specialized contractor to perform vibratory stress relieving on-site. The contractor mounted a vibration unit on the base and ran a defined frequency sweep. The process lasted a couple of hours, with sensors measuring response frequencies.
8.6.4 Results
Post-process measurements indicated about a 50% reduction in distortion. It wasn’t as perfect as a thermal treatment might have achieved, but it was enough to meet the client’s specs without further rework.
8.6.5 Lessons Learned
Vibratory stress relieving can be a viable alternative when size or logistics make traditional thermal methods impractical. It’s not always identical in efficacy, but it can be a lifesaver for huge weldments or machined bases.
8.7 Summary of Chapter 8
These case studies show how stress relieving can rescue projects from warping, misalignment, or premature cracking. From aluminum fixture plates to welded steel frames and hardened tool steels, the common thread is that residual stress is a hidden force waiting to sabotage your part’s performance. Each story ended well because a targeted stress relievingapproach was taken. The next chapter dives into common pitfalls you might encounter if you ignore or misunderstand stress relieving. Consider these real-world examples a warning and an inspiration to incorporate stress relieving into your workflow.
Common Pitfalls to Avoid
9.1 Introduction to Pitfalls
Even with the best intentions, stress relieving can go wrong if you overlook key details. In this chapter, I’ll outline some of the most frequent mistakes I’ve seen. These pitfalls can negate the benefits of stress relieving or even introduce new problems. By learning to recognize and sidestep them, you can save time, money, and frustration.
9.2 Pitfall 1: Treating Stress Relieving as an Afterthought
9.2.1 Description
Some shops treat stress relieving as an optional last step. They figure it can fix any warping that shows up. The issue is that once your part has distorted, you might need to re-machine or scrap it. Also, if the design or process parameters didn’t account for stress relieving, you might run into scheduling or cost surprises.
9.2.2 Consequences
- Missed deadlines due to unexpected rework
- Higher scrap rates
- Damage to customer relationships if promised lead times slip
9.2.3 How to Avoid
Plan for stress relieving early in the quoting and design stages. Check your material specs, part geometry, and tolerance needs. Decide on the best method (thermal, vibratory, etc.) and schedule it into your production route sheet.
9.3 Pitfall 2: Selecting the Wrong Temperature or Soak Time
9.3.1 Description
Thermal stress relieving is not a guesswork game. If you pick a temperature that’s too low, you won’t effectively relieve stress. If you go too high, you risk altering mechanical properties or causing unwanted microstructural changes.
9.3.2 Consequences
- Partial or ineffective stress relief
- Over-tempering or overaging, reducing part strength
- Surface oxidation or scale formation
9.3.3 How to Avoid
Refer to reliable heat-treatment charts, material data sheets, or consult with a metallurgist. Make sure you know the difference between stress relieving temperatures and other heat treatments like annealing or tempering.
9.4 Pitfall 3: Rushing the Cooling Process
9.4.1 Description
Stress relieving is as much about controlled cooling as it is about the soak at temperature. Quenching a hot part in water or exposing it to a drafty environment can reintroduce residual stress or even cause cracking.
9.4.2 Consequences
- Thermal shock, leading to cracks
- Reinstated residual stress from uneven cooling
- Warping, especially in thin sections
9.4.3 How to Avoid
Allow parts to furnace-cool until they’re near ambient temperature. If that’s not feasible, at least ensure a slow, uniform cooling method. Keep airflow and temperature differentials to a minimum.
9.5 Pitfall 4: Inadequate Fixturing During Vibratory Stress Relief
9.5.1 Description
Vibratory stress relieving requires the part to be securely clamped or supported. If the part is loosely mounted, the vibrations can induce new distortions or even cause damage. Some shops believe they can just rest the part on a floor or random table.
9.5.2 Consequences
- Non-uniform vibration distribution
- Possible collisions or part movement
- Reduced effectiveness, because stress is not uniformly addressed
9.5.3 How to Avoid
Follow the vibratory equipment manufacturer’s guidelines. Use appropriate clamps, supports, and sensors to monitor vibration frequencies. Ensure the entire part receives consistent energy.
9.6 Pitfall 5: Skipping Documentation or Certification
9.6.1 Description
In regulated industries, stress relieving steps often require traceability. If you don’t keep proper furnace charts, timing logs, or equipment calibration records, you might fail audits. Clients can reject your parts if you can’t prove you followed the required stress relieving spec.
9.6.2 Consequences
- Rejected batches
- Penalties or lost contracts
- Damaged reputation for failing quality audits
9.6.3 How to Avoid
Establish an SOP for data collection. Create a standard form that captures furnace temperature over time, soak duration, cooling rates, and so forth. Train employees to fill it out consistently. Keep these records organized in your job folder.
9.7 Pitfall 6: Assuming “One and Done” for Complex Parts
9.7.1 Description
Some parts, especially large or thick sections, might require multiple stress relieving cycles. Or you might need a different approach mid-process. If you assume a single pass of stress relieving solves everything, you can still face distortion later.
9.7.2 Consequences
- Residual stress remains in thick core areas
- Warping after final machining
- High scrap or rework costs
9.7.3 How to Avoid
For large or complex parts, consider a step-by-step approach: rough machine, stress relieve, semi-finish, possibly stress relieve again, then finalize. Keep an eye on post-machining inspections to see if additional cycles are needed.
9.8 Pitfall 7: Misunderstanding the Role of Toolpath and Fixturing
9.8.1 Description
Even the best stress relieving method can’t save a poorly planned machining strategy. If your toolpaths generate excessive heat, or if your fixturing introduces uneven clamping forces, you’ll have new residual stress.
9.8.2 Consequences
- Recurring distortion issues, even after stress relieving
- Tool breakage due to stress hotspots
- Variability in part dimensions across different runs
9.8.3 How to Avoid
Adopt best practices in CNC programming. Use consistent, symmetrical toolpaths. Ensure your workholding doesn’t clamp the part too tightly. Distribute forces evenly. The synergy between good machining strategy and stress relievingis key.
9.9 Pitfall 8: Ignoring Material Supplier Variation
9.9.1 Description
Not all metal stock is created equal. Two batches of 6061 aluminum could have different microstructures due to forging or casting processes. If you assume identical stress relieving parameters for every batch, you could see inconsistent results.
9.9.2 Consequences
- Erratic warping from batch to batch
- Hardness or strength discrepancies
- Unpredictable final dimensions
9.9.3 How to Avoid
Test small samples from each new batch if possible. Track how the material responds to a standard stress relievingcycle. Adjust soak times or temperatures if you notice significant deviations.
9.10 Summary of Chapter 9
Avoiding these pitfalls is not rocket science, but it does require attention to detail and a willingness to refine your process. Stress relieving is most effective when it’s carefully planned, executed at the correct temperature, cooled properly, and documented thoroughly. By steering clear of these common mistakes, you’ll reap the full benefits of stress relieving in terms of dimensional stability, reduced scrap, and improved product reliability.
Equipment and Vendor Guide
10.1 Introduction to Equipment and Vendor Selection
The right stress relieving equipment can be a game-changer. If your shop churns out high volumes of parts with critical tolerances, an in-house furnace or vibratory unit might pay for itself. Conversely, smaller operations may find it more cost-effective to outsource. I’ve dabbled in both scenarios. I’ll share some considerations for picking a furnace, deciding on vibratory gear, or vetting an external vendor.
10.2 Thermal Stress Relieving Furnaces
10.2.1 Types of Furnaces
- Box Furnaces: Common for small to medium parts. Usually electric or gas-fired.
- Pit Furnaces: Ideal for tall or cylindrical parts, lowered from the top.
- Car-Bottom Furnaces: Feature a rolling platform for large or heavy components.
- Continuous Belt Furnaces: Used in mass production lines for smaller parts.
10.2.2 Key Features to Consider
- Temperature Uniformity: A furnace that can maintain ±10°F or better is ideal. Check if it’s certified to standards like AMS2750 (common in aerospace).
- Size Capacity: Evaluate your largest parts. If you plan for future growth, pick a furnace slightly bigger than your current needs.
- Heat Source: Gas-fired furnaces heat up quickly but might have less precise control. Electric furnaces are more precise but can have higher operating costs.
- Data Logging: Built-in controls that record time-temperature curves make documentation easier.
10.2.3 Cost and ROI
Furnaces range from small, bench-top models under $10,000 to giant industrial units costing several hundred thousand dollars. The ROI depends on your production volume, the frequency of stress relieving, and whether you can batch multiple jobs.
10.3 Vibratory Stress Relief Equipment
10.3.1 How It’s Set Up
A typical vibratory stress relieving system includes an electric or pneumatic exciter, mounting brackets, and sensors to measure amplitude or frequency. You place the part on a stable platform, attach the exciter, and run a program that sweeps through frequencies.
10.3.2 Selection Criteria
- Maximum Part Weight: Some systems can handle tens of thousands of pounds.
- Adjustable Frequencies: You want a wide range to match the part’s resonant frequency.
- Monitoring Software: Real-time data logging can confirm you achieved the necessary amplitude across the part’s structure.
10.3.3 Pros and Cons
- Pros: Lower energy consumption, portability, no scale formation, minimal effect on part hardness.
- Cons: Not as universally accepted as thermal methods, results can vary with geometry, less standardization in many industries.
10.4 Natural Aging Setup
10.4.1 Basics
Natural aging doesn’t demand special equipment, but you do need a controlled storage area where temperature and humidity remain stable. If the environment fluctuates widely, the relaxation effect might be inconsistent.
10.4.2 Recommended Conditions
- Temperature: A stable ambient temperature between 65–75°F is often enough.
- Humidity: Avoid extremely high humidity that might cause corrosion, especially for steel or iron-based parts.
- Time Frame: Could be days, weeks, or months, depending on the alloy and thickness.
10.4.3 Realistic Expectations
This is the least expensive method, but also the slowest. If you have the schedule flexibility and the parts are not highly critical, it can be a simple way to reduce stress prior to finish machining.
10.5 Cryogenic Chambers
10.5.1 Overview
Cryogenic stress relieving uses ultra-cold temperatures. The equipment is specialized and usually includes an insulated chamber capable of going down to -300°F with liquid nitrogen. Automated controls gradually ramp down and then up again to avoid thermal shock.
10.5.2 Costs and Benefits
- Costs: Chambers and liquid nitrogen are expensive. You also need safety gear for handling extremely cold temperatures.
- Benefits: Excellent for stabilizing certain steels or alloys, especially tool steels. Potentially increases wear resistance or dimensional stability.
10.6 Outsourcing to Specialized Vendors
10.6.1 Vendor Selection Criteria
- Certifications: Look for NADCAP or ISO 9001 certifications, especially if you serve aerospace or medical clients.
- Capacity: Check if they can handle your largest parts or the volumes you anticipate.
- Lead Times: Ask about typical turnaround. Will you wait a week, or can they do same-day service?
- Past Clients: References or testimonials from similar industries can hint at reliability.
10.6.2 Communication and Documentation
Provide clear instructions on temperatures, soak times, and cooling rates. A good vendor will also produce time-temperature charts. Verify that they can handle any unusual requests, like inert gas atmospheres or partial vacuum conditions.
10.6.3 Pros and Cons of Outsourcing
- Pros: No capital investment, no furnace maintenance, access to specialized knowledge.
- Cons: Shipping parts adds cost, scheduling can be complex, you lose direct control.
10.7 Building an In-House vs. Outsourcing Checklist
Below is a quick reference table comparing the primary factors that push shops toward in-house stress relieving vs. outsourcing. Use it as a starting point when deciding which path makes sense for your operation.
| Factor | In-House Stress Relieving | Outsourced Stress Relieving |
|---|---|---|
| Initial Investment | High capital (furnace or vibratory unit) | Minimal capital (pay per batch) |
| Operating Costs | Energy, maintenance, labor | Vendor fees, shipping, possible expedited charges |
| Lead Time Control | High (you schedule your own cycles) | Lower (dependent on vendor availability) |
| Expertise Needed | Internal staff trained on equipment | Rely on vendor’s expertise |
| Flexibility | Adapt quickly to design changes | Must coordinate changes with vendor |
| Volume/Throughput | Ideal for high volume or repeated stress relief | Good for low-volume or sporadic needs |
| Certification Requirements | Must maintain furnace calibration logs | Vendor likely offers certifications (NADCAP, AMS, etc.) |
| Risk Management | Equipment downtime is your responsibility | Vendor might guarantee capacity, but you’re reliant on them |
We used a similar table in my old shop when deciding whether to buy our first furnace. Ultimately, we did bring a mid-sized box furnace in-house because we had enough stress relieving volume to justify it.
10.8 Summary of Chapter 10
Choosing the right stress relieving equipment or vendor is a strategic decision. If your production volumes are high, or if you frequently handle large or critical parts, an in-house furnace or vibratory system can pay off. Smaller or irregular jobs might be better outsourced. Either way, ensure you evaluate temperature uniformity, capacity, certifications, and lead times. Proper equipment and reliable vendors can make stress relieving a seamless extension of your manufacturing process, rather than a dreaded bottleneck.
Conclusion
11.1 Revisiting the Core Message
As I reflect on everything we’ve covered, I’m reminded of that first time I saw a carefully machined part warp overnight, all because we skipped stress relieving. That frustration drove me to learn how residual stress builds up and why it can sabotage even the most precise CNC work. Now, after visiting many shops, analyzing countless materials, and experimenting with different methods, I can confidently say stress relieving is the unsung hero of stable manufacturing.
Residual stress is invisible but powerful. It can twist your parts, ruin tolerances, cause micro-cracks, and shorten fatigue life. Stress relieving is how we fight back. Whether you choose thermal methods, vibratory techniques, natural aging, or even cryogenics, the point remains: controlling residual stress is key to delivering parts that meet customer expectations for accuracy and performance.
11.2 The Path We’ve Taken
Let’s briefly recap the road map of this guide:
- Chapters 1 & 2: Introduced stress relieving and explored why residual stress in CNC parts is such a critical issue.
- Chapter 3: Explained when you need stress relieving and the types of parts that benefit most.
- Chapter 4: Detailed the common methods: thermal, vibratory, natural aging, and cryogenic.
- Chapter 5: Examined stress relieving parameters for different materials, from steels to titanium.
- Chapters 6 & 7: Showed how to integrate stress relieving into your CNC workflow, discussing scheduling, mid-process strategies, and final checks.
- Chapter 8: Provided real-world case studies to demonstrate how stress relieving solves tough challenges in manufacturing.
- Chapter 9: Highlighted common pitfalls to avoid so you can get the most out of your stress relieving steps.
- Chapter 10: Gave a practical guide to equipment and vendors, helping you decide whether to invest in-house or outsource.
Now, we stand at the end of this journey. But in real manufacturing, stress relieving is not an end—it’s a routine part of the process that should be revisited and optimized as materials, designs, and customer demands evolve.
11.3 Personal Reflections
I started out seeing stress relieving as a pesky add-on. Over time, I realized it’s a powerful ally. My personal experiences taught me that skipping or mishandling stress relieving can cause endless rework, missed deadlines, and customer dissatisfaction. But when we integrate it thoughtfully, we end up with stable, high-quality parts and a smoother production schedule.
I also learned that no single method or recipe is universally correct. You have to weigh factors like material properties, part geometry, cost constraints, and final usage. Once you gather data from your own shop floor, you can refine a stress relieving strategy that consistently yields success. It’s a journey of continuous improvement.
11.4 Looking Ahead
The manufacturing world is constantly changing. New alloys emerge, machine capabilities expand, and product designers push the boundaries of geometry. With each evolution, stress relieving remains relevant. Innovative approaches like in-situ stress monitoring or advanced vibratory systems might become more prevalent. Some shops are even exploring AI-driven heat-treatment cycles tailored to specific part geometries.
Regardless of how the technology evolves, the principle stays the same: residual stress can wreck your day if you ignore it. Stress relieving remains the go-to solution, whether it’s done at ambient temperature over weeks or in a sophisticated vacuum furnace with real-time data logs. If your goal is to consistently deliver dimensionally stable, reliable parts, you’ll always have a use for stress relieving.
11.5 Final Thoughts
Thank you for joining me on this deep dive into stress relieving for CNC parts. We’ve covered a lot, from high-level concepts to minute technical details. My hope is that this guide empowers you to make informed decisions about stress relieving, whether you manage a small job shop, run a large production line, or engineer critical aerospace components. By harnessing the power of stress relieving, you can reduce distortion, cut scrap rates, and deliver parts that stand up under the harshest real-world conditions.
Remember, knowledge is only the first step. The real magic happens when you apply these principles in your daily manufacturing routine. Start with a small experiment. Document your results. Tweak your soak times or toolpaths. Keep refining. Over time, stress relieving will feel less like an extra expense and more like an essential pillar of quality control.
FAQ
Below is a comprehensive FAQ to address common questions about stress relieving for CNC parts.
1. What is stress relieving, and how is it different from annealing?
Stress relieving is a process that reduces residual stresses in a material without drastically altering its microstructure or mechanical properties. It typically involves lower temperatures than annealing and a controlled cooldown. Annealingsoftens the metal by heating it above a critical temperature, changing the grain structure. Stress relieving aims to relax internal stress, not to fully recrystallize or soften the material.
2. Does CNC machining always require stress relieving?
Not always. If the part is simple, the tolerances are loose, and the material is stable, you might not need stress relieving. However, for large, welded, or highly precise parts, stress relieving can significantly reduce warping, cracking, or other quality issues.
3. How do I determine if my part needs stress relieving?
Check if you have thin walls, tight tolerances, heavy welds, or a history of distortion in similar designs. Also consider the application’s safety requirements. If warping or cracking would lead to expensive rework or end-user hazards, stress relieving is a wise choice.
4. When should stress relieving be done—before or after CNC machining?
Both strategies exist. Some manufacturers stress relieve raw stock or welded assemblies before machining to reduce initial distortions. Others stress relieve after rough machining but before finishing. The best choice depends on your material, geometry, and cost considerations.
5. How does internal stress affect dimensional accuracy?
Residual stress can cause parts to change shape when you remove clamping forces. Even a few thousandths of an inch of movement can ruin a tight tolerance. Stress relieving stabilizes the metal’s internal structure, so dimensional accuracy remains closer to your design intent.
6. Which materials benefit most from stress relieving?
Steels, aluminum alloys (especially 7075), stainless steels, and titanium alloys often see notable improvements in stability after stress relieving. In reality, any metal that experiences mechanical or thermal stress during manufacturing can benefit.
7. What are typical temperatures for thermal stress relief?
For most steels, temperatures range from 900°F (480°C) to 1,300°F (700°C). Aluminum might only need around 300°F to 400°F. Titanium alloys often require 900°F to 1,200°F under vacuum or inert atmosphere. Always consult data sheets for precise guidelines.
8. How long should parts be held at temperature?
The general rule of thumb is about one hour per inch of thickness, though it can vary. Thicker parts or complex geometries might need longer. Some guidelines also factor in total cross-sectional mass, not just thickness.
9. Can stress relieving warp or distort the part further
It’s possible if heating is uneven or if you cool the part too quickly. Proper furnace setup and controlled cooldown minimize these risks. If done correctly, stress relieving usually reduces the likelihood of warping rather than causing it.
10. What is vibratory stress relief, and is it effective?
Vibratory stress relieving uses mechanical vibrations to redistribute residual stresses. It can be effective for large weldments or parts too big for a standard furnace. However, results can vary, and it lacks the universal acceptance that thermal stress relieving enjoys in aerospace or highly regulated industries.
11. Is it possible to measure residual stress in a part?
Yes. Techniques like X-ray diffraction, hole-drilling, or ultrasonic methods can measure residual stress. These are specialized tests often done by labs or research facilities. Most shops rely on dimensional checks to infer if residual stress is causing problems.
12. How do I prevent deformation after CNC machining?
Use balanced toolpaths, minimize heat buildup, and avoid excessive clamping forces. Stress relieving is your backup plan if the part is prone to internal stress. Sometimes you also do a rough machine → stress relieve → finish machine sequence for best stability.
13. Are there standards or certifications for stress relief processes?
Yes. Aerospace standards like AMS2750 govern heat-treatment furnace calibration. NADCAP accreditation often covers stress relieving procedures for aerospace. ISO or ASME codes might also specify stress relieving for pressure vessels or structural weldments.
14. How much does stress relieving typically cost?
Costs vary. A small batch in a local furnace might run a few hundred dollars. Large parts requiring a specialized furnace or vibratory setup can cost thousands. In-house equipment has a high upfront investment but can pay off if you do frequent stress relieving.
15. Can I perform stress relief in-house, or should I outsource?
That depends on your volume, part size, and budget. In-house gives you scheduling control but requires capital spending on furnaces or vibratory units. Outsourcing saves you equipment costs but introduces lead times and shipping expenses. Analyze your typical workload to decide.
16. What if I skip stress relieving—what’s the risk?
You risk unpredictable warping, higher scrap rates, possible cracking, and reduced fatigue life. In safety-critical applications, ignoring stress relieving can lead to catastrophic failures. If your material or geometry is stable, you might get away with skipping it, but that’s a gamble.
17. How do I choose between different stress relief methods?
Match the method to your needs. Thermal stress relieving is the gold standard, especially for regulated industries. Vibratory stress relief is handy for large structures. Natural aging works when cost is a concern, and you have time. Cryogenic treatments help for specific alloys or specialized performance needs. Evaluate costs, time, and your part’s criticality to decide.
Additional Authoritative References
- TWI – Stress Relief FAQ
https://www.twi-global.com/technical-knowledge/faqs/faq-stress-relief
TWI (The Welding Institute) is a well-known research and technology organization. This FAQ provides a clear overview of what stress relief is, why it is important, and how various industries implement it. - Wikipedia – Stress Relief (Metallurgy)
https://en.wikipedia.org/wiki/Stress_relief_(metallurgy)
A concise article on stress relief processes, explaining the basic metallurgical principles behind relieving residual stress. - Wikipedia – Residual Stress
https://en.wikipedia.org/wiki/Residual_stress
Offers background on what residual stress is, how it forms, and why controlling it is crucial in various manufacturing methods.ing.
Other Articles You Might Enjoy
- Yield Strength vs Tensile Strength: CNC Material Choice and Process Optimization
I. Introduction 1. Definition of Yield Strength and Tensile Strength I remember the first time I encountered the terms yield strength and tensile strength in my early machining projects. Yield strength refers to the…
- The Role of the Shear Stress Equation in CNC Process Optimization
A Personal Approach to CNC Process Optimization As someone who’s spent years working in the CNC machining field, I've come to realize that understanding the Shear Stress Equation is not…
- How Does Tensile Stress Affect CNC Machining Processes
Tensile stress is a fundamental concept in material science that has far-reaching implications in CNC machining processes. Understanding how tensile stress interacts with various materials can greatly impact the effectiveness…
- Understanding the Stress Strain Curve for CNC Material Selection
The Importance of the Stress-Strain Curve in CNC Machining In the world of CNC machining, understanding the stress-strain curve isn't just a technical necessity—it's a strategic advantage. When I first…
- How Yield Stress Impacts CNC Machining and Material Performance
Introduction to Yield Stress and Its Importance in CNC Machining When we think about machining and materials, yield stress is one of the most crucial properties to understand. Yield stress…
- Decoding Carbon Fiber Strain in Advanced Machining Applications
Introduction: The Unique Properties and Applications of Carbon Fiber I’ve always been fascinated by how materials behave under stress. Carbon fiber, in particular, has this almost legendary status in aerospace,…
- Why Shear Strain Matters in CNC Machining
The Importance of Shear Strain in CNC Machining Understanding shear strain is essential not only for selecting the right materials but also for optimizing machining processes in CNC applications.but also…